顯示具有 Water Decals- DIY 標籤的文章。 顯示所有文章

2013年4月1日 星期一

NOTD: Bencos and KKcenterhk water decals! By diathings


Azi o sa vedeti pentru prima data o oja Benecos la mine pe blog. E o oja superba, cu o culoare exact pe placul meu. Nuanta se numeste Expressive mint si e cel mai frumos verde mint pe care il am in colectia de oje. Oja s-a aplicat fara probleme. Eu am aplicat 2 straturi, desi arata bine si dintr-un singur strat. Rezistenta este foarte buna, mi-a rezistat 5 zile aratand mai mult decat decent. Dupa atata vorbarie ar cam trebui sa va arat si cateva poze.


Ei, ce parere aveti? Puteti observa ca am folosit, pe langa oja, si un model pe inelar. Acesta este facut cu un produs de pe kkcenterhk: water decals. Acesta arata cam asa (il gasiti pe site in categoria DIY):

Trebuie sa va marturisesc ca daca vreti sa il folositi aveti nevoie de rabdare. Eu cel putin am avut. Va spun, pentru inceput, cum am procedat iar apoi ce dificultati am intampinat, ca sa nu mai treceti si voi prin asta.

Produsul se foloseste relativ simplu: se scufunda intr-un recipient cu apa, se lasa vreo 20-30 de secunde, iar apoi se scoate si se indeparteaza foarte usor modelul, care este o foita extrem de subtire. Apoi acesta se aplica pe unghie (peste un base coat, de preferinta) cat de bine puteti fara a se forma "cute". Se indeparteaza surplusul de apa cu un servetel sau ce aveti la indemana (maneca de la bluza in cazul meu). La final se aplica un top coat si asta e!

Nu m-a atras prea tare la inceput pentru ca stiam ca trebuie sa am rabdare sa il tai cat de cat dupa forma unghiei. Intr-o zi mi-am zis ca ar merge tare bine cu lacul meu Bencos si m-am pus pe treaba. Am mai citit eu una alta pe net despre aceste water decals, dar prima data nu m-am descurcat deloc. Nu reuseam sa il tai nici macar pe aproape de forma unghiei si nu ma gandisem sa folosesc base coat, asa ca s-a asezat greu si destul de urat pe unghie. Asta ca sa nu va mai spun ca am aplicat top coat-ul si o parte din model pur si simplu s-a topit. Am renuntat si am aruncat produsul intr-un colt. La a doua incercare am fost mai atenta. Am taiat dreptunghiuri din produs si le-am aplicat peste base coat-ul meu Flormar. Am taiat apoi surplusul cu o forfecuta cat mai aproape de unghie si apoi am pilit . Mi s-a format cateva "cute"dar nu sunt vizibile decat la o privire foarte atenta. Cand am aplicat top coat-ul iarasi s-a dizolvat modelul. Mi-am dat seama ca top coat-ul meu no name are ceva ingrediente puternice si mi-am amintit ca mai am ceva produs din cel de la Yves Rocher. Am sters cu acetona unghia si am luat-o de la inceput. De data asta am aplicat top coat-ul Yves Rocher fara nici o problema.

Sa stiti ca foarte bine se simte pe unghie, nu incomodeaza deloc, si este si rezistent. Ma gandeam ca a doua zi o sa se ciobeasca sau ceva, dar nici vorba. Am spalat si vase, am facut si dus si el arata tot impecabil. A rezistat cot la cot cu oja Benecos.

Produsul il gasiti pe kkcenterhk la pretul de 2,82$.


Thank you, diathings
Check out diathings blog
http://diathings.blogspot.ro/2013/03/notd-bencos-and-kkcenterhk-water-decals.html

2012年11月30日 星期五

BARIELLE BLOSSOM + WATER DECALS by nailspt

BARIELLE BLOSSOM
A cor é linda!
Teve de levar três camadas... ralinho?? Nop!
GROSSSOOOOOO!!
Só com três camadas ficou decente :[
Prazer em conhece-lo Sr. Blossom,
vai direitinho para o fundo do Helmer!

O anelar e o polegar tiveram direito a serem brindados com um water decals
Esta folha de water decals funciona como os que já mostrei anteriormente
mas com esta podemos dar largas à imaginação e cortar na forma e tamanho 
que mais nos apetecer :)
Podem encontrar à venda no site KKCENTERHK


Thank you, nailspt
Check out nailspt blog
http://nailspt.blogspot.pt/2012/11/barielle-blossom-water-decals.html
2012年11月29日 星期四

HaPPy HaLLoween Nails + How To Use DIY Water Decals by mymakeupmania

I have changed my nails today because I have a lot of free time recently. Haven't got new printouts for hair lessons yet so I enjoy doing my manicures LOL~ For today I have another Halloween themed nail design by using water decals. I used neon orange and bright yellow polish with silver glitters on top, swirl water decals and Happy Halloween pattern of course.
5 x 6 cm water decal sheet. This size isn't enough to create full mani on all of my nails but it's because they are quite long right now. If short nails it will be enough amount; even with some extra product. Or being a creative person U can cut some french tips or stripes or whatnot and use them on nails that way.This particular design I suggest to apply on white base color to make the pattern looks brighter. Quality of the decails is very good, not fragile at all and applies nicely on the nails. Also because of the busy Halloween pattern it's very forgiving, if there is any mistakes or wrinkles it's not significant. So, I give this product 2 thumbs up!
Step-by-step tutorial on how to use DIY water decals:
Step 1: Prepare water decal sheet and peel off protecting clear plastic layer.
Step 2: On the back of the water decal sheet draw some forms suitable for the nails.
Step 3: Cut by pattern.
Step 4: Put the decal in room temperature water and wait for about 1-2 min.
Step 5: Gentely separate the main design from white paper.
Step 6: Place on the nail and smooth it out. Wipe off all water excess with paper tissue.
Step 7: Apply top coat and enjoy ur mani :)
Quick Tip:
~ Before start working and preparing water decals it's better to get ready base color polish on the nails. White creme polish works great as main base color of most of the times.
~ This is also a tutorial for how-to use reqular water decals (single designs, full patterns) starting from Step 4.
Water decals were sent from KKCenterHK.


Thank you, mymakeupmania
Check out mymakeupmania blog
http://mymakeupmania.blogspot.kr/2012/10/happy-halloween-nails-how-to-use-diy.html

2012年9月5日 星期三

KKcenterHK D.I.Y. Water Decals Review + Sally Hansen Hi-Def by delightinnails

Hello! I am probably out on the beach right now having a fabulous time with my family, but just so you don't miss me too much, I scheduled this lovely review for you. :) This is my second shot at using their D.I.Y. Water Decals and I have to say, I learned a lot the first time around, so this time went way better. I got fancy with this one. Here is what I ended up with.


So when the decal sheet arrived in the mail, it looked like this. It is packed nicely and this is actually  resealable packet as well, which is nice. I put my leftover portion of the decal sheet back in there to use it again in another mani. :)


This sheet is the same size as the last one I reviewed, and I decided to do a partial nail instead of a full nail. Here is a pic of what one of them looked like once I had it all cut out to fit on the nail.


I had a lot of fun with these, and I got to use some polishes I haven't used much yet, too. :) Here is Sally Hansen's Hi-Def by itself. It is a very thin polish, so this is about 4 coats. Lovely color, huh?


I also wanted to mention that I tried a couple different topcoats with this mani, and this time I think the topcoats I used actually were worse. :( Here is an image with an explanation about which topcoats I used on each nail.


On the pinky/thumb, I used Orly Top 2 Bottom, which is my fave basecoat. It ate the decal. On my ring finger, I used Sally Hansen Hard as Nails. It did ok, until I reach the tip of the nail, and it lifted the decal right off in one spot, which is why you see the chunk taken out on the corner, there. On my middle finger, I used NYC In a New York Minute Topcoat which did ok, but bubbled on me just because it is old and getting thick. On my index finger, I used AVON Speed Dry Topcoat, which did alright as well. It only ate the decal a little bit. So, now that I see how some of these other topcoats did, my Seche Vite doesn't seem so bad after all. I think that the NYC and AVON topcoats did the best though.

I am really pleased with my experience with the water decals this time, and super happy with my results. Definitely check these decals out. They are a great alternative to nail art if you are short on time, and look way better than anything you can do by hand without spending hours at it. :)

If you would like to try out some of the nail goodies they have, don't forget to use the 10% off coupon code that KKcenterHK has generously provided to me! It is good through 1/31/2013.

Coupon Code:  DelightInNails

*Products in this post were sent for review in return for my honest opinion.


Thank you, delightinnails
Check out  delightinnails blog
http://delightinnails.blogspot.hk/2012/08/kkcenterhk-diy-water-decals-review.html

2012年4月16日 星期一

Unhas do Momento - Beje Leopardo Glamour by blushbycrpbm

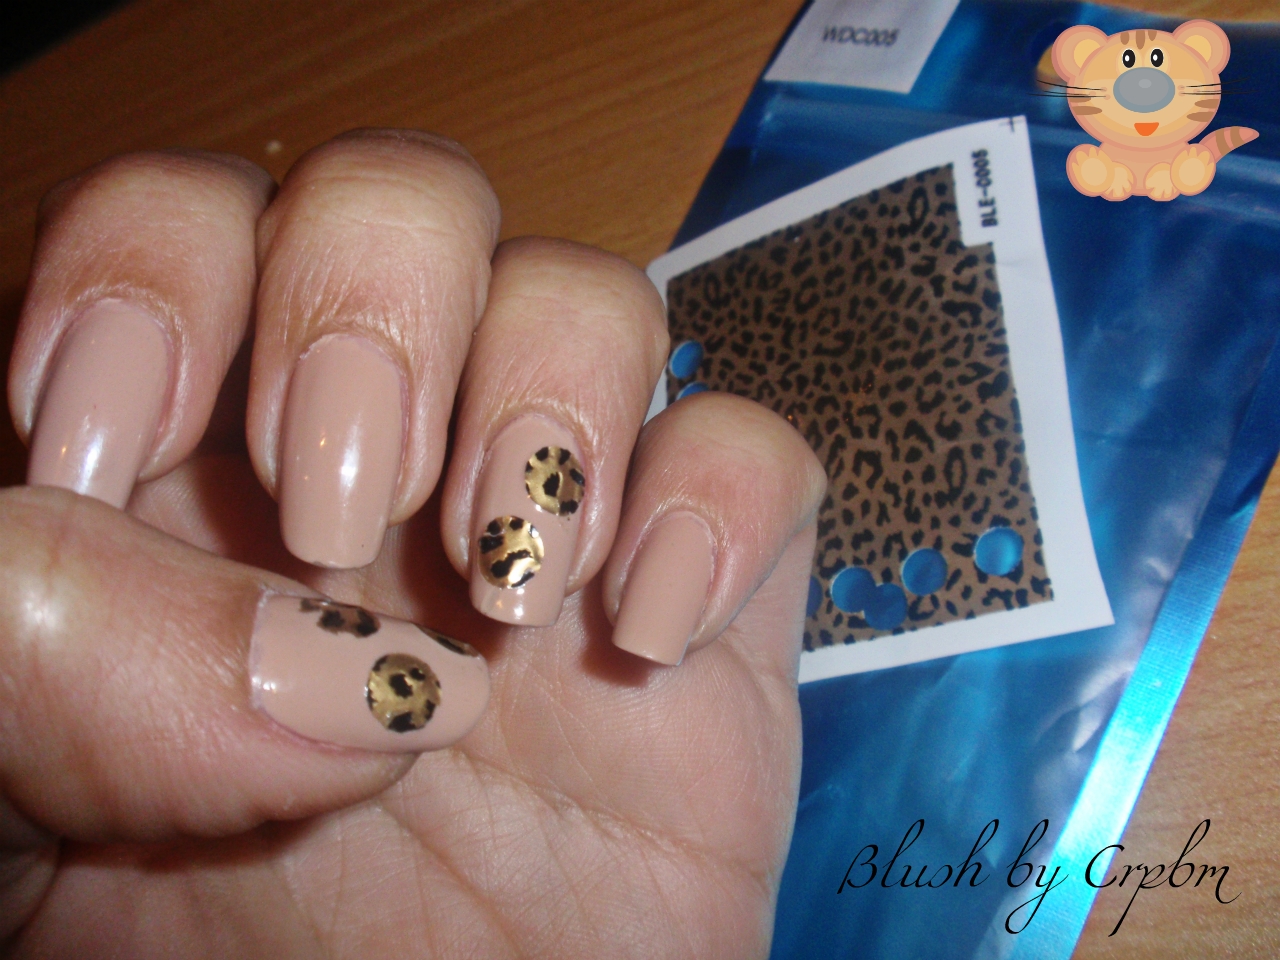
Olá Lindas tinha aqui por casa ainda por usar uns water decals de motivo leopardo e então meti-me a inventar, não saiu como queria mas acho que não ficou assim tão mau!


Usei os water decals da KKcenterHk o modelo WDC005 não sei o que se passou se foi por ter feito bolinhas com o furador mas desta vez coloquei em água e o desenho não saia acabei por usar como se fosse stick, sinceramente não percebi o que se passou. Na minha opinião para colocar na unha toda este modelo não é o mais indicado.

Como queria dar um tchan nas unhas acabei por usar o top coat com brilhos laranjas, amarelos e verdes da Cliché da Colecção Glamour o New York nas unhas indicadas:


O que acharam?

A loja oferece 10% de desconto se usarem o código: BLGA353CA10


Thank you, blushbycrpbm
Check out blushbycrpbmblog
http://blushbycrpbm.blogspot.pt/2012/04/unhas-do-momento-beje-leopardo-glamour.html

2012年4月12日 星期四

Unha do Momento - Fracesinha Zebra com Verde Menta by blushbycrpbm

Olá Lindas, hoje venho mostrar-vos como andam as minhas unhas.
Queria usar uma cor diferente nas unhas e fazer francesinha então saiu isto:


Gostei muito do resultado final, e vocês???

O verniz que usei foi o 107 da Andreia e para fazer a francesinha zebra usei os water decals da KKcenterHk mais propriamente o modelo WDBLE979.

Como usarem estes water decals:

  1. Cortem o water decals na medida que querem consoante o que querem fazer nas unhas (no meu caso cortei na horizontal  tiras com cerca de 0.5cm de altura para fazer a francesinha);
  2. Mergulhar em água o water decals e esperar cerca de 60 segundos ou até o decals sair bem do papel;
  3. Aplicar o desenho na unha e limpar com papel o excesso de água;
  4. Cortar os excessos que podem ter ficado nas unhas;
  5. Passar um top coat sem passagens repetitivas na unha porque senão acontece o que aconteceu-me, ou seja desfazem o desenho ;)
Achei estes water decals mais difíceis de usar do que os que apresentei anteriormente mas pelo resultado final na minha opinião compensa.
Podem comprar estes water decals ou outros aqui:


Thank you, blushbycrpbm
Check out  blushbycrpbm  blog
http://blushbycrpbm.blogspot.com/2012/03/unha-do-momento-fracesinha-zebra-com.html

2012年1月16日 星期一

KKcenterHK Nail Water Decails by the-anni


Jakiś czas temu otrzymałam naklejki na paznokcie od KKcenterHK. Są bardzo fajne , choć przyznam że nie wiem czy dobrze je użyłam :) Nie są zbyt trwałe, ale myślę że to dlatego że musiałam coś źle zrobić nakładając je :) Uważam że takie naklejki to świetny pomysł dla tych ktorzy nie mają cierpliwości do lakieru . np. Czasem mam tak że zanim lakier zdąży wyschnąc to tu gdzieś przypadkiem dotknę i ;/ trzeba malować od nowa. :) A jeśli chodzi o "zmywanie " naklejek to wystarczy mocniej zdrapać i już zchodzą , także naprawdę świetny wynalazek ;)

In english :
Some time ago I received a sticker from KKcenterHK nails. They are very cool, but I admit that I do not know if I used them well:)There are too durable, but I think it's because I had donesomething wrong by imposing them:) I believe that such labelsare a great idea for those who do not have the patience to finish.eg Sometimes I paint so that it dries before it is here somewhereand accidentally touch; / need to paint again. :) And when it comes to "wash" label is just harder and longer zchodzą scratch,so it's really a great invention;)

Thank KKcenterHK for the coorporate! 


Thank you, the-anni
Check out the-anni blog

2011年10月18日 星期二

KKCenterHK Water Decals one more time By spookynails


Today I want to show you water decals from KKCenterHK. Both decals are from N.Nail brand, but the first one was a full nail designs (13) and the second one are DYI decal sheets (check them here).

Dzisiaj pokażę wam kolejne naklejki wodne z KKCenterHK.Oba wzory są z firmy N.Nail, ale pierwsze to wzory całopaznokciowe a drugie to arkusze DYI (znajdziecie je tutaj).

This design looks great - but I did something wrong during the application so it doesn't look perfect, but I liked them a lot :)

Ten wzór wygląda świetnie - ale coś źle zrobiłam przy nakładaniu i nie wyglądają idealnie, ale sam wzór jest wypasiony :)


Second decals was cut by me - I had no idea how to make a nice pattern ;-) I cut them into pieces (one in a nail shape) and put on the polish (China Glaze Rodeo Fanatic). It looked better in real life ;-)

Drugie naklejki były pocięte przeze mnie - nie miałam pojęcia jak zrobić fajny wzorek ;-) Pocięłam je na kawałki (jeden w kształcie paznokcia) i nałożyłam na lakier (China Glaze Rodeo Fanatic). W rzeczywistości wyglądały lepiej ;-)


this product was sent to me for review / produkt ten został mi wysłany do recenzji

I have few more decals to show you, but I don't want to use them without any occasion lol :P 

Mam jeszcze kilka decalsów do pokazania, ale nie chcę ich używać bez szczególnej okazji lol :P


Thank you, spookynails
Check out  spookynails blog

http://www.spookynails.com/2011/10/kkcenterhk-water-decals-one-more-time.html