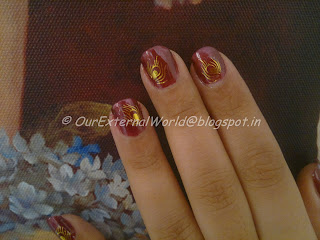
I am super excited to share this week's NOTW!
This week I am sharing a nail art done using water decals. Water decals
are designs that are created on very thin plastic sheets that can easily
stick to your nail with the help of a top coat. These are called
'water' decals because in order to get the pattern you need to soak the
pattern in water where it separates from the paper backing and can be
picked up and stuck on your nail.
I got the Gold Peacock feather water decals from KKCeneterHK.com. One
pack which has two different patterns for both hands costs around US$6.
And this is how it looks on my nails!
 |
| Bridal Nail Art - Gold Peacock Water Decals |
Now for the how to of this pretty nail art.
First let see what all you need
 |
| Things you need for Bridal Nail Art - Gold Peacock Water Decals |
- Nail paint
- Top coat
- Water decals
- Scissors
- Tweezers
- A small bowl of water (not shown in the pic)
To start off begin by choosing a pattern of the water decal and based on
the pattern, select your nail paint. Since I had golden water decals I
chose a Sally Hansen deep brown red with a hint of sparkle as I wanted
to make this nail art very bridal (Indian bridal that is!) Paint your
nails with your base colour and let it dry completely before starting
off with the water decals.
Let us now see step by step on how water decals are done.
Step 1. Remove the plastic sheet covering from your pack of water
decals and cut out one water decal depending on the size of your nail.
Step 2. Immerse the water decal in the bowl of water and let it
sit there for a few seconds. Make sure to immerse it front side up (not
reverse)
 |
| Step By Step - Bridal Nail Art - Gold Peacock Water Decals |
|
Step 3. Using the tweezers carefully take the water decal out of the bowl of water.
Step 4. Gently move the pattern away from the paper backing -
usually the pattern will start sliding off on its own but at times I had
to gently nudge it with my hand. If your pattern is not sliding off
soak it in water for a few more seconds.
 |
| Step 5: Bridal Nail Art - Gold Peacock Water Decals |
|
Step 5. Using the tweezers gently lift the pattern off the paper
and place it on your nail carefully. See how the pattern looks when
lifted with the tweezers - it has a transparent background. Now smooth
it out with your finger (or you can use a small towel which will also
dry it off a bit)
 |
| Bridal Nail Art - Gold Peacock Water Decals |
Repeat the steps for all your nails and
finish off with a top coat. A fun way to decorate your nails and make
them look awesome at any occasion.
I love the final outcome which looks
like the nail art has been done by some professional. The whole process
was easy, fun, and very rewarding!
Some more pictures to feast your eyes on!
|
 |
| Bridal Nail Art - Gold Peacock Water Decals |
 |
| Bridal Nail Art - Gold Peacock Water Decals |
 |
| Bridal Nail Art - Gold Peacock Water Decals |
 |
| Bridal Nail Art - Gold Peacock Water Decals |
 |
| Bridal Nail Art - Gold Peacock Water Decals |
 |
| Bridal Nail Art - Gold Peacock Water Decals |
Hope you liked this nail art!
Style Tip: You can try the same gold peacock water decals with a turquoise blue nail paint as base to give a true peacock look
Thank you, ourexternalworld
Check out ourexternalworld blog
http://ourexternalworld.blogspot.in/2012/07/bridal-nail-art-gold-peacock-feathers.html


沒有留言:
張貼留言