2011年10月18日 星期二

KKcenterHK: Ballerina Eyelashes - recenzja sztucznych rzęs By katalina-sugarspice


Thank you, katalina-sugarspice
Check out katalina-sugarspice blog

http://katalina-sugarspice.blogspot.com/Hej, Misiaki!

     Cóż ja Wam mogę napisać tytułem wstępu? Jak wiecie, od jakiegoś czasu rozwija się moja współpraca ze sklepem KKcenterHK. Ich flagowymi produktami są sztuczne rzęsy. Do tej pory otrzymałam już dwie przesyłki z różnymi rodzajami rzęs dystrybuowanymi przez ten sklep. Ich recenzje znajdziecie TU i TU.
     Jakiś czas temu po raz kolejny zaproponowano mi przetestowanie rzęs, tym razem marki Cosmos o nazwie Ballerina. Dostałam dwa warianty rzęs: #403 i #412.

Na pierwszy ogień: #403

      Powiem Wam, że zachwyciły mnie z obrazka! Dosłownie oczarowały. Bo i jak tu się nie zachwycić czymś tak pięknym i delikatnym? Są super-naturalne, super-długie i idealne do osiągnięcia efektu oczu lalki... Pod warunkiem że jesteśmy w stanie je nałożyć... Ale po kolei!
     Rzęsy Ballerina przychodzą do nas w ślicznym różowym, kartonowym opakowaniu z wycięciem w kształcie serduszka, przez które możemy zobaczyć jak wygląda dany model. Podobnie jak modele z serii ES nie zawierają kleju, zatem musimy zaopatrzyć się w niego we własnym zakresie. Są także dużo delikatniejsze od tamtych. I właśnie ta delikatność jest ich największym atutem i przekleństwem zarazem. Co mam na myśli? Już tłumaczę.
     Jak widzicie na zdjęciach, model 403 to super cieniutkie rzęsy przytwierdzone do super cieniutkiego paseczka. Jest on tak cieniutki, że może nastręczać sporo trudności z aplikacją. Męczyłam się niesamowicie próbując je przykleić! Nie wiem ile dokładnie robiłam podejść, ale był to proces długi i żmudny. Miałam ogromne kłopoty z ich należytym przytwierdzeniem, wyginały się i "falowały", doprowadzając mnie do szewskiej pasji. Aczkolwiek, kiedy wreszcie udało mi się je przytwierdzić, efekt był olśniewający! Na dołączonych zdjęciach możecie zobaczyć jak wyglądają na "czystej" powiece, jak również nałożone na kreskę. Powiem szczerze że zdecydowanie bardziej wolę je z kreską, bo wówczas wszelkie niedociągnięcia łatwiej jest ukryć.
     Moja ogólna opinia na ich temat jest taka, że zdecydowanie odradzam je osobom początkującym! Szczerze, jeśli dopiero zaczynacie, zrezygnujcie z rzęs na tak cieniutkich taśmach, ponieważ jedyne, co zyskacie to ogromny poziom frustracji przy ich nakładaniu. Jeśli natomiast jesteście już zaprawione w boju i niestraszne Wam wyzwania - bierzcie i próbujcie, bo efekt jaki uzyskacie dzięki tym rzęsom powali Was na kolana!


Model #412


     Te rzęsy, w przeciwieństwie do poprzednich, od początku do końca były czystą przyjemnością! W pudełeczku wyglądały dość zwyczajnie i niepozornie, jednak na oczach dały naprawdę fajny efekt, który bardzo mi się spodobał!
     Podobne miałam już w innym zestawie, jednak szczerze mówiąc jestem z nich naprawdę bardzo zadowolona i chyba będę miała z nich więcej pożytku niż z poprzedniego modelu ;). Przede wszystkim nie są tak wiotkie. Mają dosyć solidny, choć giętki pasek, ładnie wyprofilowane włoski, które trzymają kształt bez problemu. Są też trwalsze niż #403, które można zakładać maksymalnie dwukrotnie. Później w zasadzie nie nadają się już do użytku. Te spokojnie można nakładać, zdejmować, czyścić i ponownie nakładać jakieś pięć albo i więcej razy - wszystko zależy od tego jak będziemy się z nimi obchodzić.
     Są również dużo łatwiejsze w aplikacji, pod warunkiem, że damy klejowi podeschnąć tyle ile trzeba. Spośród tych dwóch par, model #412 jest moim zdecydowanym faworytem!

Tak wyglądają na oczach:


     A na koniec mały bonusik ;). Zapowiedź tego co za jakiś czas również pojawi się na moim blogu... Jak podobają się Wam moje "nowe włosy"? ;)


Buziaki, Kochani!!!2011/09/kkcenterhk-ballerina-eyelashes-recenzja.html

kkcenterhk lower lashes M131 review By cominica


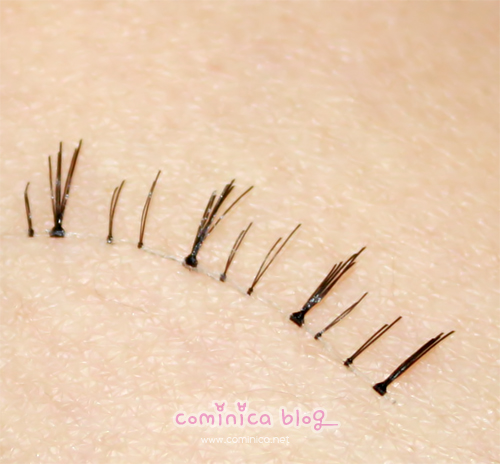
Hello ladies (≧∇≦)/ ! This is another sponsored review from kkcenterhk, now I'm going to review the lower lashes. Kkcenterhk was kindly sent me 3 different lower lashes type. When I received the package is already flattened so the false lashes packaging is a little mess, but the lashes was still okay.


I've tried to make a look together with this lower lashes, I've made a tutorial too. But, I have no time to edit it because I was really busy this few days. Since, next week I'm going to become very busy, I try to make all sponsored review as soon as possible. And If you realize, I post more than 1 post a day, mostly make up review and swatch because it's easy to do than make a look or tutorial. And once again, start from next week maybe I'll have no time to reply all comments (ノTДT), I'll try reply it on weekend if I can. >‿<


So, enough of my useless ramblings (゜∀゜), here's the look with the lower lashes from kkcenterhk. Actually, I've this kind of lower lashes design, it's same with the one I've got few months ago! This lower lashes look quite natural, it has a clear band and easy to apply.
But, the glue on the lower falsies is to tacky and looks unnatural so I have to cleaned it first before use.


glue all over the band x_x

after cleaned the glue

I've use kkcenterhk upper false lashes (A111) too on outer corner of my eyes, make it look more fuller. ^^

♔ LOVE ♔
✩ Looks natural when use
✩ Doesn't itch
✩ Easy to bend
✩ Clear band

♔ HATE ♔

✩ Need to clean the glue first before use
✩ Available online only


btw, If you're wondering where I bought this wig, this wig is a gift from my cousins in Taiwan, she gave me this on her sister wedding few months ago. My sister had use this wig before on this post. I've cut the bangs because it's too long and I hate it when itch my eyes  ̄~ ̄;)

I hope you like this look, I'll post the eye make up tutorial on my next post, just stay tuned ladies~~ Love yaaa! Thanks for reading anyway (^▽^) v
Sorry for late comment reply >_<


Thank you, cominica
Check out cominica blog

http://www.cominica.net/2011/09/kk-center-hk-lower-lashes-m131-review.html

Naklejki na pzanokcie KKcenterHK By ewelciuch


Paczka od firmy KKcenterHK


Nowy genialne odkrycie XXI wieku, czy naklejki na paznokcie. Niesamowity wynalazek. Te pochodzą ze sklepu HHcenterHK, który ma bogata ofertę wzorów. Ja wybrałam sobie taki wzór i bardzo mi się podoba. Są świetne i łatwe w użyciu a efekt jest magiczny :)


1. Najpierw należy dokładnie wypilnikować powierzchnie płytki paznokcia, wyciąć skórki.


2. Następnie wacikiem zwilżonym wodą oczyścić płytkę z kurzu i tłustej warstwy


3. Teraz możemy już odkleić naklejkę i na suchą płytkę paznokcia naklejamy naklejkę. Odcinamy ją tak by była idealnie dopasowana do paznokcia, tu troszkę trzeba się pobawić.


A oto końcowy efekt:


Thank you very much KKcenterHK :*


Thank you, ewelciuch
Check out ewelciuch blog

http://ewelciuch.blogspot.com/2011/09/naklejki-na-pzanokcie-kkcenterhk.html

Easy flower design on your nails! By nailderellanails

Hello~


Today, I'll do a review a sample I received from the Chinese online store called "KKcenterHK". It's a shop specialized in nail art products but also make up, false lashes and so on. Concerning nail art, they have some stamping image plates, water decals, glitters, stickers, and polishes (OPI, Zoya).

I was invited to chose between nail patches and full nail art water decals by the brand  X&D. I chosed the water decals because I've always been curious about them but I must admit I was a little afraid of trying water decals. I was scared the application would be diffcult and messy and the patterns would not stick to the nails perfectly...


Here is the result.


Finally it wasn't that difficult to use. Application was rather easy. I first thought I would have to cut the pattern to fit my nails but in the end I just used them as they were and it was all right, I think.
I was lucky but if your nails are larger or thinner than the pattern, this might be an issue and discourage you from using water decals. I didn't resized them but I guess this would be a little difficult...not unmanagable but a little difficult.
On these pictures I didn't use any top coat but I tried adding a layer of top coat after my photo session and it helped setting the pattern on the nails. However you have to be careful not to touch your nails before it's competely dry otherwise the pattern will get damaged (I did that on one nail...).

Final Verdict: In the end, I was quite happy with this product because you can get very easily and quickly a very nice pattern on your nails. However, I'm still a little scared it won't last very long (although I didn't do a lasting power experiment). So I will rather use this kind of products for a particular occasion when I want to have stylish nails with some fun designs!
Another alternative would be to use a water decal on only one nail as an accent nail...I guess I would wear more water decals in this way.

 And you, what do you think of water decals? Have you ever tried? Are you willing to?


 This set of water decals can be purchased at KKcenterHK for $4.50. There are 10 decals per package. This is a little sad because this means you cannot mess a single nail...unless you've decided to use them as accent nails rather.
There are instructions written in English at the back. Basically, you have to cut the image you want to use, peel off the plastic foil that is on the water decal. Then take it with a tweezer and put it in water for 10 sec. After this step, you can peel of the decal from its support, place it on your nails, expel the air bubble ,smooth it on your nail, and trim down the excess of pattern. Apply a top coat and you're done!
You can  follow this tuorial by Delaney. It's in French but no need to understand because you have the images!


 *Product in this post was sent by the company/PR for my honest review*


Thank you, nailderellanails
Check out nailderellanails blog

http://nailderellanails.blogspot.com/2011/09/easy-flower-design-on-your-nails.html

Cicekli Tirnak Etiketlerim - Floral Nail Patches By ferahfezas


Merhaba kizlar;

beklediginiz cicekli tirnak etiketlerini denedim...
Sponsorum KkCenterHk'ya tekrar tesekkur ederim.
Bu etiketler harika!
Denediklerimden uygulamasi en en kolayi bu oldu.
Yapisi cok yumusak,yapismasi kolay.


Ve bu desen,cok cok guzel <3


+++
Hello ladies,
here is my floral nail patches, i tried them on.
Thanks to my sponsor KkCenterHk.
These are awesome!
Really easy to apply them.
Very soft material,easy to stick them.

I love this pattern <3


Gordugunuz uzre, 3 set etiket gelmisti.

 Golden olanlar:burada...
Pembe olanlar:burada...

Ve bunlar sonuncusu...
Etiketleri almak icin bir cimbiz,tirnak etlerini ittirmek ve etiketi tirnaga bastirmak icin "cuticle pusher" denen alet gerekiyor.Bir de makas tabiki,kalan etiketleri kesmek icin.
Tirnaga ilk once koruyucu,top coat surmeyi unutmayin...


+++


As you see, they sent me 3 sets of nail patches.

Golden nail patches: here...
Pink nail patches: here...

These are the last ones.
You'll need a tweezer,cuticle pusher and scissors.
Before applying, use a top coat.


Uygulamaya baslayalim mi???


+++


Ready to apply them???


Ilk once sol elime uyguladim...


+++

I applied them to my left hand.


Ve iki elime de uygulanmis hali...
Nasil guzeller,degil mi?


+++


I applied them to my right hand nails,too.
Aren't they so beautiful?


Cok guzeller...

+++

They're so beautiful...


KKcenterHk'ya tekrar tesekkur ederim...
Bu harika etiketleri ben cok begendim.
%15 indirim devam ediyorken deneyin kizlar.

+++

Thanks to KkcenterHk again...
I really like these nail patches.
There's still 15% discount ,try them girls...


Thank you, ferahfezas
Check out ferahfezas blog

http://ferahfezas.blogspot.com/2011/09/merhaba-kizlar-beklediginiz-cicekli.html

Golden Nail Patches From KKcenterHk By ferahfezas


Merhaba Kizlar;

gecenlerde sponsorum KKcenterHk'den 3 cesit tirnak etiketi (etiket demek de garip geliyor ya) gelmisti.Onlardan pembe leopar desenli olanini denemistim.Simdi sira altin sarisi olanda...Bu etiketler ciktigindan beri denemek istedigim ilk renk bu idi.Cok gosterisli...
Simdi deneme firsati buldum...
Sponsoruma tesekkurler...


++++
Hello girls,

as I told you before, my sponsor KKcenterHk sent me 3 nail patches to try,here.
I tried the pink ones with leopard design on.And now time to try "Golden" patches.I've always wanted to try golden nail patches and now time to try them ^_^
 Love this color, so posh.
Thanks to my sponsor KKcenterHk.


Gordugunuz gibi denemem icin, 3 cesit etiket geldi...
Simdi gold -altin sarisi olanini denedim...
Uygulamasi cok kolay.Tirnak koruyucu surdugunuz tirnagin uzerine uyguluyorsunuz.(alta mutlaka tirnak koruyucu surun ki,cikarirken tirnaginizi zedelemesin) 
Dipten baslayarak yapistiriyorsunuz.Uc kisimlarini kesiyorsunuz.(cok artarsa diger ufak tirnaga kullanin derim, ben oyle yapiyorum)
Ben yine yuzuk parmak tirnagima ayni renk oje surdum :)

Etiketler buyukten kucuge gore ufaliyor.Benim bas parmagima 2. buyuk uyuyor,artiyor da.

Cok parlak olduklarindan fotograflar hep parladi.


++++


As you see, they've sent me 3 nail patches to try.And i tried the golden ones.
It's easy to apply them.
Remove plastic cover at the backside. Hold and peel away gently..Smooth onto the nail surface. 
(before applying use a base coat.)(because it can damage the nails without a base coat while removing them)(i applied golden nail polish for a finger,i love it,this is my style :P )
Stick them onto the nails and cut the rest of patches from the nails.

They're so glossy and the photos are shiny too :)


Yakindan bakis.

++++


A closer look.


Ve uygulanmis hali...
Ben cok begendim....Kaliteli ve gosterisliler...Ozel gun ve geceler icin cok uygun bence,hem ojeli tirnaga bakin,ne kadar fark var,nasil paril parillar ^_^


++++

And here I applied them.
Love them a lot.Best quality and they're really posh.Perfect for special days,occasions,birthdays etc.Look at my ring finger,it's nail polish...The patches are more shiny then it...So liked them...


Daha bir yakindan bakis...Uclarini torpulemeyi unutmayin,ama yavas yavas torpuleyin,etiketi yirtmadan :)
10 gune kadar dayanir yazsa da, benimkiler 3 gun dayandi,ev islerim vardi da :)

Tesekkurler KKcenterHk
(27 eylule kadar %20 indirim,alin size deneme firsati)
(hem de kargosu cok hizli)

Umarim altin sarisi tirnaklarimi begenmissinizdir ^_^


(bir sonraki yazim koca bir alisveris yazisi olacak)


++++


A closer look again...
Don't forget to rasp,it's easy to do it,because the nail patches are so thin and don't rasp them quickly,you can deform the patches :)
"10 days wear" is written on their package but my patches went for 3 days because I had to do some housework :)
 
Thanks KKcenterHk.
(20% off end of 27-sep-2011)
(time to try girls)

Hope you liked my golden nail patches...


Thank you, ferahfezas
Check out ferahfezas blog
http://ferahfezas.blogspot.com/2011/09/golden-nail-patches-from-kkcenterhk.html

Leopard patterned nail patches / Leopar Desenli Tirnak etiketleri By ferahfezas


Merhaba kizlar;

Tirnaklarimizi suslemeye devam edelim mi...
Sagolsun sponsorum KKcenterHk yeni tirnak etiketleri yolladi,bende hemen deniyorum...
Desenleri ben sectim...
Daha once pembe uzerine leopar deseni kendim cizmistim,bu etiketin aynisi...
Etiketini kullanmak daha kolay tabi ^_^


+++


Hello girls,
Let's decorate our nails again...
Thanks to my sponsor KKcenterHk,they sent me new nail patches.
I chosed the patterns from their collection.
I tried the same pattern as a manicure before with nail polishes.
It's easy to use these patches than spending time to decorate nails with nail art pens 
^_^


Bu kez 3 cesit etiket yolladilar.
Birini altin sarisi,metalik sari sectim.
Digeri uzerinde harika guller olan bir etiket,digeri de bu leoparli desen...
Metalik sari olan daha once denedigim gibi ,diger ikisi ise daha farkli,daha ince ve uygulamasi daha kolay.


+++

They sent me three nail patches.
One is metallic gold,
One is blue, there are beautiful roses on them,
One is pink,leopard pattern.
The blue one and the pink one are thinner than the other one, they're easy to apply.


Guzelliklere yakindan baki$...
Bunlari cok begendim ben ^_^


+++


A closer look to these beauties...
I love them ^_^


Ve leopar desenli pembe etiketler...
Dedigim gibi bunlarin yapisi ince ve uygulamasi daha kolay.Hic zorlanmadan uyguladim.Etiketinden siyirin ve bir kat koruyucu surdugunuz tirnagin uzerine yapistirin...
(altina mutlaka koruyucu surun ama)(yoksa cikarirken tirnak zarar gorur)
Ben yine bir tirnaga oje surdum...Biraz kirmizi geldi gozume, bir kat da ucuk pembe surdum uzerine, o sonraki fotolarda :)


+++

And here; pink leopard patterned nail patches...
As I told you, it's easy to apply them.Remove clear plastic cover. Hold silver tab and peel away gently..Smooth onto the nail surface...
(before applying use a base coat.)(because it can damage the nails without a base coat while removing them)
(i applied dark pink nail polish for a finger,and thought it was dark ,then applied hot pink on it :)


Pembe $alim ve pembe kupelerim ile...
Desenlerle uyumlu ^__^


+++


My pink scarf and pink earrings...
Compatible patterns ^__^


Pembe $alimla pek guzel durdular :)
Bir bardak cay da ekleniverdi fotografa :)


+++


With my pink scarf again...
A cup of Turkish tea <3


Degisik fotograf denemeleri...
Oje neden oyle parlamis anlamadim :) Ama rengi guzel ^_^
Uclarini torpulemeyi unutmayin ama...
Dedigim gibi yapisi ince oldugundan torpulemek de kolay...Yalniz dikkat edin,yapisi ince, torpulerken kaptirip soymayin etiketi :)))))


+++


Different photos...
I don't know why the pink nail polish glowed like this :) But loved the colour.

Don't forget to rasp,it's easy to do it,because the nail patches are so thin and don't rasp them quickly,you can deform the patches :)


Paketin  uzerinde 10 gune kadar dayanacagi yazsa da, cabuk cikabiliyor,ozellikle temizlik vs yaparsaniz....Onceden de demistim, bunu uygulayip hicbir i$e el surmemeniz lazim :) Ki cok dayansin...
Ama birkac gun bile dayansa yeter,fakli birsey denemis olmak adina.Yada ozel gun yada gecelerde ideal...Ojeyle ugrasmak yerine, bunu uygulayin daha kolay...

Ben cok begendim...
Cikarttiktan sonra tirnaklariniza bakim yapmanizi siddetle oneririm...

Tesekkurler KKcenterHk.
Hizli posta icin de...

Digerlerini de uygulayacagim, gullu olan favorim...

^__^


+++


"10 days wear" is written on their package but it's not that easy,because if you're a housewife or if you have to do some houseworks they peel off easily.You shouldn't do housework after applying them :)
It's good for a different look for your nails,maybe for special days or special occasions...Just apply them and don't spend time with nail polishes ^_^

I like them.
After removing them, your nails will be dry and do some treatment for your nails.

Thank you KKCenterHk.
Thanks for quick delivery, too... 


Will try the rest of them.

^__^


Thank you, ferahfezas
Check out ferahfezas blog

http://ferahfezas.blogspot.com/2011/09/leopard-patterned-nail-patches-leopar.html