顯示具有 Nail Patch- Dot ‧ Line Pattern 標籤的文章。 顯示所有文章

2012年11月29日 星期四

Zig-Zag Chevron by chitchatnails

Hello Lovely Ladies,
I hope you are starting the week energized from a good weekend?  I had the weekend off (as did Peter!!!! – rare occurance in our household).  Thanks to my sister and her husband, the kids were well taken care of , and we went for a lovely lunch and then headed to watch “Argo” (what a great sit-at-the-edge-of-your-seat movie documenting a historical event).
On to today’s manicure:

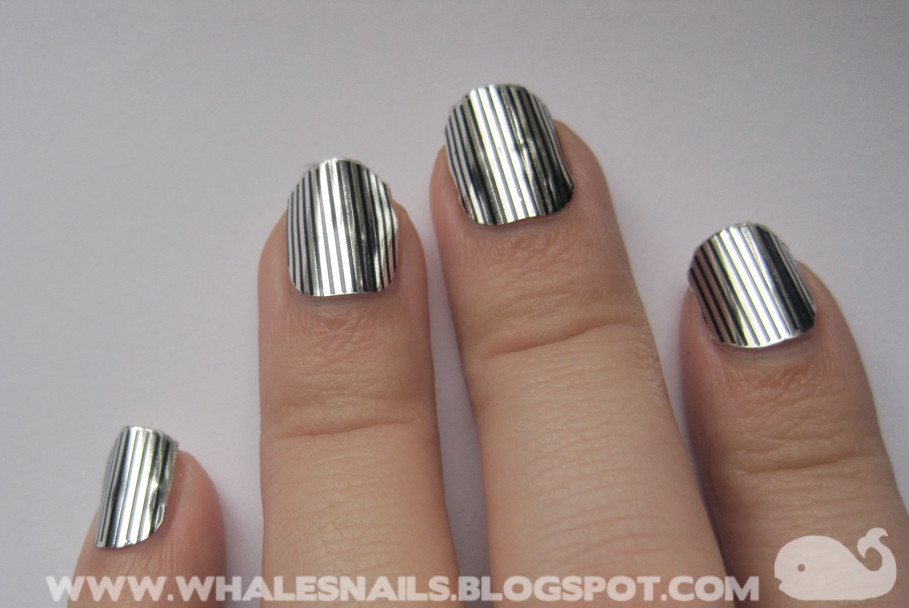
For today, I have a Full Nail Patch review for KKCenterHk :) Thus far I have been showing you their water decals, but I’m quite happy that they carry full nail decals/patches as well.

This package of 16 nail patches can be used to create a full manicure (with a few extras just to make sure that the patches fit the size of your nail), or they can be worn as accent nails (which is the way I intend on using them).
Please NOTE:
These are patches/decals with a ‘glue’ base rather than being made out of nail polish.  What this means is that they will adhere to your nail and can stretch to fit the sides of your nail.  They will also NOT dry out like real-nail polish decals do so you can use one at a time and not worry about having to dispose of the rest of the package ;) BUT, because they are blue based, they also will not wear as long as the promised 12-days of real-polish nail appliques.
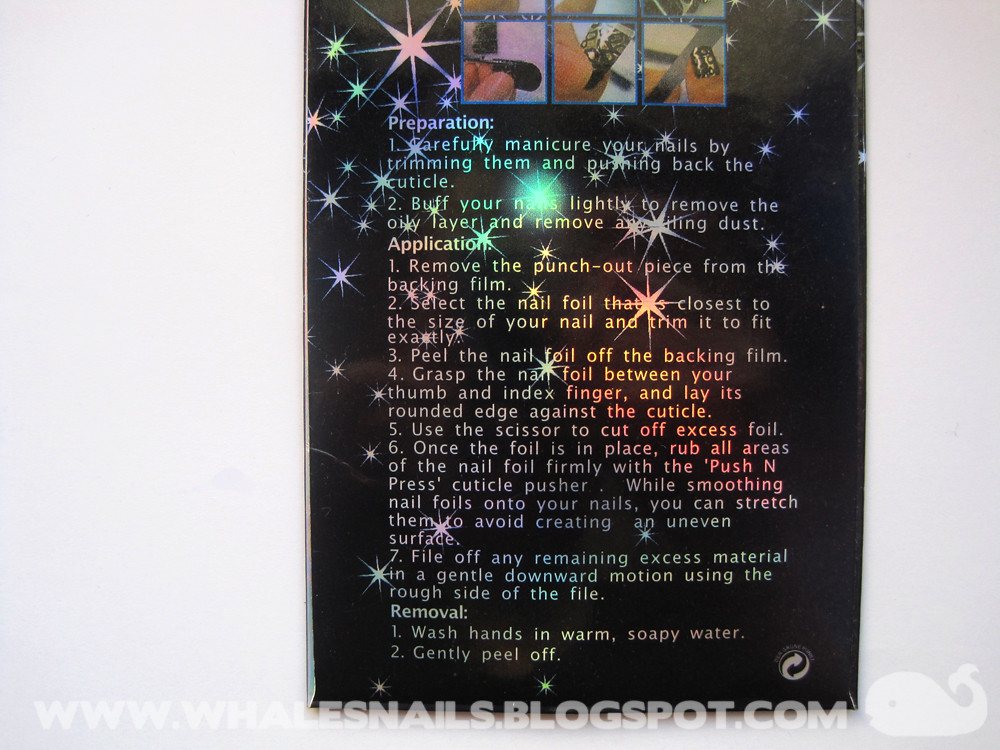
* * *
How to:
1. Pick a patch that fits the width of your nail best (you don’t want to pick one that is too wide or you will end up covering your cuticles, a patch that is too narrow will show the sides of your nails.  (There are plenty of sizes to choose from, but you can also just cut along the sides of the decal to make them narrower if you need).
2. Remove the patch and place it (rounded side) against the base of your cuticles.
3. Rub the decal down the center to make it stick, and then towards the edges.  I didn’t realize (until it was too late) that these decals are strong but stretchy so I could have stretched them a bit at the sides to prevent a little bit of lifted edges (that is a first-time user error, not a defect of the product).
4.  When the decal is nice and firmly attached to your nail, use a nailfile to file down the excess from the tip of your nail (I file in a downard motion).
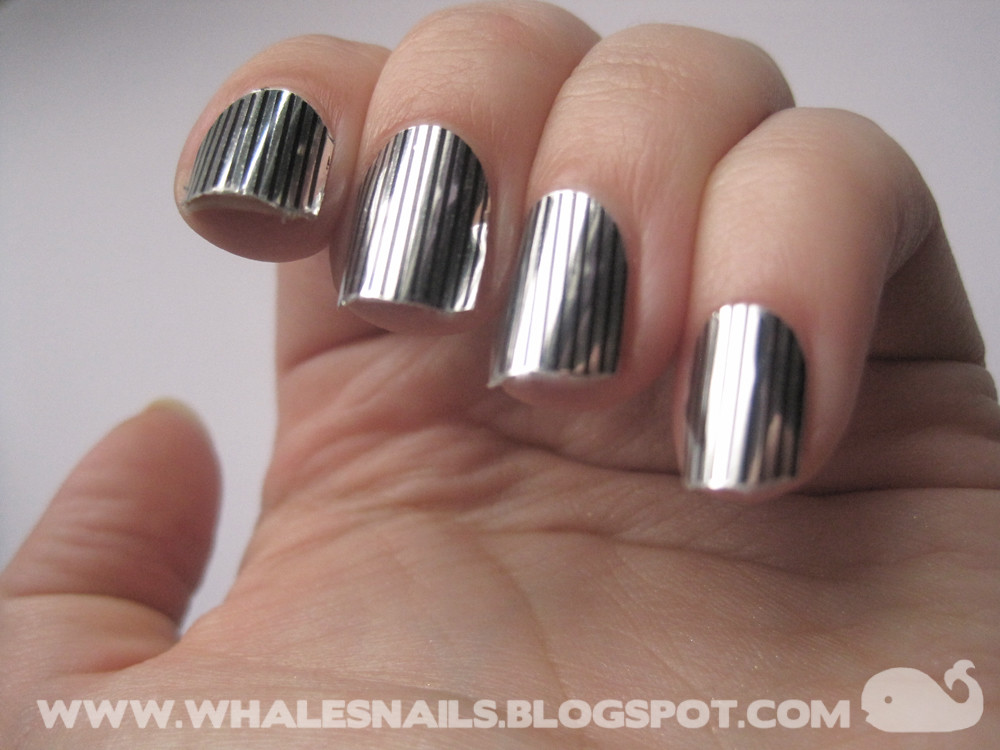
These decals create really neat effects, and are perfect for someone like me who doesn’t have the freehand-precision to create even lines ;)
To create this Skittlette manicure I painted my nails with China Glaze VII;he pinky is a layering of silver glitters.
I continue to be amazed at the wide range of nail-art decals and patches that KKCenterHk carries, you can purchase these full nail patches HERE.
Just a reminder, as always, if you want to purchase any of the neat KKCenterHk nail art supplies, please feel free to use my 10% discount coupon: CHITCHAT
Also, you still have a couple more days to enter my Bundle Monster giveaway, all the info can be found HERE ;)
* * * * *
Did you have a good weekend?
What do you think about this Skittlette manicure?
Have you worn the nail patches/nail-polish appliques?  Do you like them?
THANK YOU FOR READING!


Thank you, chitchatnails
Check out chitchatnails blog
http://www.chitchatnails.com/2012/11/05/zig-zag-chevron/

2012年9月7日 星期五

Nail Ideas: Nail Wraps! by thepolishwell


 I have to confess - ever since I started dabbling in simple nail art, I'd thumbed my nose at nail wraps and stickers. After all, I can always recreate the designs myself, right?

Wrong.
I never realized that there can be a million and one things that make it impossible to do nail art until I started on a preparatory course for my upcoming bar exam. Ever since the course started, I've only done nail art on a few occasions. Most of the time, I just slap on a polish and wear it for the entire week or until it chips. And you know me, wearing a plain color for an entire week can really bore me to tears.

At times like this, I've really got nail wraps to thank:


Tada! Fancy nails in under 5 minutes!
Please pardon the mangled looking edges for some of the nails. I did some experiment with the wraps on different nails for this review.

Application is really simple and you can do all ten of your nails in under 10 minutes - no rushing necessary. Here are the instructions on the packaging (in my own words because I've misplaced the cover ):

  1. Remove plastic film on top of wrap
  2. Find a strip of nail wrap that fits on the nail.
  3. Carefully peel the nail wrap off the packaging.
  4. Position the nail wrap on your nail (you can carefully lift it up and reposition it if you got it wrong).
  5. Smooth the nail wrap on your nail and remove any wrinkles or bubbles.
  6. File off the excess nail wrap at the tips. 
In addition to that, I would recommend trimming the nail wrap with a pair of scissors to fit your nails before step 3. It will give a neater and crisper edge near the cuticles - see ring finger. 
I've tried to trim the nail wrap after putting it on the nail and it didn't turn out so pretty - see middle finger. It might be neater if you use a cuticle cutter but I'm not too sure about that.
I've also tried to get a neat line near my cuticles by using my usual clean-up method (using a brush and acetone). They did say the nail wrap can be removed using nail polish remover so I thought I would give it a shot. Unfortunately, that didn't work too well either. The acetone dissolved some of the wraps and gave it a fuzzy edge - see index finger.
The nail wraps are relatively shiny on their own but I would not recommend using a topcoat to seal it or to give it extra gloss.
I've tried Seche Vite on my pinky and it mangled up the design near the tips. 
I've also tried a non-quick-dry topcoat on my thumb and the nail wrap pretty much disintegrated into little bits on my nails - crackle/shatter-style.
Minutes after I've applied the nail wraps, I had a horrible itch on my back. Of course, I had to scratch it. I was a little bummed when the corners of the nail wrap lifted up easily. A few hours later, however, I was quite surprised when I could scratch the itch without any trouble. The wraps held on and did not lift up at all. 
If I asked you to scratch my back could you manage that
Like yikky yea Travie I can handle that
- Stereo Hearts
Wear time was quite good.
The nail wraps held on for at least 3 days before there was visible tip wear. 
The pinky with the Seche Vite didn't fare as well and chipped majorly on the third day.

Removal was a piece of cake.
I was picking at the chip on my pinky when I realized I could peel off the wrap really easily.
I did try the suggested removal method - nail polish remover. I soaked a cotton pad in acetone and pressed it against my nail for about 10 seconds and everything came off neatly in one swipe. There was only a bit of black left at the sides of the nail.
Needless to say, I proceeded to peel off the remaining wraps. I then gave them a cursory wipe with acetone to remove any sticky residue.

Overall, I must say I'm really impressed with these nail wraps and would definitely recommend them to those who don't have time for DIY nail art.
You can find a wide range of nail wraps here at KKCenterHK. You can find the design I used here.

Have you tried nail wraps before? What do you think of them?

xoxo,
mich

**Product provided for our honest review. Please see our disclosure policy for more information.**


Thank you, thepolishwell
Check out  thepolishwell blog
http://thepolishwell.blogspot.hk/2012/08/nail-ideas-nail-wraps.html

2012年3月10日 星期六

Nail patch - silver/black by whalesnails

I've got a funky nail patch set from KKCenterHk, metallic silver with thin black stripes...loveliness. These are not water decals but regular stickers (I've  just learnt it's good to use a hair dryer to blow some hot air onto the patches, so that the glue is more sticky). Basically application is rather easy and I had problems only with one nail (index finger), which seems to be more convex than the rest. The cool thing is that you have 16 'nails' in one set, so it's not the end of the world if something goes wrong. I love love love this metallic effect, there's no nail polish like that. Apparently, it is supposed to last for 11 days on nails, I cannot imagine wearing any mani for 11 days...but surely, this is a great party look. I took a photo of instructions, so there's no point in rewriting them, just have a look at the photo at the end.
You can check more patches here.  Choice of designs is wild. :)
                                                                             *  *  *
Dostałam zestaw super nalepek na paznokcie z KKCenterHk, metaliczne srebro w cienkie czarne paski...są czasowe. To nie są wodne naklejki, tylko takie zwykłe (dowiedziałam się, że można nadmuchać na nie ciepłym powietrzem z suszarki, żeby klej lepiej łapał). Ogólnie naklejanie nie było jakieś trudne, miałam problem z jednym paznokciem (wskazującym), który jest chyba trochę bardziej wypukły niż reszta. Fajne w tym zestawie jest to, że macie 16 'paznokci', więc nie ma tragedii jeśli coś nie wyjdzie. :) Jestem zachwycona tym metalicznym efektem, żaden lakier taki nie jest.  Na opakowaniu jest napisane, że nalepki wytrzymują do 11 dni...nie umiem sobie wyobrazić noszenia jakiegokolwiek mani przez 11 dni...ale to na pewno super paznokcie na imprezę. Na końcu wrzucam zdjęcie instrukcji.

Tutaj możecie obejrzeć więcej nalepek. Wybór wzorków jest szalony. :)


Ogólnie należy dobrze przygotować płytkę przed naklejaniem, można lekko zmatowić, a przede wszystkim odtłuścić.
Wybieramy odpowiednie rozmiarowo nalepki, odklejamy i przylepiamy zaokrąglonym brzegiem od strony skórek.
Nożyczkami odcinamy nadmiar folii, dociskamy do płytki np kopytkiem (chociaż mi wygodniej było po prostu palcem). Jak już dobrze się trzyma, wyrównujemy wszystko dobrym pilnikiem. Możemy dodać top coat żeby przedłużyć życie nalepek, bo zmywają się wodą z mydłem. Odchodzą bez problemu, a klej łatwo się zmywa.


Thank you,
Check out whalesnails blog
http://whalesnails.blogspot.com/2012/03/nail-patch-silverblack.html