顯示具有 nail Patch(Brand) 標籤的文章。 顯示所有文章

2013年9月25日 星期三

Swallows From KKCenterHK By zebra-nails

 Hi girls!
Have you entered my giveaway? If no, you can still do it here :).
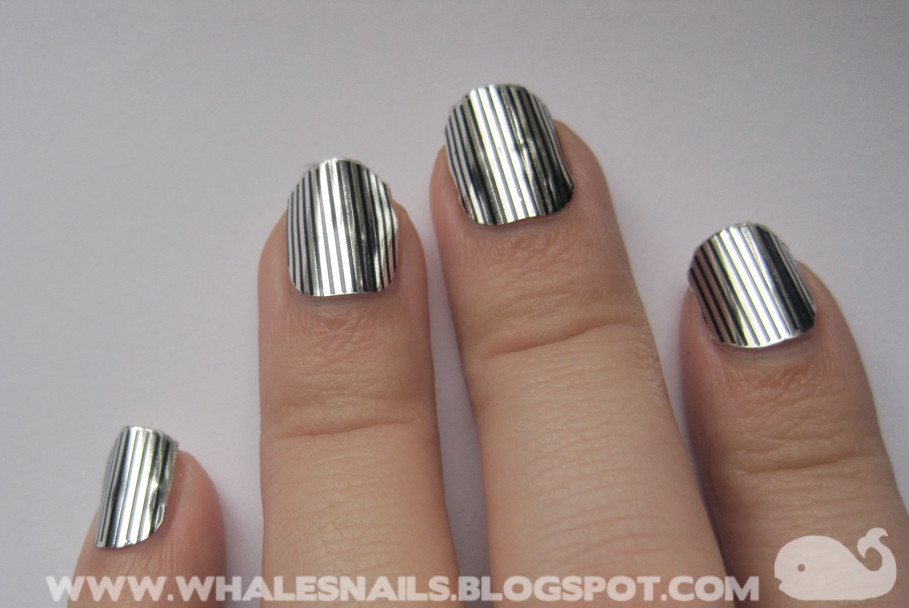
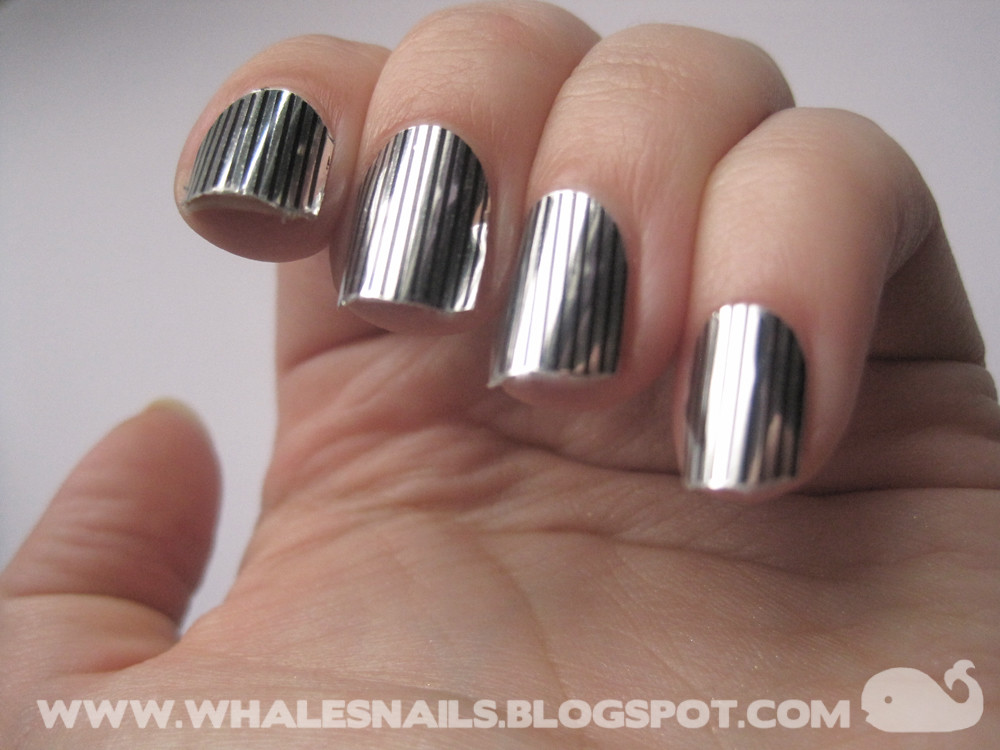
Today I want to show you one of my recent manicures which I did using nail patch that I got fromKKCenterHK. I picked nail patch with swallow design because I love these birds :).
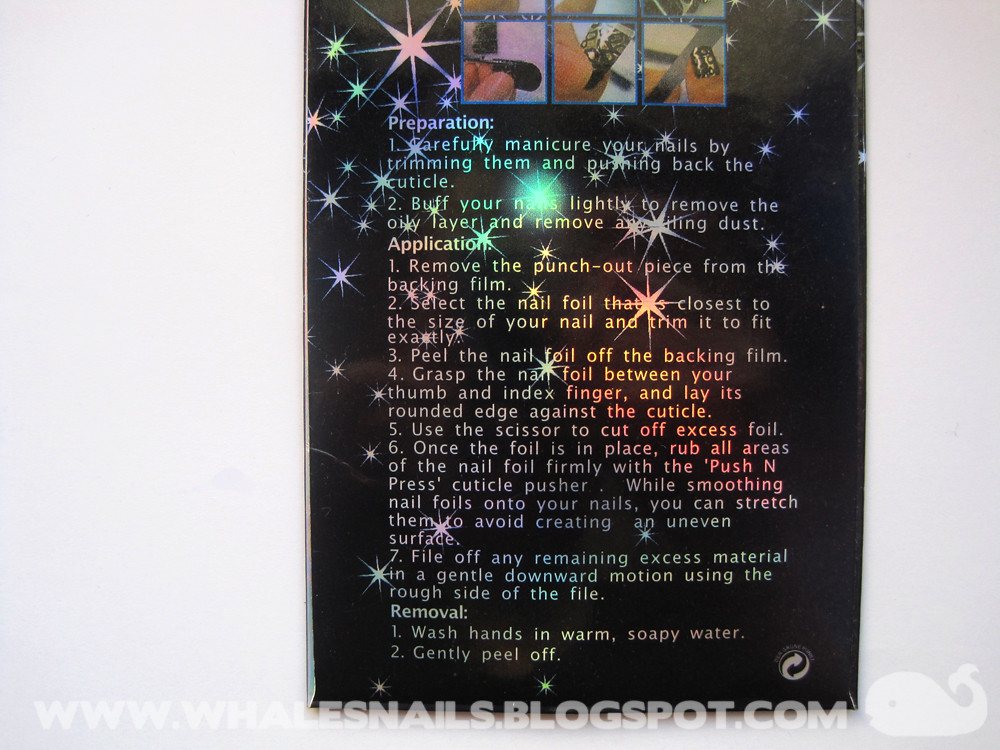
I've never tried nail patch before, but application wasn't very difficult.
Not sure why, but after I took the photos I decided to apply a top coat and my manicure became looking "less metallic".
On the third day of wear I got bored (by the way there were only some tip wear) and just peeled off the stickers. My nails were not damaged in any way, but there were some glue left on them. I tried to remove the glue with nail polish remover and my nails were clean after just a few seconds :).


The nail patch sells for 5,84 $. And if you're buying something on the KKCenterHK you can use codeZEBRA-NAILS for 10% off from your order (until the 31-st of January 2014).


Have a great weekend! :)


*Some of the product(s) in this post was(were) sent me for review. For more information read my Disclosure Policy.

Thank you, zebra-nails
Check out zebra-nails blog
http://zebra-nails.blogspot.hk/2013/06/swallows-from-kkcenterhk.html

2012年11月29日 星期四

Zig-Zag Chevron by chitchatnails

Hello Lovely Ladies,
I hope you are starting the week energized from a good weekend?  I had the weekend off (as did Peter!!!! – rare occurance in our household).  Thanks to my sister and her husband, the kids were well taken care of , and we went for a lovely lunch and then headed to watch “Argo” (what a great sit-at-the-edge-of-your-seat movie documenting a historical event).
On to today’s manicure:

For today, I have a Full Nail Patch review for KKCenterHk :) Thus far I have been showing you their water decals, but I’m quite happy that they carry full nail decals/patches as well.

This package of 16 nail patches can be used to create a full manicure (with a few extras just to make sure that the patches fit the size of your nail), or they can be worn as accent nails (which is the way I intend on using them).
Please NOTE:
These are patches/decals with a ‘glue’ base rather than being made out of nail polish.  What this means is that they will adhere to your nail and can stretch to fit the sides of your nail.  They will also NOT dry out like real-nail polish decals do so you can use one at a time and not worry about having to dispose of the rest of the package ;) BUT, because they are blue based, they also will not wear as long as the promised 12-days of real-polish nail appliques.
* * *
How to:
1. Pick a patch that fits the width of your nail best (you don’t want to pick one that is too wide or you will end up covering your cuticles, a patch that is too narrow will show the sides of your nails.  (There are plenty of sizes to choose from, but you can also just cut along the sides of the decal to make them narrower if you need).
2. Remove the patch and place it (rounded side) against the base of your cuticles.
3. Rub the decal down the center to make it stick, and then towards the edges.  I didn’t realize (until it was too late) that these decals are strong but stretchy so I could have stretched them a bit at the sides to prevent a little bit of lifted edges (that is a first-time user error, not a defect of the product).
4.  When the decal is nice and firmly attached to your nail, use a nailfile to file down the excess from the tip of your nail (I file in a downard motion).
These decals create really neat effects, and are perfect for someone like me who doesn’t have the freehand-precision to create even lines ;)
To create this Skittlette manicure I painted my nails with China Glaze VII;he pinky is a layering of silver glitters.
I continue to be amazed at the wide range of nail-art decals and patches that KKCenterHk carries, you can purchase these full nail patches HERE.
Just a reminder, as always, if you want to purchase any of the neat KKCenterHk nail art supplies, please feel free to use my 10% discount coupon: CHITCHAT
Also, you still have a couple more days to enter my Bundle Monster giveaway, all the info can be found HERE ;)
* * * * *
Did you have a good weekend?
What do you think about this Skittlette manicure?
Have you worn the nail patches/nail-polish appliques?  Do you like them?
THANK YOU FOR READING!


Thank you, chitchatnails
Check out chitchatnails blog
http://www.chitchatnails.com/2012/11/05/zig-zag-chevron/

2012年4月24日 星期二

KKCenterHK Nail Strips: Swatches and Review by goosesglitter

KKCenterHK has some pretty nifty nail patches. The first kind I tried didn't seem to work well on my nails, but these are much better! These are basically very thin plastic strips.

Most nail patches I've tried that are not actual nail polish have been kind of thick and tend to wrinkle because of the curved shape of some of my nails (if you want to see what I'm talking about, check here).  These are different in that they are very thin and flexible, as well as a bit stretchy.  They worked MUCH better for me than the others (although still not quite as nice as 100% nail polish strips).


KKCenterHK Nail Patches
As you can see in the closeup, I got a few tiny wrinkles on some of the nails, but honestly I got better at it with each nail I did, stretching it just perfectly to minimize the crinkles. Just like the 100% nail polish strips, these take a little bit of practice. Overall, though, they're pretty easy and the result is nice.

I didn't get a chance to test the wear - I only wore them for a day. The problem came in the shower... one and only one of the stickers started to peel up on all the edges. The rest were still stuck nice and tight. I'm not sure what I did differently on that finger, maybe I accidentally touched it and ruined the adhesive before I applied it. Not sure. They were easy to remove though. They peeled off easily without doing any damage, and left the adhesive as a film on the nails that came off right away with polish remover.


As you can see, they come in a sealed package like Incoco, but since these aren't nail polish I don't think they dry out after they're opened. I'm saving the extras for accent nails, so I'll update this post when I find out.

Overall, I actually really liked these!  The design is nice (although I wish the little "tail" of black had fit onto my nails), and they'd be perfect for a special occasion or night out.  They were much easier to manage than other nail patches and didn't bother me with rough or peeling edges.

These can be ordered from the KKCenterHK site here, along with lots of other cool nail patches!


Thank you, goosesglitter
Check out  goosesglitter blog
http://www.goosesglitter.com/2012/04/kkcenterhk-nail-strips-swatches-and.html

2012年4月17日 星期二

KKCenterHK N.Nail + X&D nail decals and stickers by spookynails


I suck at using nail stickers and water decals - I'm too impatient and careless. I also didn't noticed that N.Nail stuff I got from KKCenterHK are NOT a water decals - these are very nice nail stickers -.-'. I used a few of them wet and I ruined the whole manicure. So DON'T use any water lol and I think you also don't need any topcoat. I don't like X&D water decals very much - water decals with small pattern are much better (something like that). I had also DIY N.Nail water decals sheets, but I really don't know how to use them - I'm not a water decals mistress :P I cutted N.Nail #108 design because my nail are short and I didn't see masks without cutting stickers. So - stickers are great, full nail water decals are little bit worse.
Jestem antyalentem jeżeli chodzi o używanie naklejek na paznokcie i wodnych naklejek - jestem zbyt niecierpliwa i nieuważna. Do tego nie zauważyłam, że gadżety z N.Nail które dostałam do testów z KKCenterHK to NIE SĄ wodne naklejki tylko bardzo fajne zwykłe naklejki -.-' Kilka z nich nieopatrznie użyłam na mokro i zniszczyłam cały manicure. Więc NIE używajcie z nimi wody lol i w sumie topa też nie potrzeba. Niezbyt mi pasują naklejki wodne X&D - takie małe naklejki wodne (jak tutaj) są o wiele lepsze. Miałam też decalsy DIY (do wycinania) ale kompletnie nie umiałam ich używać - nie jestem naklejkową boginią :P Przycięłam wzór N.Nail #108 bo moje paznokcie są krótkie i bez tego nie było widać masek. Wiec - naklejki są świetne a wodne naklejki są takie sobie.

N.Nail #108


N.Nail #540


X&D #09


this product was sent to me for review / produkt ten został mi wysłany do recenzji


Thank you, spookynails
Check out  spookynails blog
http://www.spookynails.com/2012/04/kkcenterhk-nnail-x-nail-decals-and.html

Naklejki na paznokcie - nail patch by kkcenterhk by trustmyself-make-up

Cześć!

Dzisiaj chciałam Wam zaprezentować jedną z dwóch rzeczy, które otrzymałam w paczce od kkcenterhk, a mianowicie naklejki na paznokcie. Ciekawił mnie ten produkt chociaż recenzji nie ma zbyt dobrych. Czy przypadł mi do gustu? Zapraszam do dalszej lektury.


 W paczce od kkcenterhk otrzymałam sztuczne rzęsy: http://www.kkcenterhk.com/Natural-Lashes/c94/p5287/COSMOS-Five-Pairs-Bright-Series-Of-False-Eyelashes-CN06/product_info.html
oraz rzeczone naklejki na paznokcie: http://www.kkcenterhk.com/Nail-Patch-Checkers-Pattern/c99_159/p5427/nail-patch-16-Pcs-Sticker-For-Fingers-Toes-(M344)/product_info.html


Pewnie każda z nas marzyła o lakierze do paznokci, który będzie wysychał w ciągu paru sekund, jednocześnie będzie super krył, nie będzie odpryskiwał i ścierał się z końcówek przez dłuższy czas. Lakieru takiego do tej pory nie wynaleziono, ale wynaleziono za to naklejki na paznokcie, które mają za zadanie nam go zastąpić. Wybrałam wzór w kolorową kratkę, który przypomina mi motyw przewodni jednego z moich ulubionych domów mody - Burberry.
Za 5,48$ otrzymujemy 16 naklejek na paznokcie o różnym formacie, aby jak najlepiej dopasować je do naszych paznokci. Cała procedura przyklejania obywa się w miarę szybko, jedynym warunkiem są wygładzone i osuszone z tłuszczu paznokcie. I tutaj też zaczynają się schody... Ok, naklejki są w miarę dopasowane do paznokci, chociaż jak i tak musiałam je jeszcze przycinać. Samo naklejanie idzie dosyć sprawnie, ale już wygładzanie powierzchni naklejki jest drogą przez piekło. Wiadomo, że paznokcie nie mają równej powierzchni, toteż i naklejka nie przywiera równo, tworzy zagięcia, które nieestetycznie odznaczają się na jej powierzchni. To, co wystaje ponad płytkę paznokcia "obcinamy" za pomocą pilniczka. Przyklejenie 10 naklejek zajęło mi około 15-20min. Ale sam efekt ani trochę mnie nie zadowolił. Z daleka paznokcie wyglądają całkiem przyjemnie i przyciągają wzrok, natomiast z bliska widać każde załamanie, co już na wstępie dyskwalifikuje ten produkt. Owszem, nie muszą schnąć, bardzo ładnie błyszczą i nie brudzą, ale nie wytrzymują w nienagannym stanie 11 dni. U mnie nie dotrwały nawet do godziny, wystarczyło, że umyłam dłonie wodą z mydłem i naklejki zaczęły się odklejać jedna po drugiej, co poskutkowało tym, że sama je od razu poodklejałam w całości. Tutaj plus - pozbycie się ich z płytki paznokcia jest błyskawiczne i nie trzeba do tego zmywacza do paznokci ;) Szczerze? Nie przykleiłabym już takiego czegoś ponownie, nawet na kilkugodzinną imprezę, czy też sesję zdjęciową. Zawiodły mnie na całej linii, a w dodatku mało nie kosztują.

Moja ocena: 3/10

Liczę na to, że sztuczne rzęsy za to mnie oczarują :)


Thank you, trustmyself-make-up
Check out  trustmyself-make-up blog
http://trustmyself-make-up.blogspot.com/2012/03/naklejki-na-paznokcie-nail-patch-by.html

2012年4月13日 星期五

Ukochane złoto by grzee

Wpadam z recenzją, która czekała na specjalną okazję :)
Mowa dziś o naklejkach na paznokcie od KKCenterHK, w cudownym złotym kolorze imitujące jakby folię aluminiową (? :P). Bardzo ucieszyłam się na widok tych naklejek, bo miałam ogromną ochotę wypróbować takich cudeniek, ponieważ nie raz widziałam w internecie zdjęcia paznokci, które pokrywała warstwa niemalże "lustra" :)
Przyznam szczerze, że miałam obawy w związku z tymi naklejkami, ponieważ już raz miałam do czynienia z innym wzorem, który raczej mnie nie zachwycił... -> Kwieciste Paznokcie


Ilość
Tu naprawdę wielki plus! Nie jest to równo odliczone 10 naklejek, a 16, więc w razie problemów technicznych i destrukcji którejś z naklejek, nie musimy się martwić, bo zawsze jest zapas :)

Wielkość, kształt itd
Posiadam naprawdę małą płytką paznokcia, więc jaki byłby ich rozmiar, kształt itd to i tak musiałabym się nagimnastykować, aby wyciąć odpowiednio naklejkę, ale przyznam szczerze, że nie było tragedii :)
Naklejki są dość duże, co z jednej strony nawet mnie cieszy, bo postarałam się wycinać bardzo dokładnie i tym samym z każdej naklejki została mi spokojnie jeszcze połowa! Więc możliwe, że wytworzę z tego jeszcze jakiś mani :)

Kolor, tekstura
Kolor fenomenalny, prawdziwie złoty odcień! Jestem zachwycona :)
Co do tekstury, byłam przygotowana na to, że powierzchnia będzie idealnie gładka jak folia aluminiowa, jednak jest na niej wyczuwalna (jak i delikatnie widoczna) chropowatość. Nie jest to wielki minus tych naklejek, ale jednak bardziej ucieszyłabym się z gładkiego wykończenia.

Aplikacja
Bajka! Nie ma kombinacji z namaczaniem w wodzie, nakładaniu topcoat aby się trzymało paznokcia, nie ześlizguje się... cudo :)
Lewa strona naklejki jest pokryta klejem, który świetnie się trzyma paznokcia. Jednak trzeba pamiętać o tym, aby płytka była dokładnie odtłuszczona. Wycinamy kształt, przyklejamy, pilniczkiem spiłowujemy odstające poza paznokieć fragmenty i finito! Ja na koniec jednak położyłam jeszcze topcoat, szczególnie na końcówki paznokcia, aby się nie zadzierało.

Trwałość
Nie wymagałam po naklejkach nie wiadomo jakiej trwałości. Na opakowaniu widnieje tekst z obiecującą informacją o tym, że wytrzymują nawet do 11 dniu! Kpina :P
Po 2 dniach większość naklejek była pozadzierana, część odklejała się. Ale i tak jest dobrze, że wytrzymały ten jeden pełny dzień.

Ocena:


Jestem zachwycona efektem, jaki zapewniły te naklejki.
Pięknie mieniące się paznokcie, które odbijają światło. Cudo cudo!
Paznokcie były "imprezowe" i wiele osób z zachwytem oglądało moje pazury :)
Dodatkowo na tę okazję pomalowałam końcówki na turkusowy french
(aby pasowało do makijażu) - efekt nieziemski!


Jeśli zdecydujecie się na zakupy w sklepie KKCenterHK,
możecie uzyskać 10% rabatu!
Wystarczy podczas zamówienia podać kod, który brzmi "Grzee"! :)


Thank you, grzee
Check out  grzee blog
http://grzee.blogspot.com/2012/04/ukochane-zoto.html

2012年3月12日 星期一

KKcenterHK Foil Nail Decals Review by goosesglitter


After trying out their French tip water decals, KKcenterHK sent me a couple more of their nail decals to review. These here are some of their foil decals:


I liked this design because it looked very "holiday" to me. It even kinda looks Dr. Seuss-ish - like wrapping paper you'd see in How the Grinch Stole Christmas. I'm not sure why it's listed under "flags," but it is. Here is the link to the product itself: M032


These applied like most other nail patches, except with these I had a bit of trouble with wrinkling. For the most part they look nice, and it's only up very close that you can even see the wrinkles. The photos show the gold parts as being a bit lime green, and they do show that color at some angles, but for the most part, the "ribbons" just look like a soft gold.

So here's the deal: they went on perfectly on some fingers (like my ring and pinky) and not so well on the others.  The difference is that my ring and pinky are "flatter" from cuticle to tip, like this:


My other fingers (middle, pointer, and thumb) are all more curved and that caused the foils to wrinkle up a bit.  See the curve?


The bottom line is, if your nails are nice and straight from cuticle to tip, then these will probably work very well for you.  However, if your nails are curved like some of mine are, then they'll most likely end up with a few little wrinkles on each nail.

That said, if you can handle the wrinkles, these would be pretty awesome for a Christmas party or a night out.  The package claims 11 days of wear (I don't know if I believe that, because the wrinkles keep them from sticking down tightly), but I don't know if I could handle them for everyday wear anyway.  The thing that bothered me the most was the feel of the tips when I put my hands in my pocket - it was kind of a weird scratchy feeling.

Also a note:  Once I realized they were wrinkling, I tried using heat from a hair dryer to make them a little more elastic, and it seemed to help if I held the heat on right after applying it, before pushing all the edges down.  But it didn't help entirely.

Overall, I think these are pretty cool, but only really for a special occasion, not for everyday wear.  For pretty designs on my nails all the time, I'll go for Incoco or Sally Hansen Salon Effects (I have GREAT success with the 100% nail polish strips).

If you want to try these or any other nail decals, they can be found at KKcenterHK's website.

(These were sent to me for review.)


Thank you, goosesglitter
Check out  goosesglitter blog
http://www.goosesglitter.com/2011/12/kkcenterhk-foil-nail-decals-review.html

Heavy Metal Platinum Nails by monroemisfitmakeup


Wore these fab silver metal mirrored nails last night to see Sleigh Bells. Love how shiny they are!

Photobucket Photobucket Photobucket
The Details:
  Platinum Metal Silver Nails from kkcenterhk (sample provided)
Black PVC fingerless gloves from Hot Topic


Thank you, monroemisfitmakeup
Check out  monroemisfitmakeup blog
http://www.monroemisfitmakeup.com/2012/02/heavy-metal-platinum-nails.html

2012年3月10日 星期六

Nail patch - silver/black by whalesnails

I've got a funky nail patch set from KKCenterHk, metallic silver with thin black stripes...loveliness. These are not water decals but regular stickers (I've  just learnt it's good to use a hair dryer to blow some hot air onto the patches, so that the glue is more sticky). Basically application is rather easy and I had problems only with one nail (index finger), which seems to be more convex than the rest. The cool thing is that you have 16 'nails' in one set, so it's not the end of the world if something goes wrong. I love love love this metallic effect, there's no nail polish like that. Apparently, it is supposed to last for 11 days on nails, I cannot imagine wearing any mani for 11 days...but surely, this is a great party look. I took a photo of instructions, so there's no point in rewriting them, just have a look at the photo at the end.
You can check more patches here.  Choice of designs is wild. :)
                                                                             *  *  *
Dostałam zestaw super nalepek na paznokcie z KKCenterHk, metaliczne srebro w cienkie czarne paski...są czasowe. To nie są wodne naklejki, tylko takie zwykłe (dowiedziałam się, że można nadmuchać na nie ciepłym powietrzem z suszarki, żeby klej lepiej łapał). Ogólnie naklejanie nie było jakieś trudne, miałam problem z jednym paznokciem (wskazującym), który jest chyba trochę bardziej wypukły niż reszta. Fajne w tym zestawie jest to, że macie 16 'paznokci', więc nie ma tragedii jeśli coś nie wyjdzie. :) Jestem zachwycona tym metalicznym efektem, żaden lakier taki nie jest.  Na opakowaniu jest napisane, że nalepki wytrzymują do 11 dni...nie umiem sobie wyobrazić noszenia jakiegokolwiek mani przez 11 dni...ale to na pewno super paznokcie na imprezę. Na końcu wrzucam zdjęcie instrukcji.

Tutaj możecie obejrzeć więcej nalepek. Wybór wzorków jest szalony. :)


Ogólnie należy dobrze przygotować płytkę przed naklejaniem, można lekko zmatowić, a przede wszystkim odtłuścić.
Wybieramy odpowiednie rozmiarowo nalepki, odklejamy i przylepiamy zaokrąglonym brzegiem od strony skórek.
Nożyczkami odcinamy nadmiar folii, dociskamy do płytki np kopytkiem (chociaż mi wygodniej było po prostu palcem). Jak już dobrze się trzyma, wyrównujemy wszystko dobrym pilnikiem. Możemy dodać top coat żeby przedłużyć życie nalepek, bo zmywają się wodą z mydłem. Odchodzą bez problemu, a klej łatwo się zmywa.


Thank you,
Check out whalesnails blog
http://whalesnails.blogspot.com/2012/03/nail-patch-silverblack.html

2012年1月16日 星期一

KKcenterHk nail patch by makeupmylack

Innan nyår fick jag dessa nail patches från KKcenterHK hemskickade.

De kommer förpackade i set om 16 fullnageldekaler för att passa alla nagelstorlekar och kostar USD$5.48, vilket motsvarar ca. 39,50kr


Tyvärr verkar inte inte dessa passa mina naglar, och då menar jag inte storleksmässigt, utan de vill inte bli släta över mina rätt kurviga naglar.
Detta är min kurvigaste nagel, vänster pekfinger, de andra är inte fullt så böjda.


Såhär blev resultatet:

Hur mycket jag än försöker släta och pressa ut "vecken" höjer de sig igen efter två sekunder.
Jag har även dragit lite i nagelfolien med hopp om att släta ut vecken, men då har vecken hamnat någon annan stans istället.

Jag har sett flera lyckade manikyrer med dessa "nail patches", men även resultat som liknar mitt.
Har man en rak nagel, som växer mer rakt ut (fram?), eller hur jag ska förklara, verkar resultatet bli toppen.

Jag tycker det ser så grymt ut på många andra, men just dessa passar tyvärr inte mina naglar.
Jag har ett set till som jag tänker prova om ett tag igen, tills dess håller jag mig till nagellack:)

Är ni intresserade av något från http://www.kkcenterhk.com ,
så har jag en kod till min läsare som ger er 10% rabatt fram till den 31 januari
Kod: BLGA35BR10


Thank you, makeupmylack
Check out makeupmylack blog