顯示具有 NPM (Brand) 標籤的文章。 顯示所有文章

2013年1月9日 星期三

Spoiled by Wet N Wild Don't Be Cheesy Halloween Mani (plus Nail Stencil Review!) by kimberslacquerkorner


Morning Ladies! Happy Wednesday!

Since it's officially Halloween season, I have my first Halloween mani to share with you today! Recently Maggie from KKCenterHK sent me some products to review. One of the products that I chose was a really cute cat stencil. I dig black cat manis (obviously, this is only the 3rd I've posted on this blog!), and this cat stencil was purr-fect for a Halloween manicure.

These stencils are very different from your run-of-the-mill sticker style stencil. They are a red silicon type material that really molds nicely to the shape of the nail, creating a crisp, clean image. They actually molded almost perfectly to my nails, which is a feat since I have a very pronounced C-Curve. I wasn't expecting to like these, since I've used other Nail Stencils with horrible results, but these babies really work well.

I decided to pair them with Wet N Wild Don't Be Cheesy, a really awesome yellow/Orange, as my base color, and used Finger Paints Black Expressionism for the stencils on my Thumb and index fingers. Then I added some bats on my middle finger and pinky using Bundle Monster plate BM213 and Konad Black. I LOVE how this came out!


Here's a macro shot of the stencil on my index finger:


I am loving these like woah! Cats and bats - my Halloween faves! I have to admit, I really do not want to take these off tonight.

Don't Be Cheesy is a surprise fave as well. This color kind of reminds me of the cheese you get on Movie Theater Nachos. Not a color I would normally have chosen, but I am really digging it! It also had a perfect formula and easy peasy application. Bonus!

These are the stencils I used for the cats:


Aren't these just adorable? At first I thought they would be stickers, but nope. Silicon type stencils. They have a half moon shaped curve at the bottom, which leads me to believe they are designed to placed facing you, but I am a rebel (haha) and used them facing away so other people don't have to try to flip their heads upside down to see them. They were easily placed, conformed to the nail nicely, and peeled off easily. Quick and easy to use - that makes Kimber a Happy Panda! These retail for $2.67 and can be found at KKCenterHK Online Store, Product Number NPM-M041, or click the picture above! For 10% off, use my link on my sidebar and enter code KimbersKorner at checkout.

Thanks for stopping by and Happy Polishing!
-Kimber

**Nail Stencils provided by KKCenterHk for review purposes. For more information, please see Disclaimer/Legal tab**

Thank you, kimberslacquerkorner
Check out kimberslacquerkorner blog
http://www.kimberslacquerkorner.com/2012/10/spoiled-by-wet-n-wild-dont-be-cheesy.html

2012年11月30日 星期五

Nail Art, Printing Mode, Cat by happynailsbymada

Witam Was :) Dzisiaj cieszę się bardzo bo pomimo tego, że to jest weekend na uczelni dzisiaj skończyłam o 11:45 zamiast o 20:15. Jest różnica :D
Chcę Wam zaprezentować coś co dla mnie jest czymś nowym. A mianowicie szablon do wzorków. Ja mam w kształcie kota, bardzo uroczego kota. Ale po przetestowaniu stwierdzam, że wolę płytki do wzorków. Po pierwsze dlatego, że płytki można użyć wiele razy i się nie zużywa. A tu, jeśli chcecie mieć koty na każdym paznokciu to się nie da, ponieważ w zestawie nie ma tylu szablonów. Ponad to lakier się trochę rozmazuje i trzeba bardzo uważać przy zdejmowaniu szablonu - zdarza się, że pęka :( Ale jeśli wszystko się zrobi szybko i sprawnie to efekt jest całkiem przyjemny :) ja kota polubiłam :)


base color - Anny, Spicy Thing | kolor bazowy Anny, Spicy Thing
 
Accessibility | Dostępność: HERE

This product was made ​​available to me for review by the KKcenterHK company.
Ten produkt został mi udostępniony do recenzji przez firmę KKcenterHK.


Thank you, happynailsbymada
Check out happynailsbymada blog
http://happynailsbymada.blogspot.hk/2012/10/nail-art-printing-mode-cat.html

NOTD: purple dolphins by beautybymissl


Hi!
So here is a little NOTD post for you. I used three different purple nail polishes and Nails printing mode Dolphin/Porpoise Nail Printing Mode from KKCenterHK. 
and a close-up
Using this printing mode from KKCenterHk was easy and this time I was better at it then the previous time  (HERE). 
And the polishes I used for this design:
-Orly Nailtrition as a base coat
- W.I.C by Herome Kontiki Beach
- Models Own Pinky Brown
- Models Own Magneta Divine on my ringfinger
- INM OTD top coat
Why did I do this purple manicure? Read on...
Bullying is not funny. It is not cool. It is not right. And more importantly, it is not okay.
Most of us are, thankfully, residents of countries that support tolerance and many of our families have settled in these places simply for that reason. Generations later, it is our responsibility to perpetuate that message of tolerance across our new social platforms, including the internet.


As members of the nail polish blogging community, we all share a love of beauty, color, and lacquer. Other than that, we are remarkably different: from our race to our religion to our hair color...even to our polish application techniques. To marginalize anyone because of those differences is completely unacceptable and today I take a stand against that. I refuse to allow other people's view of "normal" dictate how I behave, believe, and blog. 

In solidarity with a multitude of bloggers linked below, my purple manicure represents my proud commitment to the No H8 movement. Today, November 8, I dedicate my post to ending bullying of any kind and to encouraging diversity and imperfection among our colorful community.


Thank you, beautybymissl
Check out beautybymissl blog
http://www.beautybymissl.com/2012/11/notd-purple-dolphins.html

Veckans naglar: Guld, glitter och en rosett by adaras

Först ett lager med Orlys Flare, sedan ett lager med det underbara glitterlacket Halo. För att piffa till det ytterligare testade jag mina "Bow nails printing mode" från KKCenterHk. Om du är skillad skulle du lätt kunna göra rosetter på fri hand, men jag tycker alltid det är så svårt att göra på den högra handen. Här är mallarna extra smarta då du snabbt kan fixa mönstret du är ute efter.
 
Jag tycker dock att det var lite pilligt att ta bort mönstret från nageln. Eftersom det är små detaljer får man vara extra försiktig så att inte mallen förstörs. Jag föredrar jag faktiskt nail art stamping eller vattendekaler. Men det är såklart alltid kul att testa nya saker.


Thank you, adaras
Check out adaras blog
http://adaras.se/2012/november/veckans-naglar-guld-glitter-och-en-rosett.html

2012年8月9日 星期四

Zoya Kimber & KKcenterHK Printing Mode by mylifeinpolish


Sun
Hey Everyone!  How's it going?  Sorry for the lack of posts lately.  Hopefully now that school has started my posting will pick up some.  So today I have a review of the nail printing mode from kkcenterhk.com.  I know it's a weird name but really it's a stencil for your nails.  Here's the link for the ones I used for this manicure.  Basically you paint your nails and make sure they're dry.  I used a quick dry topcoat and just waited a bit.  Then peel the stencil off the paper backing, stick it a few times to your hand to remove some of the sticky and place it on the nail where you would like it.  They come with different sizes to accommodate different nail sizes.

Shade

For this I used three coats of Zoya Kimber, a bright hot pink foil from the Surf Collection.  I still had VNL after two coats.  After that was dry I placed the stencil.  Using Zoya Zuza I painted over it.  Then quickly pull up the decal.  You can see that some of the flower petals are misshapen.  That is completely my fault.  I realized to late that it wasn't stuck down completely.  I did a second flower using  Zoya Trixie that came out much better.  The nail printing modes are one time use but because I'm just using them for accent nails they will last a while.  I will definitely be picking up some more of these soon.  If you order from kkcenterhk use the code mylifeinpolish to save 10% through Jan 31, 2013.  I don't get referral credit or anything I just want you all to save some money.

Shade
Have a great day!

Sara


Thank you, mylifeinpolish

Check out mylifeinpolish blog

http://mylifeinpolish.blogspot.hk/2012/08/zoya-kimber-kkcenterhk-printing-mode.html

2012年8月1日 星期三

KKCenterHK Nails Printing Mode Review (NPM-M030) by zebra-nails

 Together with nail decorations from the KKCenterHK I've got NPM-M030 nails printing mode with the dolphin design.
As a base for this manicure I used my favourite holographic nail polish China Glaze Kaleidoscope Him Out.
Usage of "printing modes" was easy. I followed the instructions that were on the back side (below you can see the instruction on the photo).
I also have to say that "printing modes" are rather thin so you should be carefull when you apply them.

I'm wearing this manicure now and I'm loving it <3.


You can purchase this nail printing mode for 2,67 $ on the KKCenterHK.
Don't forget that you can use code: BLGA350IR10 for 10% off.

*Some of the product(s) in this post was(were) sent me for review. For more information read my Disclosure Policy.


Thank you, zebra-nails

Check out zebra-nails blog

http://zebra-nails.blogspot.hk/2012/07/kkcenterhk-nails-printing-mode-review.html

2012年7月27日 星期五

Nail Art attack ♥ Water Decals Review by thetouchofyellow

 How are you? Today I'm gonna post a sponsored review from KKCenterHk. They sent me 3 nail art products for review purposes.

This is my first time to try the water decals, and to tell you the truth at first I didn't really know how to use it. hahahaha So I researched on how to use it, luckily I found many reviews and youtube videos they really saved me. LOL


Product Description
Indication:
Can Be Placed On The Nails' Surface And Decorate Nails Freely
Water Transfer Sticker
Easy To Apply, Zero Dry Time!
Water Decals are Not Sticky!

Pattern: Princess Love With Pink And Black Hearts
Price: USD 6.39
Available at: KKCenterHk

How to use Water Decals
(I apply water decals on polished nails)

1. Peel off the plastic cover before use.
2. Size the decal with your own nail. Cut off the decal which has the best fit with your own nails.
3. Prepare a cup/bowl of water and dip the water decal into it.
4. Use tweezer to pick up the decal after a few minutes.
(The water decal will silde off the paper if you dipped it successfully.
If not, the decal will not slide off the paper - dip again until it sildes off).
5. Place the water decal on your nail and adjust the position.
(In this step, be careful. The water decal will be movable as it is still wet.
If it is drying on your nail, put a few drops of water on it and you can
continue to adjust the position.
6. Dab excess water with tissue paper when the decal is in psition.
7. Carefully file off any excess decal and apply top coat.
*Credits to Piece of Pie*


The outcome 3 was my sisters nails hahahaha she's envious of my nails so I decided to nail art her too. And she loved it Also, I did tried on her the Nail printing mode since it has 1 excess piece I only need 10 pieces but it has 11 so its not problem.

Check the outcome 3 on her right hand middle finger.

I didn't see the full effect of it because her middle finger doesn't have a base coat. But as you can see, the star is really visible. This is what it looks like.

I decided to make this my next nail art. I will try it with white coat to see what it'll look like


Thank you, thetouchofyellow

Check out thetouchofyellow blog

http://thetouchofyellow.blogspot.hk/2012/07/nail-art-attack-water-decals-review.html

Nail art Stickers - Pussy on my Nails (nails of the week 6) by ourexternalworld

 Another nail post you say? Well yes but this time I'm trying something very different - nail printing stickers from N.Nails

I got these stickers (with a pussy shaped cut out) from KKCenterHK.com
They are priced at US$2.67 (approx Rs147) The pack contains 10 stickers good enough for both hands (and one extra - so a total of 11 stickers)

Nail Printing Mode - Pussy Stickers
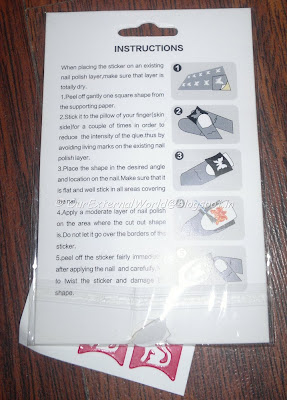
The stickers come in a convenient packaging. The ones I have are red in colour (colour of the sticker does not matter). The instructions on how to use them are clearly listed on the back of the pack.
Nail Printing Mode - Pussy Stickers - instructions
Nail Printing Mode - Pussy Stickers - Instructions


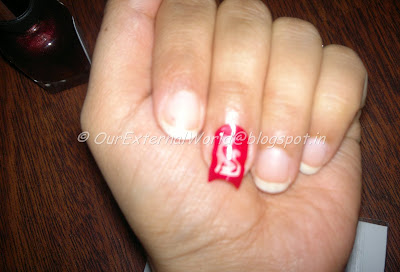
Here is the final look I created with the stickers.
Nail Printing Mode - Pussy Stickers
Nail Printing Mode - Pussy Stickers - final look
And now for the step by step procedure.

You start off by applying any base colour to the nails and let it dry completely. I painted my nails with a clear paint as the base coat.

Step 1. Gently take off a sticker from the pack. The stickers are almost like soft plastic which you need to take off carefully specially if the design is a bit intricate (like the tail of the pussy in my case). Choose the sticker based on its size and the finger you are applying it to.
Nail Printing Mode - Pussy Stickers
Step 1: Nail Printing Mode - Pussy Stickers
Step 2. Stick the sticker on the inside of your thumb to reduce the amount of glue the sticker has. This step is important so that when you take off the sticker from the nail it comes off easily. If there is too much glue it will become difficult to take it off.
Nail Printing Mode - Pussy Stickers
Step 2: Nail Printing Mode - Pussy Stickers
Step 3. Place the sticker on your nail (sticky side down) placing the pattern as desired. On my thumb I placed the pussy slightly towards the side whereas on the centre finger I placed it bang in the centre.
Nail Printing Mode - Pussy Stickers
Step 3: Nail Printing Mode - Pussy Stickers
Step 4. Take your desired nail paint and simply paint in the cut out pattern covering it properly with a single stroke. Let it dry for about 10 seconds and then gently remove the sticker off the nail.
Nail Printing Mode - Pussy Stickers
Step 4: Nail Printing Mode - Pussy Stickers 
Volla! You have your pattern neatly painted on your nail!
Nail Printing Mode - Pussy Stickers
I did mine one by one but you can easily put the stickers on all your nails at one go and then simply paint them all. This way it would be faster.


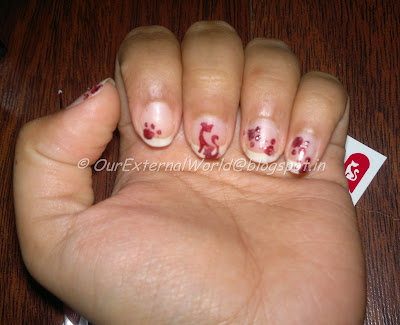
You can also add other patterns around the main pattern. I added pussy foot prints randomly on the rest of the nails.
Nail Printing Mode - Pussy Stickers
I thoroughly enjoyed doing this and will surely try it again with a different color combination (and maybe I will put pussies on all my nails next time :) )


Handy Tip: try and use a nail paint that is not too thick and don't let the sticker sit for too long on the nail after painting it - both these tips will make sure that the pattern comes out neat and clean.


Thank you, ourexternalworld

Check out ourexternalworld blog

http://ourexternalworld.blogspot.hk/2012/07/nail-art-stickers-pussy-on-my-nails.html