2013年2月8日 星期五

N.NAIL Chinese Camellia Japonica Surmount Difficulties Nail Art

N.NAIL Chinese Camellia Japonica Surmount Difficulties Nail Art
http://www.kkcenterhk.com/p10364/N.NAIL-Chinese-Camellia-Japonica-Surmount-Difficulties-Nail-Art/product_info.html

2013年2月4日 星期一

Thermidor Brand A Pair Dazzling Party Glitter False Eyelashes

Thermidor Brand A Pair Dazzling Party Glitter False Eyelashes
http://www.kkcenterhk.com/p10220/Thermidor-Brand-A-Pair-Dazzling-Party-Glitter-False-Eyelashes/product_info.html

KKCenterHk: Water decals by mateja-nails


KKCenterHk: Water decals

Hello

Quite some time ago I got this water decals in review and today I'm sharing it with you.

I believe you all know about KKCenterHk. If you haven't you definitely must. Click here to visit their shop.
In the shop you will find all sorts of things for your nails to make up, false lashes and wigs and other amazing things.

In front of you are water decals from N.nail and you can find it here. It is set of 20 decals in blue colors with flowers and bows.


Before you start putting decals on your nails make shore that your nails are ready. Apply polish and let it dry completely. If you want you can add a layer of top coat, but it is not necessary since you need to seal decals at the end with another layer of top coat.

So how to use it:
First take of the clear foil that is protecting decals.


Than chose desired pattern and cut it out.


Now you will need a small container with room temperature water. Let the piece that you previously cut out in the water for a few second. Take it out of the water and careful separate it from paper base 


The last thing to do is put it on the nail. Now let it dry so there is no water. And seal it with a layer of top coat.


Water decals are super easy to use. So if you want to have sort of nail art on your nails, but don't have time, resources or patience to do it, this is a great solution. Also good thing is that you can manipulate with them a little more than with nail stickers. For example if you don't like it on current position you can move it around. But only for a short time, after it dries you can only destroy it with moving around.


If you like this water decals or would like to see other you can get them on KKCenterHk.


* The products in this post were provided for review. This in no way influences my opinion. I always do my best to provide my clear and honest opinion.


Thank you, mateja-nails
Check out mateja-nails blog

http://mateja-nails.blogspot.hk/2013/01/kkcenterhk-water-decals.html

Glow In The Dark 3D Nail Art Sticker Review & NOTD by ourexternalworld


Glow In The Dark 3D Nail Art Sticker Review & NOTD

Yes yes you read it right - I did get my self some nail art stickers, glow-in-the-dark kind. And the fun part is that I had completely forgotten that these are glow-in-the-dark, so I was admiring my nail art at night just before dozing off when Mr Husband turned off the lights and I almost screamed at my own nails. No no they don't look scary at all its just that they took me completely by surprise!

So here you go, take a look at my nail art and enjoy. I love the way this nail art turned out - all soft pink and romantic.

Romantic Nail Art Using 3D Nail Art Stickers

3D Nail Seal - Glow In The Dark Nail Art Stickers

The stickers used are from kkcenterhk.com and they have a large variety of stickers available on their website. These stickers come in a cute pink packing. Usage instructions are clearly mentioned on the back of the pack. Simply take off the sticker and apply to your nail, press firmly and then top with a top-coat.
3D Nail Seal - glow in the dark nail art stickers
Instructions on How To Apply Nail Art Stickers

Products Used

On my nails I used a mauve shade of nail paint by Cameo (reviewed HERE HERE), over that I used one coat of Sally Hansen Diamond Strength Nail Paint in shade Fairy Tale Ivory (reviewed HERE). Once that dried off I applied the 3D nail art stickers. Then I topped it off with a top-coat by Orly (seen HERE)

Some points to remember:
1. Let the base coat dry completely before placing the sticker
2. Press firmly and ensure all edges of the sticker are stuck to your nails before applying top coat.

Its been almost a week since I have them on my nails. With some household chores two stickers came off (the ones I applied to the nail while the base coat was still wet and hence could not press the sticker firmly)
3D Nai Seal - Glow In The Dark Nail Art Stickers

I could not capture the glow-in-the-dark effect properly but this is how it looks (photo is taken from google to give you an idea)
chuska glow in the dark 3D
Glow In The Dark Nail  Art
image source: http://www.nailsmag.com/style/nail-art/archive/45867/chuska-glow-in-the-dark-3d?p=75

Enjoy more pics of this nail art.
3D Nai Seal - Glow In The Dark Nail Art Stickers
Do let me know if you liked this nail art or not - I think this is the easiest way to dress up your nails!

Thank you, ourexternalworld
Check out ourexternalworld blog

http://ourexternalworld.blogspot.hk/2013/01/glow-in-dark-3d-nail-art-sticker-review.html

Myviven GN32 by nailderellanails


Myviven GN32

Hello,

I have a very pretty polish containing star-, heart-, and flower-shaped glitters, to share with you today! This polish is from the brand,Myviven and its "name" is GN32.


I tried 2 different combinations, one over a bright red and one over black.


First combo is with Purple Professional 21, a hot orange-red creme. I used 1 coat of Myviven GN32.


And I also tried it over A England Ophelia.


Final verdict: I was really suprised and pleased with this polish! I love the iridescent glitters in it. It looks very delicate and cute! Over black, it looks like you have a glaxy painted on your nails! I also appreciate the heart-, star-, and flower-shaped glitters but they were difficult to get out of the bottle, especially the flowers. To catch them, I had to use a toothpick that I dipped into the bottle. The consistency of the polish was also a bit thick.

If you know a polish with flower-shaped glitters that are easy to get on the nails, tell me, please becaue I love this type of glitters!


Purchase info:
Myviven polishes as well as other nail art supply are available at KKCenterHK. This polish is listed here.

For KKCenterHK, you can use my coupon code "nailderellanails" to get 10% off your order. Just enter "nailderellanails" at the check out to get 10% off.
 

Thank you, nailderellanails
Check out nailderellanails blog

http://nailderellanails.blogspot.ch/2013/01/myviven-gn32.html

Baby Queen Eyelashes KKCenterhk by oanna-w.blogspot


Baby Queen Eyelashes KKCenterhk


Hei girls!
Deşi nu sunt o mare specealistă în materie de make-up,pot să afirm că mă descurc binişor la aplicarea genelor false.Deşi la început mi se păreau imposibil de aplicat,acum am devenit expertă şi în mai puţin de un minut le pun la ambii ochi..Am adunat cam 40 de perechi,majoritatea primite de la KKCenterhk,care mi-au propus din nou să-mi mai aleg un model pentru a le face review.Puteţi vedea celelalte perechi de gene de la ei aici ,aici şi aici.
Dintre toate pe care le-am testat până acum,cele pe care vi le arăt astăzi sunt preferatele mele.Vă întrebaţi de ce?Pentru că sunt foarte,foarte comode,nici nu le-am simţit pe ochi după ce le-am aplicat.
Banda lor este subţire,sunt flexibile şi se dau foarte uşor jos.Pun o dischetă cu demachiant pe ochi,o las cam 5 secunde şi se dezpilesc singure.Dacă am grijă de ele şi le curăţ cum trebuie,rezistă cam 4-5 purtări.Se mai pot folosi şi după,dar îşi pierd din formă şi nu se mai aplică chiar atât de uşor.Setul Baby Queencostă 21 de$,adică în jur de 7 lei perechea.Dacă sunteţi începătoare pe acestea le recomand dintre toate încercate până acum
Cum arată aplicate:
Le-am scurtat puţin pentru că sunt mai lungi decât ochiul meu,dar în rest mi se par perfecte,nu am ce să le reproşez.
PS:Până pe 31 ianuarie 2013, folosind codul oanna-w, aveţi reducere de 10% la orice comandă de pe site.
 
Vă plac genele false?Le-aţi încercat pe cele de la KKCenterhk?
Oanna


Thank you, oanna-w.blogspot
Check out oanna-w.blogspot blog

http://oanna-w.blogspot.ro/2013/01/baby-queen-eyelashes-kkcenterhk.html#.UQ8I_x03uqw

Baby Queen 522 Lower False Eyelashes Review by cosplayrune


Baby Queen 522 Lower False Eyelashes Review

I'm currently making this review before I go to sleep. Good thing I have the day off from work tomorrow~

So here goes! (ノ^_^)ノ

KKCenterHK has been my number one choice for pretty false lashes. They have a lot of designs that are not available locally. Quality-wise, false lashes by KKCenterHK are durable and light weight which makes it perfect for my cosplays and photoshoots. (ღ˘⌣˘ღ)

Photobucket

They recently sent me this set of lower lashes by Baby Queen. And I must say, if you'll check the site, most of the false lashes under this brand are out of stock! I'm lucky I get to review this false lashes! (´▽`)

Photobucket

Eventhough the product was sent for review, this post will contain my honest opinion about the product.

Photobucket

The Baby Queen 522 Lower False Eyelashes are handmade but made up of synthetic fibers. The lash band is thin and transparent. 

Photobucket

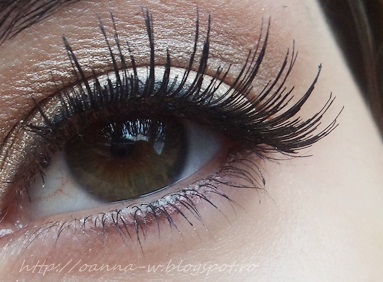
The lash fibers are thin on the inner side, which gives it a soft and natural look to the eyes. The outer part has thicker lash fibers which gives off a dolly-like effect. I love both effects! “ヽ(´▽`)ノ”

Photobucket

Since its made of synthetic fibers, they somewhat look shiny but are not that noticeable unless someone look closely unto your eyes to check. 

Photobucket

I love the transparent lash band which makes it look like you really have nice lower lashes, rather than wearing fake ones. (ノ゚▽゚)ノ

Photobucket

The length of the lower lashes is just fine. I really adore spiky false lashes! (ノ≧∀≦)ノ

So sorry for my poor facial makeup. This was simply a trial eye makeup for my future cosplay. Fufu~

Would I recommend this?

If you want to look dolly, I recommend this false lashes! It only costs $12.20 for a box of 5 false lashes. A pair would only cost $2.44 or just around P100! I suggest you buy or save up for more lashes so you can save up on shipping cost.

Or, you can use my discount code CosRune to avail a 10% off on your puchase. ( ̄▽ ̄)ノ

Hope they will restock this lower false lashes soon though~ (T▽T)

Anyway, Oyasumi~ Σ( ̄。 ̄ノ)ノ


Thank you, cosplayrune
Check out cosplayrune blog

http://cosplayrune.blogspot.hk/2013/01/baby-queen-522-lower-false-eyelashes.html

♡.*SNOW GIRL + NEW LASHES (KKCENTERHK)♡.* by cocothechoco


♡.*SNOW GIRL + NEW LASHES (KKCENTERHK)♡.*


Today I'm going to review these ES lower lashes that I received from KKCenterHk
I've actually had them already for some time to check the durability and how well they stay on etc. to have actually worn them to make this review as accurate as I just can


Tänään arvioin nämä ES:n alaripset, jotka sain KKCenterHk:lta
Minulla on ollut nämä jo vähän aikaa, koska olen halunnut kunnolla testata näiden kestoa ja kuinka hyvin pysyvät yms. tehdäkseni mahdollisimman hyvän arvion

Here is my snow girl look!

ES Brand 10 Pairs Clear Liner Cross Under Lower Eyelashes [ES-A021] 

ES Brand 10 Pairs Clear Liner Cross Under Lower Eyelashes [ES-A021] 

Here are the lashes! 
Total 10 pairs of lovely lower lashesI chose these because they had a clearlashband and the design reminded me of Dolly Wink's lashes


Tässä siis nämä ripset!
Kokonaiset 10 paria ihania alaripsiäValitsin nämä siksi kun näissä oli kirkasripsinauha, ja koska minulle näistä tuli mieleen Dolly Winkin ripset


Here I am wearing the lashes


the GazettE on the background XD


Close-up from the lashes!
Lower lashes ES - Upper lashes Fairy Lash Drop Eye


Here is my Snow Girl themed coordinate


Hat: Lindex - Poncho: Liz Lisa - Skirt: Liz Lisa - Boots: Yumetenbo

Review

Overall I really liked the lashes! The lashband is clear and flexible which makes them easier to apply. What I liked the most about the lashes is that the lashband is really wide so these are great for really big eyes! The lashes are not that long from the inner corner, but as I had to cut the lashband shorter to fit better to my eyes, I did it so from the shorter lash side. Only minor flaw is that the lashes are thick and non-flexible. When I apply these I have to sort of keep them in place when the glue dries, otherwise these bend flat against my skin. 
I have tried these with both light and dark makeup and they look great in both! 

Kokonaisuutena pidän näistä ripsistä paljon! Ripsinauha on kirkas ja joustava, se tekee näiden liimaamisesta hieman helpompaa. Eniten näissä ripsissä pidin siitä, että ripsinauha on todella pitkä, joten nämä käyvät hyvin isohinkin silmiin! Itse ripset eivät ole niin pitkät, varsinkaan sisänurkan puolelta, mutta koska jouduin itsekin lyhentämään ripsinauhaa että mahtuvat paremmin, leikkasin sitä juuri sieltä lyhyiden ripsien puolelta. Ainut pieni miinus näissä ripsissä on se, että itse ripset ovat todella muovimaiset ja jäykät. Ainakin itse joudun pitämään näitä tietyssä asennossa liiman kuivumisen aikana, koska muuten ne löpsähtävät ihoa vasten. 
Olen kokeillut näitä ripsiä sekä tumman, että vaalean meikin kanssa, ja kumpikin näytti hyvältä!

Review: ♥ ♥ ♥ ♥ 4/5


 Get these lashes from
KKCenterHk!


Get -10% off with
this unique coupon
code:
cocothechoco

Thank you, cocothechoco
Check out cocothechoco blog
http://cocothechoco.blogspot.fi/2013/01/snow-girl-new-lashes-kkcenterhk.html