顯示具有 XIN DAI (Brand) 標籤的文章。 顯示所有文章

2013年1月28日 星期一

KKCenterHK Review - X&D Full Nail Art Water Decals XD-75 by raggio-di-luna-nails


KKCenterHK Review - X&D Full Nail Art Water Decals XD-75

At the end of last year I received a very kind offer from KKCenterHK to review one of their products. They really have so many interesting products, you can spend hours on their web site... :-) 

Of course, the most interesting things for me were nail products :-) and the products that captured my attention were full nail art water decals...  :-) 

I chose X&D Full Nail Art Water Decals XD-75 with a beautiful blue swirl design! :-)

X&D Full Nail Art Water Decals XD-75

X&D Full Nail Art Water Decals XD-75

The packaging contains 10 water decal images in different sizes.
On the back of the packaging there are the instructions.

The procedure is:
1. cleaning the nail surface
2. cutting the image with scissors
3. placing the decal images on the water for 10 seconds
4. taking out the decal image, removing the paper backing
5. placing the decal image on the nail
6. drying with a make up cotton pad and holding water decal image on the nail until it totally dries
7. clipping down to size
8. protecting the decal with top coat

For me it wasn’t so easy like it seems and like I imagined. I had some problems with placing the decal images on my nails, because they had a tendency to slide around.
Also, after adding the topcoat my decal images wrinkled up a little bit.
So after the first nail done I almost wanted to give up trying, I had the impression that I was doing something wrong.. But it happened with the decals on all the other nails, so I think that this is just the way they “work”…
Of course, after 2-3 nails done the result was a little bit better and I became faster, so I guess that “practice makes perfect” :-)

After two layers of top coat I was satisfied with the final result! I think that the result is definitely worth all the patience! Do you agree?

Have you ever tried full water decals? What was your experience in using them?

If you like them but you haven’t tried them yet, you can find these blue swirl decals and many more beautiful full nail art water decals at KKCenterHK.

And, finally, my full nail art water decals manicure... :-)


Thank you, raggio-di-luna-nails
Check out raggio-di-luna-nails blog

2013年1月9日 星期三

Panda kynnet by lepikossakuhisee


Nämä lakkaukset/koristelut ovat olleet mulla koko muuton ajan kynsillä eli siis lähes viikon ajan. Vain kynnen kärjet pääsivät kulumaan, lakkaus muuten pysyi ja kesti saman näköisenä oikein hienosti.
Kynsille pääsi mun toinen China Glazen Bohemian Rare&Radiant, kaunis lakka jonka tosin olisin toivonut taittavan enemmän vihreään. Mutta onhan tuo kultainenkin oikein kaunis. Panda water decalsit ovat ostettu MiMax:ilta ja ovat siis XL-arkista jossa on ns.6 normaali kokoista arkkia. Helpot olivat laittaa :) ja ennen kuin joku sanoo siitä että ovat hyvinkin kärsineen näköiset mun kynsillä. Niin se johtuu siitä että mun seche Vite veteli kyseisellä hetkellä viimeisiään ja se vaurioitti decalsien pintaa sen takia etten saanut sitä kerralla "sutiin" tarpeeksi. Viivat tein KKCenterHk:lta saamallani X&D Sky-Melon koristelulakalla. Tätä olenkin jo testannut kerran ystäväni kynsiin :) Tykkään kyseisestä koristelulakasta erikoisen värinsä takia oikein paljon.
Mutta jospa nyt niitä kuvia, vai mitä mieltä olette?


Päivän valossa

Salamalla


Kuten näette pullossa Rare&Radiant vihertää ihan kivasti, mutta en vain saanut yhtään kuvaa siitä kynsillä vääntelimpä käsiä miten päin tahansa. Kyllä se siis vihersi tietyssä valossa kynnelläkin ja kun oikeassa kulmassa katsoi, mutta aikas vähän.

No nyt mulla onkin jo toiset lakkaukset jotka tein eilen illalla. Niistä paremmin sitten huomenna tai ylihuomenna siitä riippuen kuin ehdin.

Yhteistyökumppanini ovat muistaneet tulevaa lakkauskilpailua erittäin ihanilla palkinnoilla. Nekin pitäsi kuvata sillä kilpailun aloitus päivä koittaa pian :) Kiitos MiMax, Ihanat Kynnet ja Pretty.fi oikein ihanista palkinnoista!!! Näillä päästään palkitsemaan kolmet parhaat kynnet :)

Thank you, lepikossakuhisee
Check out lepikossakuhisee blog
http://lepikossakuhisee.blogspot.fi/2012/09/panda-kynnet.html

[SPONSOR] - MAGNETIC NAIL POLISH BY KKCENTERHK by thiswasforever

Mood [Full]
Currently Playing [None]


Today I'm going to be talking about magnetic nail polish because they are the latest trend in nail design at the moment! I think almost ALL the nail polish brands have created some kind of magnetic polishes! And even KKCenterHK have now started to carry some magnetic nail polishes as well! What's really neat about the store is that they even carry a magnetic stamp tool that's especially designed for their nail polishes.


This is what I received from the company. I chose a darker purple color because it's getting closer to Autumn and darker shades are becoming more popular. This is the tool I was talking about earlier. It's a Magnetic Nail Polish Pattern Shaping Magnet. It has 3 pattern in 1 set and it comes with a small frame and bracket. It makes it very easy to adjust the height of the magnet to the shape pattern on the nails. It's really cool because there's enough space between the magnet so it will make sure that your nail will not tough the magnetic. I always find this to be such a problem when I'm using these polishes. So this tool is very useful!


After you have painted a generous coat of nail polish on, it's time to put the nail under the stamp. Here are some tips for working with magnetic polishes:


-I find that you need a larger amount of polish in order for this to work.
-Remember that it will NOT work if your nail polish is dry, so make sure you stamp it BEFORE.
-You should leave it under the magnet for 5-15 seconds to make sure that the pattern will appear.
-Do not use a fast dry top coat because I noticed that the pattern will fade when a top coat is applied
-Do not touch the magnet with magnetic polish.


Here is the final result! Really pretty huh? Make sure to check out the rest of the magnetic nail polishes by KKCenterHK!


Thank you, thiswasforever
Check out thiswasforever blog
http://www.thiswasforever.com/2012/09/sponsor-magnetic-nail-polish-by.html

2012年9月5日 星期三

[SPONSOR] - EASY FLORAL 3D NAILS TUTORIAL (KKCENTERHK) by thiswasforever

Mood [Hungry]
Currently Playing [None]


It feels like I haven't done a nail tutorial in the longest time! Hopefully I'll have more tutorials coming up shortly! So here's another nail tutorial that's extremely simple to complete and very pretty! It lasts for a really long time and it's perfect for any occasion. The main material that I am going to use have been sponsored to me by kkcenterhk. Here are the materials that you'll need:

1. Pro FX Epoxy Bond Base Coat 2.5 oz (Available at Walmart) - I absolutely LOVE this stuff! Not only is it a really good base coat but it's extremely cheap for only $5! This salon size is also HUGE! I feel like I can use this for the rest of my life! Haha!
2. Nail color - I decided to use this OPI Nicole by OPI Nail Lacquer, "Baby" Blue. It's the one that Justin Beiber created! It's a very beautiful blue and it matches the flower stickers perfectly!
3. X&D Flowers Pattern 10 Pieces Nail Glitter Fabric - Very easy to use and to apply onto my nails. It lasts for a really long time and it sticks perfectly onto my nails.
4. Revlon Quick Dry Top Coat - I love this! You can read my review of it here!


Step 1 - Once the base coat has been dried, you can go ahead and apply the color of your choice. This OPI polish is really good and with only 2 layers, you'll get the opaque color that you want. I love this blue, don't you? ;)

Step 2 - Apply the quick drop topcoat.


Step 3 - After the color coat has been dried. You can go ahead and stick on the X&D Flowers Pattern 10 Pieces Nail Glitter Fabric. I really like the details in the sticker. The added bow is such a great detail! Plus, at only $2.08 per piece, you can't really go wrong with that price!

Step 4 - Once you have applied the sticker, you can go ahead and apply the top coat. The top coat will seal the design and prevent it from chipping.

Step 5 - Repeat on the other hand and wait for everything to dry!

And this is the final result! So pretty isn't it? Such simple procedures and the designs look so complicated! I have received so many compliments on my nails and no one would believe that they are just nail stickers.

If you like the nail stickers, you can check out kkcenterhk store! They have SO many other nail glitter stickers!

Check out their store here!


Thank you, thiswasforever
Check out  thiswasforever blog
http://www.thiswasforever.com/2012/08/sponsor-easy-floral-3d-nails-tutorial.html

2012年7月4日 星期三

Weekly Nail Art Challenge: #1 Blue for AMC Awareness: KKCenterHK Decals by nailpolishanon

 This is me cheating at nail art! It's only because I'm on holiday without any nail art accessories and a very limited amount of polish! The theme is blue, and there's some blue sky on these water decals, so I might just scrape through on a technicality!!!!!!!!!!!!!
This is another one of Jilltastic Nail Design's brain child's, so be sure to visit her website for a list of participants.

Today's challenge is simply BLUE.

And here's a bit of a ramble explaining how I got to this post:

KK Center HK kindly sent me some nail decals for review early this year. I've posted about one set here
I requested some easter egg and bunny decals especially for an Easter themed manicure, unfortunately, in typical Michaela style, I left them in Chch when I went on Easter break :(
It felt  bit silly to do a very belated Easter post once I went back to uni so I just put them to one side until I could think of something non-Eastery to use them for.

The other decals I got for review required long nails and I haven't had them all year without major breaks! I got some gorgeous floral french tips and the full nail water decals that I'm showing you today. The french tips are very long and I want to show off the whole pattern so they will be used for a special occasion. The full length ones were just too cool to wait for longer nails so I bit the bullet and brought them on holiday this time with the express purpose of wearing them!!!

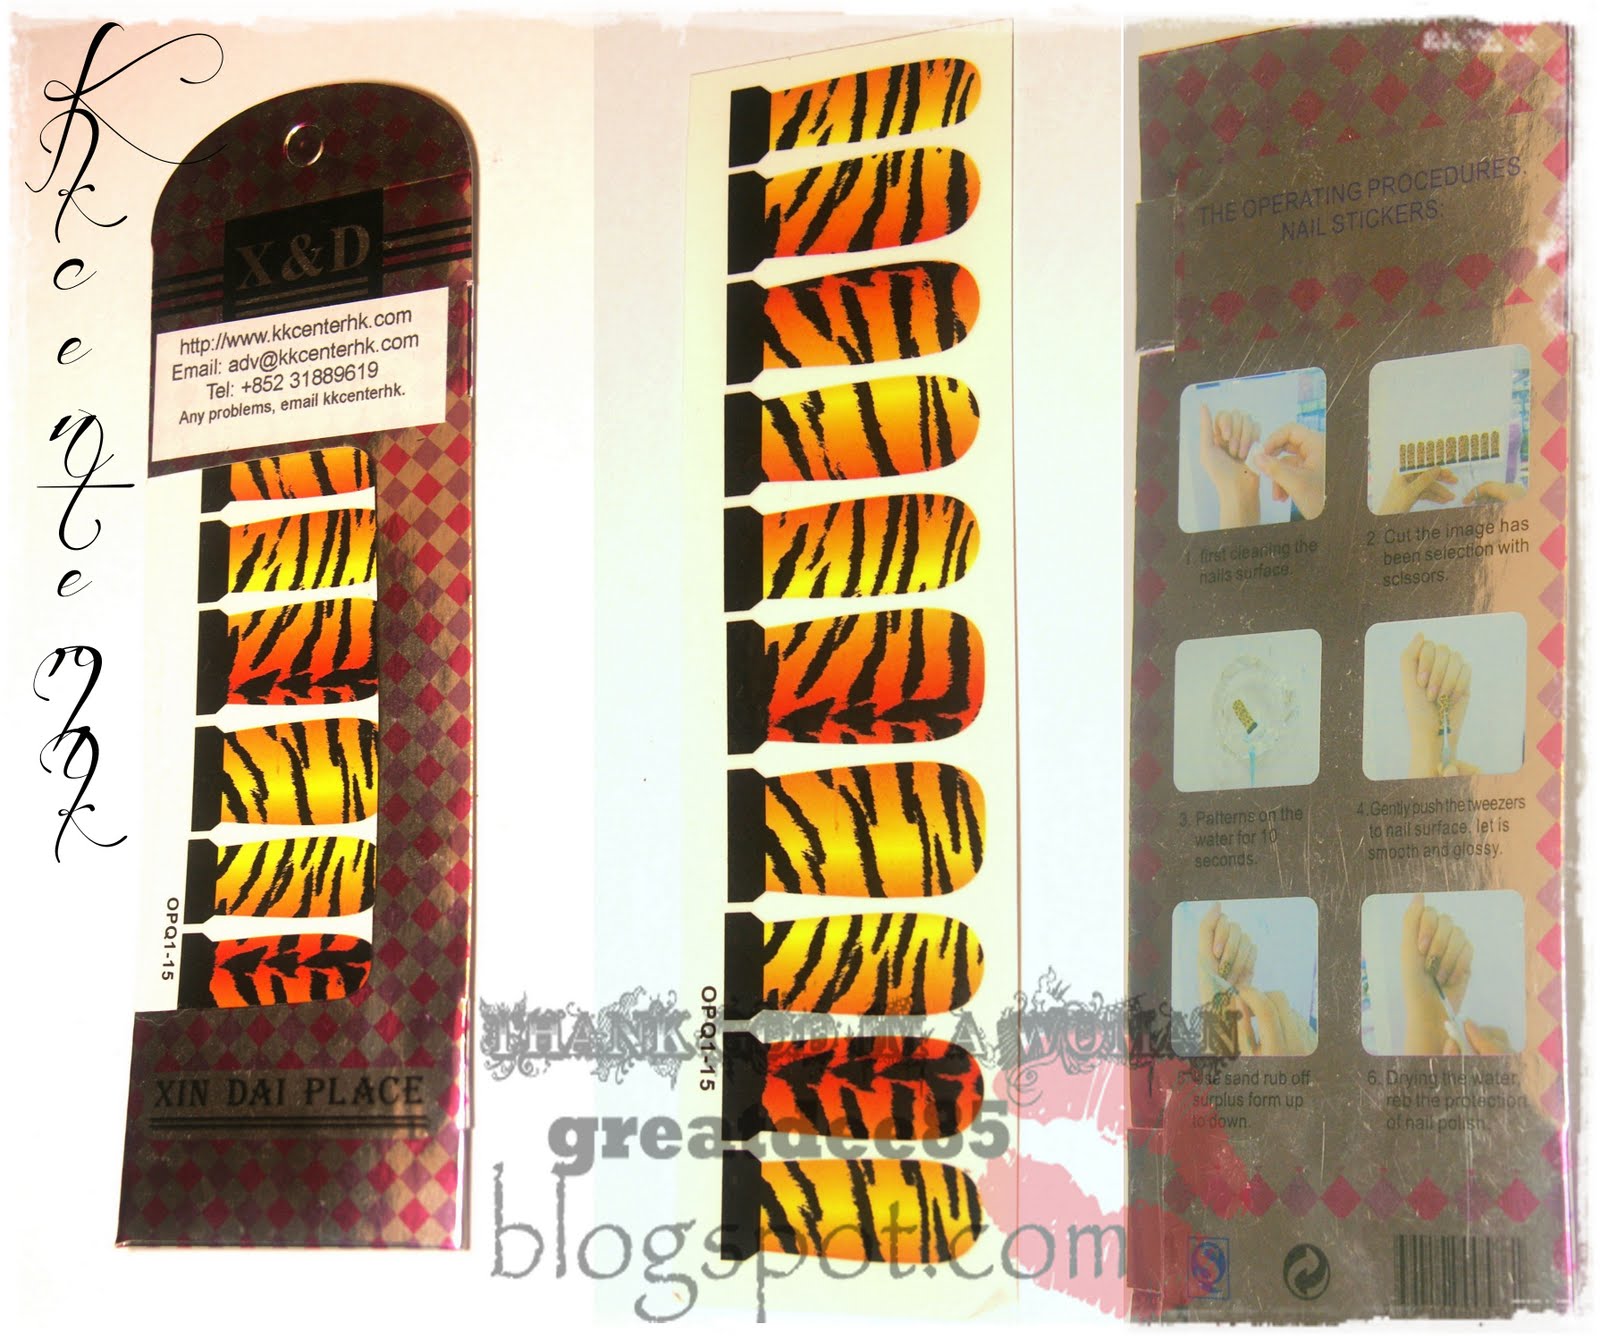
This is what the set looks like.


 You get 10 decals in a pack so you use them for one full manicure or as accents I suppose. I'm not sure why they have made the two biggest (presumably for the thumb nails) decals off centre. The the middle two in the pattern should be the biggest but instead the 6th and 7th decal are so the bird gets a bit mucked up unless you have tiny thumb nails!

On the back of the pack are instructions for application, but you basically roughly cut them out take off the protective coating and soak them in water til they come off the backing. Then you place them on your nail and smooth out and crinkles and wait for them to dry.
Then you file off the overhanging decal on the free edge and apply a layer or two of clear top coat for protection, shine and longevity (I suspect they could fall off whenever your nails get wet otherwise!!!).

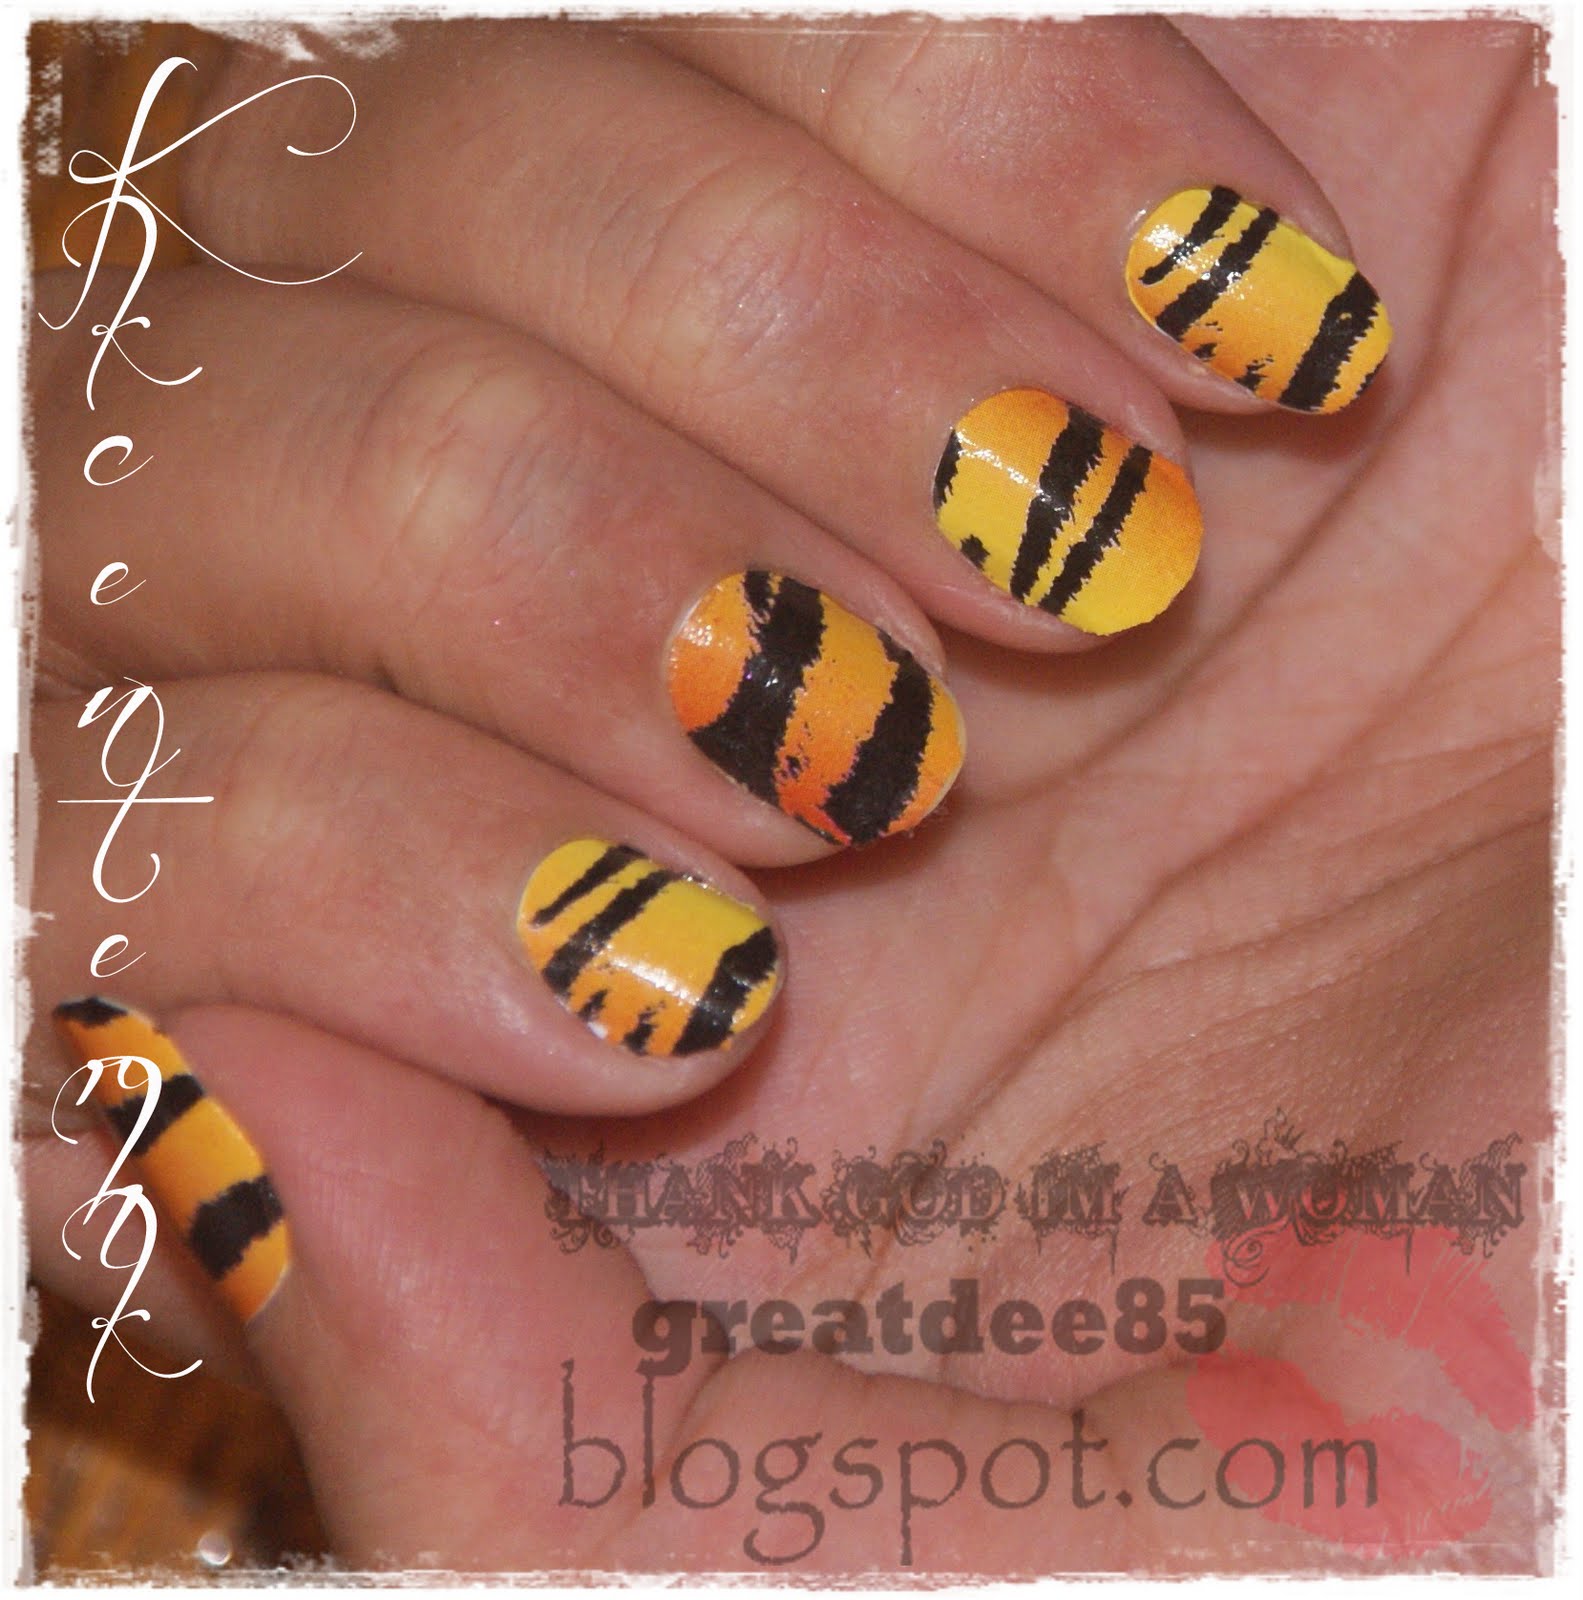
Well here's how mine turned out:


 Keep in mind that this was my first experience applying full nail water decals! I included the close-up of my pinkie because that was my tidiest nail!! I didn't end up doing my right hand because it was so much work!!!

I have to say though, that it's not really the decal's fault!!!!
From just a metre away my nails looked great, you couldn't see the wrinkles/creases.

My nails just do not conform to the dimensions of the decals is all! Or any sort of stick on nails/ nail polish strips that exist on the market.
I have very small nail beds so every decal had to be trimmed down. This was very finicky because I had to soak them, apply them, remove them, trim them down slowly til they kind of fit, then wet them and apply them again, wait for them to dry and file the huge amount of excess decal off (my nails are very short at the moment). All the crinkles mainly came about because I didn't trim them enough and then I didn't apply a thick top coat so they wrinkled a tad from the brush strokes. I added more top coat later and they looked way better. Mum told me she really liked this, she thought it was polish though...

What I Like:
On nails that are wider and longer these decals would ROCK! The design is really cool, like a dragon bird!!! If you mess up the application you just add water and start over!!!!
Also as messy as my photos make the mani look, only people who examine your nails up close will see the mistakes!
Also water decals are a way cheaper alternative to the nail apps/polish strips on the market from Sally Hansen, OPI etc. The wear time is probably shorter due to the material they're made of, but I would never get my money's worth of wear out of the '2 week polish strips' on the market.

In NZ Sally Hansen strips retail for something like $20 - extreme and I won't be buying any of them for this price ever!!!
The KK Center HK decals however, start at US$5.05 - way more cost effective. You can find these decals
http://www.kkcenterhk.com/Nail-Water-Decals-Full-Nail-Tips/c106_114/p3806/X%26D-Full-Nail-Art-Water-Decals-24%23/product_info.html and HEAPS more on the KKCentreHK website.

They were also kind enough to provide a 10% discount coupon to my readers BLGA345MI10. You can find it any time on my sidebar under all the Labels links. They have a 15% discount running at the moment as a Facebook promotion, so if you plan on buying from KK soon, get to it!

xxx
NPA

Thank you, nailpolishanon

Check out nailpolishanon blog

http://nailpolishanon.blogspot.co.nz/2012/06/weekly-nail-art-challenge-1-blue-with.html

2012年4月16日 星期一

Pre-Cut Flower Water Decals by mymakeupmania


 HeLLo everyone! I just came home with no feeling of my feet LOL~ I walked in high heels for about an hour and dying of tired, didn't wear them for very long time :P
Today I want to share not nails of the day but the design I was wear last week. Because I'm a bit crazy to criticize myself I found that the nail edges was not pretty enough and I filed them to more squoval shape. And of course I had to remove this manicure...
Image and video hosting by TinyPic
It's X & D pre-cute slide full water decals with flower images. They looks very fresh and spring-ish. And I really like them! I like absolutely all water decals in the world hahaha~ 
Image and video hosting by TinyPic
Each set contains 10 decals, as usual.
Image and video hosting by TinyPic
This time I applied pearl white background color because the width of the decals slightly narrow than my natural nails. Also the application looks a bit crumpled because my natural nails are curved. FYI all full image water decals looks crumpled on my nails.
Image and video hosting by TinyPic
Thats it for today! Thanx for visit and haPPy polishing everyone :)

Have U tried any full water decals?
This product was sent for review. For more product info click [HERE].


Thank you, mymakeupmania
Check out  mymakeupmania blog
http://mymakeupmania.blogspot.com/2012/03/pre-cut-flower-water-decals.html

BLUE SWIRLS by mymakeupmania


 HeLLo everyone! The other day I changed my manicure on this "Blue Swirls" they are pre-cut water slide decals. And it's my first time without use of main background color, I applied them just on my nail polish base. But immediately regret it because width of the decals it's a bit smaller than my nails. Anyways I got a lot of compliments from my new friends and teachers from the driving school. And next time I'll be definitely use close to water decals main background color.
Image and video hosting by TinyPic
Approx.Length: 3cm/ 30mm/ 1.1"
Code: 75
Price: $4.74
Available: KKCenterHK
Image and video hosting by TinyPic
Each set contains 10 pre-cut water decals. Also on the back of the package there is great instructions and useful step-by-step pictures for those who don't know how to use this water decals.
Image and video hosting by TinyPic
I love using water decals especially those days when I don't have any idea for nail design or enough free time to do something on my nails.
Image and video hosting by TinyPic
Thats it for my weekend manicure.
Thanx for looking and happy polishing :)
Product was sent for review.


Thank you, mymakeupmania
Check out  mymakeupmania blog
http://mymakeupmania.blogspot.com/2012/03/blue-swirls.html

2012年3月12日 星期一

KKcenterHk- Full Nail Water Decals review & Coupon Code! by thechainnail


KKcenterHk- Full Nail Water Decals review & Coupon Code!


KKcenterHk, an online nail art and makeup store, sent me their Full Nail Water Decals for review. I have tried full nail stickers before, this was the first time I was trying decals. 
Each set contains 10 decals. Water decals stick better on polish, so it is a good idea to apply a layer of base coat before sticking the decals. They work just like normal water decals.

What I liked:
They are more flexible and thus easier to use than standard nail stickers.
The packaging is pretty cute.
Such complicated designs are difficult to freehand. 
KKcenterHk sells them at a very affordable price of $4.74.
There are a variety of designs available on the KkcenterHk website.

What I didn't like:
There are only 10 decals in each set, so some people might find it difficult to find the right size for their nails.
I got some air bubbles, but this the first time that I used them, so I'm sure the result will be much better the next time :)

I would love to try more of these in the future. These decals are available on the KKcenterHk website here for $4.74. You can use my coupon code BLGB653RH10 for a discount of 10% on your order!

*These product were sent to me for an honest review*


Thank you, thechainnail
Check out  thechainnail blog
http://thechainnail.blogspot.com/2011/12/kkcenterhk-full-nail-water-decals.html

"Naklejki" na paznokcie od Kkcenterhk / Nail water decals from Kkcenterhk by greatdee85


Jakiś czas temu dostałam do przetestowania "naklejki" na paznokcie od sklepu Kkcenterhk. Szczerze mówiąc pierwszy raz miałam z czymś takim do czynienia, więc moje wrażenia będą dziewicze ;)
I recdieved nail water decals from Kkcenterhk some time ago. I actually had such thing for the first time so my feelings will be completly pure ;)


To właściwie nie są naklejki, przypominają mi tatuaże dołączane do gum do żucia z dzieciństwa. I w taki sam sposób też się je nakłada. Instrukcja jest trochę niezrozumiała, ale łatwo można się połapać co i jak.

  • rozcinamy naklejki, żeby każda była osobno
  • ściągamy folię ochronną
  • wkładamy naklejkę do wody na ok 10 sekund
  • zdejmujemy wzór z papierka i dopasowujemy do paznokcia
  • przyciskamy dokładnie do paznokcia
  • pilniczkiem pozbywamy się nadmiaru naklejki
  • malujemy top coatem

Łatwe? Noo, przynajmniej się tak wydaje...
The instruction is a little hard to understand but there're also pictures so you'll know everything.

  • separate all decals
  • get off the thick safety foil
  • put it into water for 10 sec.
  • get it off the paper and put on your nail
  • push it well into your nail
  • get rid of the rest of the decal with sand rub
  • put on a top coat

Easy? It seems to be easy...


...ale takie nie jest. Wszystko jest fajnie aż do punktu, w którym naklejka powinna się przykleić do naszego paznokcia. Otóż, ona nie chce się przykleić. Nawet kiedy wydaje się, że już jest ok, to nagle cała naklejka spada, trzeba znów kombinować z wodą i dopasowywaniem, aż w końcu zaskoczy. Ciężko jest przykleić naklejkę idealnie do całego paznokcia, mi się do nie udało idealnie. Jednak po pomalowaniu top coatem naklejka się mocno utrwala.
... but it's not. Everything is ok 'till you have to put the decal on your nail and it should to stick in. Well, it doesn't want to stick in. Even if you think it's ok then all the decal falls down and you have to gain a little water and try to stick it again and again and in the end it will stick in. It's hard to stick them in perfectly, I couldn't do it. When you put your top coat it'll look nice and will be harder.


Efekt jest świetny, bardzo zwraca uwagę i prezentuje się bardzo dobrze na paznokciach. Dopóki nikt nie przygląda się z bliska możemy czarować naszym manicure. Tak jak się spodziewałam, już następnego dnia naklejki zaczęły mi odpadać na końcówkach paznokci, jednak tam gdzie były dobrze przyklejone trzymały się kilka dni. Podejrzewam, że przyklejanie tych naklejek jest sztuką do opanowania, a wtedy świetny efekt warty jest tego całego procesu przyklejania. Ten zestaw, który ja posiadam to dokładnie TEN. Jeśli macie ochotę na zakupy (DARMOWA PRZESYŁKA!) to z kodem BLGB440GR10 dostaniecie 10% rabatu aż do 28 lutego!
The effect is really really nice and eye-catching. Until anybody can't see the details you can be proud of your manicure. Unfortunatly next day the decals started to fall off on the tips of my nails where they ware sticked wrong as I expected. The rest (that part that was sticked in well) lasted for few days. I think you can learn how to stick them in perfectly with practice then this great effect is definetly worth that hard process. THIS is exactly what I had. If you want to purchase something from Kkcenterhk (FREE SHIPPING) you can use the code BLGB440GR10 for 10% off till february 28th!


~~~~~~~~~~~~~~~~~~~~~~~~~~~~~~~~~~~~~~~~~~~~~~~~~~~~~~


Thank you, greatdee85
Check out  greatdee85 blog
http://greatdee85.blogspot.com/2012/01/naklejki-na-paznokcie-od-kkcenterhk.html