顯示具有 Water Decals-Full 標籤的文章。 顯示所有文章

2014年10月17日 星期五

review: kkcenterhk full nail water decals by iloveprettycolours

Hey everyone! 
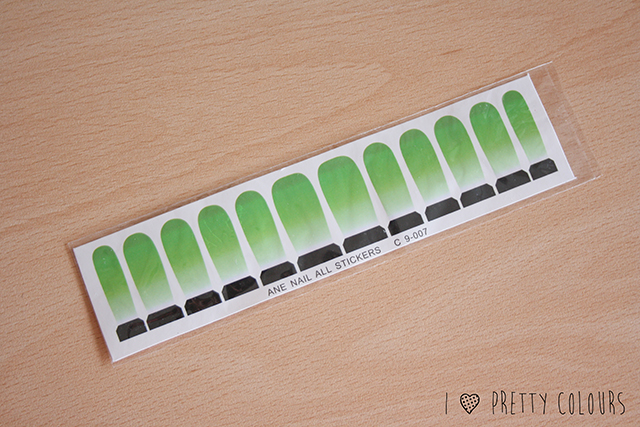
Today's post is going to be all about these green gradient nail wraps that I got from  KKCenterHK.

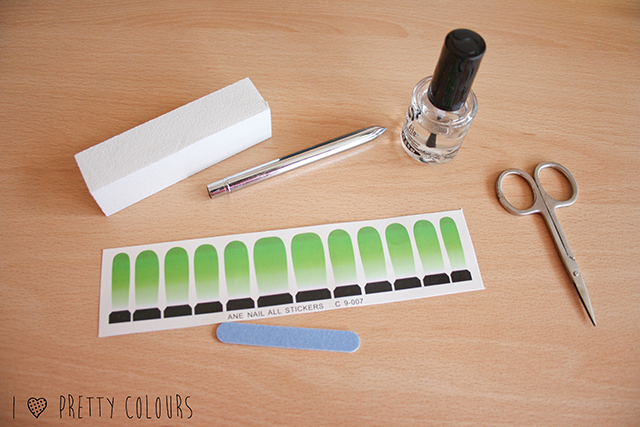
The package contains 12 nail wraps and a small nail file to file off the excess. There are many different variations, but I decided to try out the gradient ones.


Once removed, you can see that all of the nail wraps are adhered to the sheet. There are no score lines, so that means that you will have to cut them by hand.


The tools you will need in order to apply the wraps are the following:


• the wraps
• a nail file and/or buffer
• scissors
• any tool that will help you smooth them out
• top coat

First off, you start by cutting each wrap. This process will take about 5 minutes. If you are not really capable of handling scissors (like me), you probably will end up with crooked edges :) I'd suggest leaving just a bit less than 1 mm space around the wrap and you will be okay. Then, you just need to choose the right size for each finger and you're ready for application.


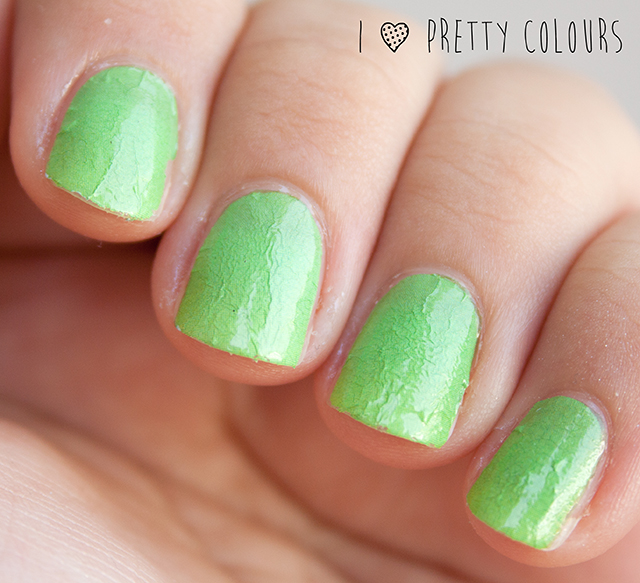
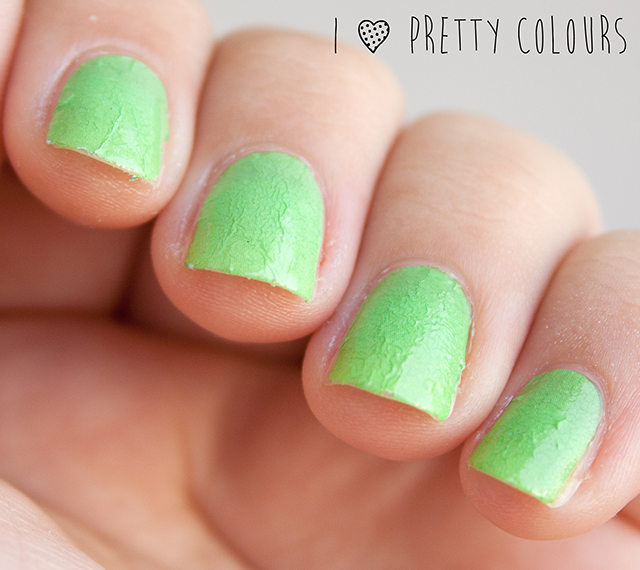
Afterwards, you want to dip your nail wrap in a small cup of water (or place it on a wet sponge). After a couple of seconds, the wrap will come of its backing and will be ready for application. I applied a thin layer of top coat underneath the wrap, even though it's not written in the instructions, because when I tried without a base layer it wouldn't stick at all. After you smooth the wrap on your nail, the instructions say to apply a top coat. However, the top coat that I used crinkled the wraps and they didn't turn out nice looking :( Not applying top coat is also not an option, mostly because the wraps are really thin and they will chip in a couple of hours tops.


You get a nice looking dark green to light green gradient, but unfortunately in order to get the full gradient you need to have really long nails.


Even with a nice top coat, the wraps don't last too long, you'll get chips here and there and overall they are way to thin to be handled.


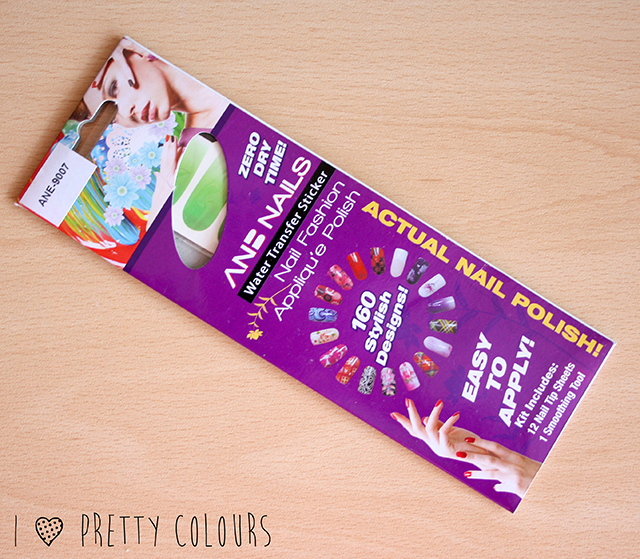
What I really loved about them is they can be removed really easy with a bit of polish remover. It says on the packaging that they are made with 100% polish, so when you remove them, instead of getting little pieces of plastic or whatnot, they disintegrate with the help of your polish remover.

Pros
• great variety of designs
• application is moderately easy
• they don't leave sticky residues once removed
• can be removed using regular polish remover

Cons
• slight sizing issues with each piece - you may need to trim them down
• crinkling after application of top coat - might be my mistake, though
• the wraps aren't scored, so you have to cut them by hand
• they don't last too long


Overall, my opinion is a bit here and there about this product. They have a couple of minor issues that when combined, make these wraps a bit difficult to handle, especially if you are looking for an easy manicure that looks good. They didn't look too bad even when they crinkled, but like I previously mentioned that might have been my mistake.
If you want to try them for yourself and see if they work, you can get these water decals here for $3.70. You can see the other designs here.
You can get 10% off your order over at KKCenterHK using the code: "iloveprettycolours".
KKcenterhk125x125jpg banner

The product was sent to me for review. However, my opinion is 100% honest and is not affected by this.

Thanks for reading :)


Thank you, iloveprettycolours
Check out iloveprettycolours blog
http://iloveprettycolours.blogspot.hk/2014/08/review-kkcenterhk-full-nail-water-decals.html
2014年10月15日 星期三

Galaxie florale by cocosnailss

Aujourd'hui on va ENCORE parler water decals, vous en avez peut-être marre, non? J'avoue préférer le freehand, mais ces petits derniers ont quand même de gros avantages, surtout quand on a pas trop de temps devant soi.
Je sais vraiment pas pourquoi, mais quand j'ai choisi mes produits sur KkcenterHK, j'ai pris ces WD. Ils m'avaient l'air sympas, mais en même temps j'ai grave hésité, par peur qu'ils ne soient pas si faciles à porter... Le motif me fait penser à une légère galaxie, avec quelques roses toutes douces, j'aime assez l'idée d'associer les deux. 
Mais bon, comme prévu, c'était pas une mince affaire pour savoir comment les assortir... Finalement, j'ai pas vraiment réfléchi, cette manucure est née d'elle-même, comme ça, comme une grande^^ Ca ne me ressemble pas vraiment, mais je trouve le résultat de loin plutôt cool. Après je porterais pas ça une semaine entière non plus hein...

En base on a donc le beau Poetic Hues de Color Club, fidèle allié. Ces WD ne nécessitent pas de base de couleur en dessous, mais vu que je suis partie sur une mini ruffian, j'étais un peu dans l'obligation d'en poser une^^
J'ai simplement mis les water decals un peu plus bas que d'habitude pour créer la ruffian (je crois d'ailleurs qu'en fait, j'en avais jamais fait avant aujourd'hui ! Pourtant je trouve ça super classe ! mais pas forcément sur moi ^^). Puis j'ai recouvert d'une couche d'OPI - Servin Up Sparkle, afin d'accentuer cet effet de galaxie.
J'ai éviter le full look, en posant simplement un strass sur le pouce et le ptit doigt, et voilà, c'était fini !

J'ai conscience de la bizarrerie de cette manucure quand même, c'est plutôt inhabituel, et c'est pas vraiment mon style, mais je suis contente d'avoir trouvé quelque chose pour assortir ces jolis WD. Je pense qu'avec du noir ils pourraient être pas mal aussi ! Et vous, qu'est-ce que vous en pensez? Vous auriez fait quoi à ma place pour les assortir? 
N'oubliez pas le code promo cocosnailss pour 10% sur kkcenterHK :)

PS: excusez mes moignons en guise d'ongles, j'ai tellement hâte qu'ils repoussent! Mais fini l'usine pour au moins 2/3 semaines, alors ils sont tranquilles :)


Thank you, cocosnailss
Check out cocosnailss blog
http://cocosnailss.blogspot.fr/2014/08/galaxie-florale.html

2014年8月6日 星期三

KKCenterHK's ANE-NAIL Flower Transfer Sticker Decals by tornadocalli

Ughhhhhh you guys! I am OBSESSED with these water decals from KKCenterHK! They're such a gorgeous design that's sweet and nail arty without being in your face and obnoxious. A high-gloss top coat made them look unreal! I'm not ashamed to say I was very sad when these reached the end of their life-cycle.


 For 10% off at KKCenterHK, use code: TORNADOCALLI (expires Jan. 31. 2015)


**This product sent to me by KKCenterHK. This is my honest, unbiased review.


Thank you, tornadocalli
Check out tornadocalli blog
http://tornadocalli.blogspot.hk/2014/05/kkcenterhks-ane-nail-flower-transfer.html

2014年3月17日 星期一

Review: KKCenterHK Water Transfer Stickers by asmallbudgetbeauty

Over the weekend I tried out the Cute Dot and Bow water transfer stickers from KKCenterHK. Basically they are just like water decals, the are just made to cover your whole nail.

It comes with a strip of 12 water transfer stickers (decals) and a 'smoothing tool' which is just a small nail file. Below is what the strip looked like after I had cut the individual decals.


The directions say to clean, cut & trim to fit, soak & apply, smooth and apply top coat. It also says to peel off the protective film, but there was no protective film on mine. So I followed all the directions and the decal would not stay on my nail, it just kept sliding off, so I went to their website to see if there were any tips. On their website it says to soak the decal for 10-15 minutes, ain't nobody got time for that LOL and they will come off a lot sooner. It also says to dry the decal off with something so I used a cotton ball, it did help keep it from sliding around, but it still did not adhere to my nail. The second issue I had was the decals were so long and my nails are not, so most of the bow got trimmed off.


For me these were a fail, I didn't ever bother with putting top coat on them, I just took the photo and peeled them off. The packaging says by applying a top coat the decals will last up to 7 days, and only 1-2 days with out. Maybe they would have worked better if I had applied a base coat, the instructions did not say anything about it so I didn't do it. I also think they should have a long and short version so us nubby girls could use these too with out loosing any details.

KKCenterHK's Full Water decals cost $7.20

If you shop at KKCenterHK you can save 10% off your order with this coupon code: SBB2013


Thank you, asmallbudgetbeauty
Check out asmallbudgetbeauty blog
http://asmallbudgetbeauty.blogspot.hk/2014/03/review-kkcenterhk-water-transfer.html

2013年1月28日 星期一

KKCenterHK Review - X&D Full Nail Art Water Decals XD-75 by raggio-di-luna-nails


KKCenterHK Review - X&D Full Nail Art Water Decals XD-75

At the end of last year I received a very kind offer from KKCenterHK to review one of their products. They really have so many interesting products, you can spend hours on their web site... :-) 

Of course, the most interesting things for me were nail products :-) and the products that captured my attention were full nail art water decals...  :-) 

I chose X&D Full Nail Art Water Decals XD-75 with a beautiful blue swirl design! :-)

X&D Full Nail Art Water Decals XD-75

X&D Full Nail Art Water Decals XD-75

The packaging contains 10 water decal images in different sizes.
On the back of the packaging there are the instructions.

The procedure is:
1. cleaning the nail surface
2. cutting the image with scissors
3. placing the decal images on the water for 10 seconds
4. taking out the decal image, removing the paper backing
5. placing the decal image on the nail
6. drying with a make up cotton pad and holding water decal image on the nail until it totally dries
7. clipping down to size
8. protecting the decal with top coat

For me it wasn’t so easy like it seems and like I imagined. I had some problems with placing the decal images on my nails, because they had a tendency to slide around.
Also, after adding the topcoat my decal images wrinkled up a little bit.
So after the first nail done I almost wanted to give up trying, I had the impression that I was doing something wrong.. But it happened with the decals on all the other nails, so I think that this is just the way they “work”…
Of course, after 2-3 nails done the result was a little bit better and I became faster, so I guess that “practice makes perfect” :-)

After two layers of top coat I was satisfied with the final result! I think that the result is definitely worth all the patience! Do you agree?

Have you ever tried full water decals? What was your experience in using them?

If you like them but you haven’t tried them yet, you can find these blue swirl decals and many more beautiful full nail art water decals at KKCenterHK.

And, finally, my full nail art water decals manicure... :-)


Thank you, raggio-di-luna-nails
Check out raggio-di-luna-nails blog

2013年1月24日 星期四

Please check out my "Beauty Empties" project I posted empty products of December. I know it's kindda weird showing all this finished products but for some reason I really enjoy looking at posts of project 10 pan, hit pan or something like that. It makes me happy. I like finishing stuff a lot :P And it snowing today :) School bus was canceled this morning and my boys stays at home today. So we went out and had a lot of fun together playing with snow and making the snowman. Add me in your friends list on Facebook, I always share some of my presonal pictures on timeline :) I'm wearing "Black Dragon" pre-cut water decals on my nails. And since 2013 will be year of the Snake I probably will keep this nail design for New Year Eve. Because I think the dragon and snake have something in common with each other. ANE-NAIL Dragon Pre-cut Water Decals. A kit of 12 pcs water decals and one smoothing tool. There is very useful step-by-step tutorial on the back of the package for those who have not used any water decals yet. I give this product 5 stars from 5. Definitelly worth to check out! Water decals was sent from KKCenterHK. The other day I showed new polishes I bought from Etude House Holiday edition and LDN Baby~ asked for the swatches. So, here it is -> Both sunlight and shade pictures. 2 coats of each polish. First 3 pcs is all nail polishes by itself. Next 2 pcs is If the White Witch on black and white bases. The last 2 pcs is Coco Black on white and black base as well. Please note that Holiday kit includes only 2 polishes in Melts With Love and If the White Witch. The Coco Black is from Dear My Party Nails collection. My personal favourite from this 3 is If The White Witch on darker base. Have a Happy New Year!! by Anastacia a 12/28/2012 05:08:00 PM Email This BlogThis! Share to Twitter Share to Facebook 5 comments: GirlieBlogger@Beauty Fashion Blog Seattle12/28/2012 6:07 PM Love the design. Dragon is my thing. Reply Sarah12/28/2012 6:41 PM The mani is really awesome as well as the nail polishes. I think one day I will buy these brand of polish!! Reply Анна12/29/2012 12:46 AM Красивый дизайн получился! Reply Rainy Days and Lattes12/29/2012 3:44 PM Wow, your nails are INCREDIBLE! Beautiful look!!! Reply Cel12/30/2012 11:20 PM Hi, I'm a new follower, just came across your lovely blog ^_^ Wow, that's a fabulous nail design! Perfect for a walk in the snow! Reply Load more... LET ME KNOW WHAT DO YOU THINK? :) Newer Post Older Post Home Subscribe to: Post Comments (Atom) About Me Anastacia by mymakeupmania


Please check out my "Beauty Empties" project I posted empty products of December. I know it's kindda weird showing all this finished products but for some reason I really enjoy looking at posts of project 10 pan, hit pan or something like that. It makes me happy. I like finishing stuff a lot :P

And it snowing today :) School bus was canceled this morning and my boys stays at home today. So we went out and had a lot of fun together playing with snow and making the snowman. Add me in your friends list onFacebook, I always share some of my presonal pictures on timeline :)
I'm wearing "Black Dragon" pre-cut water decals on my nails. And since 2013 will be year of the Snake I probably will keep this nail design for New Year Eve. Because I think the dragon and snake have something in common with each other.
A kit of 12 pcs water decals and one smoothing tool. There is very useful step-by-step tutorial on the back of the package for those who have not used any water decals yet
I give this product 5 stars from 5. Definitelly worth to check out!
Water decals was sent from KKCenterHK


Thank you, mymakeupmania
Check out mymakeupmania blog
http://mymakeupmania.blogspot.kr/2012/12/black-dragon-nails-etude-house-holiday.html

"Vintage Rose" Nails by mymakeupmania


My first mani in 2013 :) Haven't changed it since BLACK DRAGON nails. But actually in a few days it's birthday of my eldest son and I wanted to have my nails done in advance. Because I'm gonna cook for him a lot of yummy stuff :) He turns 6 y.o (7 y.o. on Korean style).
My both hands ...
Super quick mani, it took me 30-40 mins and no more. I love water decals so sooo much :)
Water decal kit of 12 nail tips, 1 smoothing tool (blue mini nail file) and step-by-step pictorial on the back of the package.
Before water decal application I applied 2 layers of blue nail polish suitable to the main color of the images. To make sure that all nail sides are covered with suitable color, in case if the water decal wasn't wide enough for your nail plate. Also I don't use the smoothing tool, I prefer to cut water decal as short as possible to fit my nail length and after top coat application it become soft and easy to remove. The main water decal application looks very wrinkled and uneven but once you apply a top coat on it get smooth. Make sure to seal nail free edge and this design will last you for quite a few days!
Water decals was sent from KKCenterHK.


Thank you, mymakeupmania
Check out mymakeupmania blog
http://mymakeupmania.blogspot.kr/2013/01/vintage-rose-nails.html

Disney Theme: Princess Jasmine Nails by mymakeupmania


I'm stuck at home for the past few days. It's very cold outside and because my eldest son is still at home I don't want to take him out. And obviously got nothing to do like painting my nails ahahaha~ I made Disney mani today, wanna be pretty :)
I'm 27 already but still in love with all these Disney princess characters as a child :)
 How to get this design:
1. Make sure to apply a base coat to protect your natural nails.
2. Then apply creme white polish on middle finger and baby blue to the rest of the nails.
3. Apply silver glitters to the nail tips on baby blue polish (skip the ring finger though).
4. Apply Jasmine image water decal on to the white polish.
5. With white acrylic paint and detail nail art brush draw a Disney castle on the ring finger.
6. Seal everything with clear top coat.
A pack of 12 image tips (Snow White, Cinderella, Belle, Jasmine, Ariel), 1 smoothing tool (blue tiny nail file) and step-by-step pictorial on the back of the package.
I have no idea why my pictures of the water decals come out like this. In real life all those images looks absolutely as normal pictures without that texture, I swear. 
Water decals was sent from KKCenterHK.


Thank you, mymakeupmania
Check out mymakeupmania blog
http://mymakeupmania.blogspot.kr/2013/01/disney-theme-princess-jasmine-nails.html

2013年1月11日 星期五

KKCenterHK Review – Full Water Decals by emilydenisephotography


I have a review on some full water decals for you today! They are from the awesome Asian cosmetics supply KKCenterHK. Last time I showed you some smaller water decalsfrom them which I loved. This time I tried these full water decals. Since I had such a great experience with other water decals I figured these would be great!
I chose this beautiful floral design featuring roses and vintage colours. The wraps comes with 12 decals and a small nail file. On the back of the packaging you will find instructions. You start by cutting around the water decal, following the edges of the design. Then you place the decal in some lukewarm water and wait for 10 seconds. Take it out, remove the paper backing. Finally place it on the nail, then clip down to size and add top coat.
It sounds easy but it sadly wasn’t! I found that the previous decals I tried will easily stick down on the nail once you pat them dry but these full decals had a tendency to slide around at all times. Adding topcoat shrinks the decal and makes it wrinkle up a little, though this disappears for the most part once you add a second coat of topcoat. The biggest issue for me was when I added topcoat the decal would slide around or fold over. I had to redo a few nails because the topcoat made the decal slide off my nails completely.
There’s definitely some patience required when you apply these. But when you are extra careful with the top coat and application, you’ll get awesome results! It’s definitely worth it in my opinion. :)
Anyway this is what they look like on the nails! Doesn’t it look beautiful? I really love them! Since the decals are so long (almost twice the length of my own nails) I was able to use the leftover part as well. On my pinky for example, I used the excess part of another decal. This way you definitely get a lot of use out of the decals. I cannot stand wastage so I simply couldn’t throw it away. :D
I was able to do a full set of nails using these decals. On my right hand (not pictured) I used just two decals, and three leftover parts, so I still have three full decals left! I can still use those in future manicures as accent nails. Yay!
Overall I loved trying these full water decals but application definitely wasn’t as easy as with small water decals. I was hoping these would be the ultimate nail wraps but that was sadly not the case for me. If you have the patience the result is definitely worth it though. And these last quite well too, they behave like regular polish, maybe slightly better. I’ve had mine on for three days now I believe, and there’s no chips and barely any tipwear!
You can find these floral decals (and many other gorgeous full decals) at KKCenterHK. They have a lot of great products ranging from nail art deco to make-up, even wigs and clothing. If you place an order with them, make sure to save some money by using my coupon code, VERYEMILY gives you a 10% discount! Enjoy!
Have you ever tried full water decals? What was your experience in using them? Let me know!


Thank you, emilydenisephotography
Check out emilydenisephotography blog
http://www.emilydenisephotography.com/blog/?p=3201

Koko kynnen Lohikäärme water decalsit by lepikossakuhisee

Nyt täytyy myöntää että en ihan hirveen montaa kertaa ole koko kynnen water decalseja käyttänyt ja ne joita olen käyttänyt ovat olleet paljon ohuempia mitä nämä tämän kertaiset. Nämä kyseisetlohikäärme decalsit olen saanut KkCenterHk:lta testattavaksi. Ohjeet olivat selkeät pakkauksen takana ja mukana tuli myös kiva pieni kynsi viila :)


Itse decalsien laittaminen olisi varmaan ollut huomattavasti helpompaa vähämmän kaareviin kynsiin kuin minulla on, mutta hei ihan ite oon omat kynteni muotoillut, joten ei se decalsien vika ollut. Decalsit olivat märkinä helposti liikuteltavissa ja kohdistettavissa ja kuten sanoin jo aiemmin niin ne olivat paksummat mitä osasin odottaakkaan ja kestivät siis hieman kovempaa käsittelyä :)
Kun aloitin niin en tajunnut että decalsit olivat kokonaan pohjaa myöten värjätyt, eli näihin ei olisi tarvinnut alle mitään värillistä pohjalakkaa. No nyt mulla on ja se hieman näkyykin kynsien reunoilta, ei kylläkään niin paljoa, että mua olis häirinnyt.
Kynnen päälle laitoin vielä ihan tavallista kirkasta lakkaa, en Secheä niin kuin normaalisti... oon sillä saanut meinaan sulattettua useampia decalseja...


Kokemuksena kiva ja tämä ei varmastikkaan jää viimeiseksi kerraksi kun vastaavia tulen käyttämään :)


Thank you, lepikossakuhisee
Check out lepikossakuhisee blog
http://lepikossakuhisee.blogspot.fi/2013/01/koko-kynnen-lohikaarme-water-decalsit.html