2012年5月28日 星期一

Baby Queen Lower Lashes Review - Luminous Change look alike! by cominica


Kyaaaaaaaaaaaaaaaaaaa~(ノ≧∀≦)ノ! *slapped 100x. I'm so happy KKcenterhk sent this lower lashes to me for try! Seriously, all lower lashes I got from them are supeeerrr nice! It's not lose with Japanese false lashes I've tried, I'm not saying this because they're my partner. You will know the quality if you try it by your self. Japanese false lashes are quite pricey  (¬‿¬) and sometimes just get 2/3 pairs on 1 box. I feel robbed! LOL But this one is really affordable compared to them. The quality is good and nice too so far. This one is a new brand called Baby Queen and it's from Taiwan.。◕‿◕。


Now, I'm going to share one of lower lashes I got from kkcenterhk. When the first time  I saw the design, I thought it look like one of Luminous change false lashes! That time I was looking for lower false lashes so I remembered it. It look like Luminous Change! by Rumi no #9, Huge Eye.

Oh well, it's not 100% look a like (¬、¬) , because this one is look thinner than the one I got from kkcenterhk.


This lower lashes has a thin and clear strand which I love. I'm happy because this lower lashes is fit my eyes perfectly. I don't need to cut it again, hehehe. Want to see how it look? My eyes change and look huge! Super super loveeeeee~ Too bad this lower lashes is already SOLD OUT REALLY QUICK (」゜ロ゜)」, I hope they'll stock it soon so other people can try it! ^O^
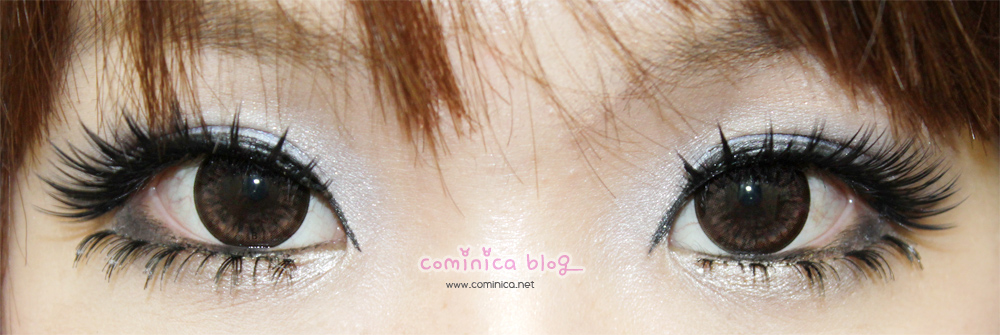


Closer look. How can you not fall in love with this lower lashes? I use Chan Wei false lashes from kkcenterhk for the upper lashes. Check out the review HERE.
Love it??? Btw, I use Lioele eyeshadow on my previous post and Canmake.


This is the whole look, I feel weird because my eyes look so big @___@ hahahhaah

Why my face so chubby? -___- 


I'm getting better with wink pose now, bahahahahhaha *slapped ┗(`ー´)┓


♔ LIKE ♔
✩ Make my eyes look HUGE
✩ Clear band and thin, easy to apply
✩ Perfect size and length
✩ Affordable
✩ Get 5 pairs in 1 box
✩ Can be use for maany times!
✩ Look obvious in photos


♔ DISLIKE ♔
✩ Available online only


I don't have any complain to this lower lashes~ Baby Queen lower lashes is surprisingly nice~♥(ノ´∀`)! I hope they release more moreee lower lashes, can't wait to try other design from them. Btw, If you want to check this product please click HERE. And don't forget to use my coupon code : COMINICA to get 10% discount at kkcenterhk. BTW, They have a promotion now! Check it out, just click the image below! Hurry~~~~


Thank you, cominica
Check out  cominica blog
http://www.cominica.net/2012/05/baby-queen-lower-lashes-review-luminous.html

Antoinette-Futurette by maryammaquillage


Bonjour mes belles et mes beaus!! It's me, Maryam, reincarnated into a futuristic emo version of Queen Marie-Antoinette inspired by Lime Crime's latest creation: Palette d'Antoinette!! Since this look pretty much speaks for itself; I, without further ado, present to you my concept of the day complete with reviews, tips, and tricks for all you makeup lovers and enthusiasts! 


Keep reading!!


Isn't she a beauty?
The Almighty Palette d'Antoinette & Eyeshadow Helper sample by Lime Crime*:
  • Royal Flush -- pretty pastel pink (matte finish) -- used in the inner corner, lower lash line & in the crease of the eye as a transition shadow
  • Absinthe-Minded -- light pistachio green (matte finish) -- saved for my next Lime Crime inspiration
  • Macarooned -- perfect peach (matte finish) -- used as a highlight under the brow
  • Ribbonesque -- pastel lavender (matte finish) -- used in the outer "v" of the eye and on the eyebrows
  • Mercurious -- metallic silver (shimmery sparkle finish) -- used on the lid and lower lash line

With colors so wearable and perfect for the summer, I simply couldn't allow myself to go with a pretty makeup look as my first Palette d'Antoinette inspiration. What I love about Lime Crime is that the brand encourages its followers to step outside of the norm and embrace the beauty of individuality and artistry. After all, we're all unicorns on the inside, so why not relinquish it for a day or two?!
To create this untraditional eye look, I applied the colors in the opposite way that I "normally" would... i. e. brighter color in the highlight, paler color in the crease and for the first time ever, I colored my eyebrows. dot... dot... dot... 

In the process, I've made a few discoveries... follow along :)))

HOW-TO get COLORFUL eyebrows if you have THICK, DENSE and/or DARK eyebrows:
  1. Start by brushing your eyebrows upward and following the natural growth of the hairs. Take a greasy base like a concealer or NYX jumbo eye pencil in Milk (my choice) and apply it heavily all over your brows.
  2. Blend the base into the hair and skin under the brows using your finger. The greasy consistency will help the unruly hairs stick together.
  3. Take a q-tip and clean up the area around your eyebrows, making them uniform and sharp.
  4. Take your eyeshadow of choice (I used Ribbonesque) on a flat shader brush and begin by patting the color onto the sticky base. Fill in any gaps with a smaller brush and extend your brows using the same shadow.
For my two-toned lippies, I used none other than:
Other Products Used:

Length: approx. waist-length

Color: Lavender / Purple

Price: $37.53

Where to Buy: www.KKcenterHK.com

10% OFF Coupon Code: MARYAM -- good for any merchandise from the KKcenterHK website. Don't forget to enter the code at checkout.

Description: Fun, flirty, lavender costume wig -- perfect for unicorns, Antoinettes and beyond. Need I say more? :)))

 
creepy photo LeeLee couldn't resist taking... 
Why? -- Cuz not everything has to be pretty all the time -- he said
I concur :))

bisous,


Maryam Maquillage


Join me on FACEBOOK / TWITTER / BLOGLOVIN


Photo Credits: Le Var (merci!!!)


*The products featured in this post were sent for my consideration and review. I was not compensated for this review and the information stated is 100% my own, uninfluenced and unbiased opinion. 


Maryam Maquillage © 2012. www.maryammaquillage.com


Thank you, maryammaquillage
Check out  maryammaquillage blog
http://www.maryammaquillage.com/2012/05/antoinette-futurette.html

Mary From the Block by maryammaquillage


Yo yo yo chicas & chicos!!! Today's look is bright, fresh and funky; featuring more of my IMATS goodies and built around one awesomely awesome OCC lip tar. Inspired by Narcissus, a punchy blue-based lavender-pink lip tar, I created a look with blingin' glittah eyez and a long super shiny pony-tail, perfect for any Urban Barbie.


Read more for reviews, pix & deets!


Narcissus Narcissist!
Can you tell that I'm slightly obsessed with OCC Narcissus lip tar? To me, this medium pink-lavender lippie is the perfect pink for medium, tan, and olive skin tones. I personally hate the chalky look of lighter pink lipsticks on darker skin tones (think Nicki Minaj), so I'm always very nervous when picking these tricky shades (which also tend to yellow the appearance of teeth). OCC Narcissus does no such thing. On the contrary, it brightens the teeth and works really well with my coloring (and probably a lot of others). I'm obsessively compulsively obsessed!!


Products!


Other Products (not pictured)


Candy-coated rainbow graffiti glitter eyes!!
*keep in mind, glitter is very hard to photograph, so these pictures don't do justice to the real-life bling factor of these liners :)
GLITTER EYES HOW-TO: This is a popular request, and I'm finally sharing my "secret" :)))
  1. Prime your eyes with primer potion.
  2. Apply three shimmery eyeshadows on top of your lid to create a gradient. I chose the colors to match my NYX glitter liners: Lime Green, Aqua Teal and Lavender Purple. Use patting motions to apply the shadow and short swiping strokes to blend the transitions. For Asian Eyes: apply the shadows slightly above your "crease" or half way to your eyebrow.
  3. Use a matte neutral shade (UD Naked) to define your crease and blend out the edge of the colorful shadows.
  4. Line the top lash line with a black liner to define the eye and provide a base for the false lashes. Optional: extend the inner corner for even more edge.
  5. Apply the glitter liners on top of their respective shadows and layer them on top of one another at the transitions to better blend the colors. Wait at least 30 seconds for the liners to dry (keep your eyes closed if you can).
  6. Line the waterline with a white pencil to help the eyes pop and apply the falsies.

The RESULT: bright, glittery, popping summa-time winkers ;)))

My PONY!!!
This tie-in Pony Tail is longer and bigger-than-life and is the perfect completion to my "Mary from the block" alter-ego. To create this super easy hair style, I gathered the hair below my crown into a ponytail and secured it with a strong elastic. Next, I clipped in the pony-tail extension and tied the ribbons around the base of my ponytail. To hide the ribbons and the transition where my hair meets the extension, I gathered my bangs and the hair on top of my crown, slicked it back and wrapped the ends around the base of the extension. I used bobby pins to secure the hair in place. Voila!


Length: 65 cm / 25.5 in (approx. waist length)

Color: 2T33

Price: $14.01

Where to Buy: www.kkcenterhk.com

Verdict: As with most KKcenterHK wigs, this synthetic ponytail extension is great quality and does not shed at all. I particularly love the ribbon attachment and small grip, which makes this piece more versatile than a clip-in ponytail. This extension is great for costumes, but may be a bit too shiny for everyday wear. Although, I would prefer more natural looking extensions for personal use, this piece is not a one trick pony and can be blended with your own hair for a more wearable look. Stay tuned for future posts with tutorials :))


SPECIAL: Use my exclusive 10% off coupon good for any merchandise from the KKcenterHK website :)) This coupon ends Dec. 31, 2013, so start shopping by clicking on the coupon link above. Don't forget to enter the code at checkout :))


I may not have all the rocks just yet...
 but I'm still, I'm still...


Mary from the Block :))


bisous,


Maryam Maquillage


Join me on FACEBOOK / TWITTER / BLOGLOVIN


Maryam Maquillage © 2012. www.maryammaquillage.com


Thank you, maryammaquillage
Check out  maryammaquillage  blog
http://www.maryammaquillage.com/2012/05/mary-from-block.html

MY FIRST TIME STAMPING!!! by jutmelchior

HI LOVES ♥

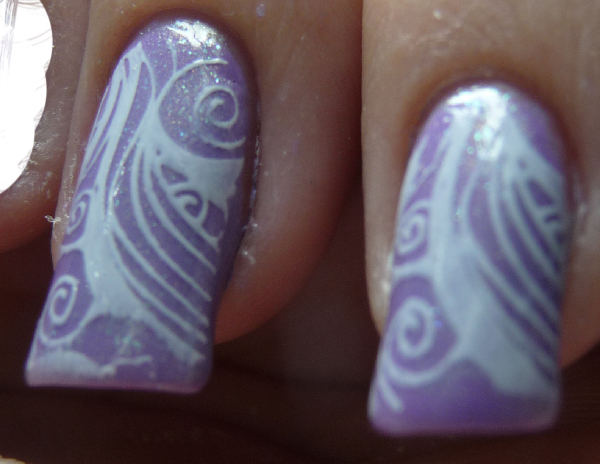
It has been a LONG time since I last posted a mani, right? Well, I finally decided to post something, and like I said before, I'm posting a mani from when I first started stamping. I didn't fail per say, but I didn't do great either. But I'll leave you to be the judge...
I first started with two coats of OPI Do You Lilac It? and one coat of Hits Soneca, which is a frosty blue pearl top coat. The I stamped with China Glaze White On White :)
I used KKcenterhk stamping plate m55, the plate costs USD$5.05, I haven't tried any of the other designs, only the one I used for this post. They sent me two plates, and I'll be posting a review post soon:


And here's how it looked liked when I was finished:

I absolutely loved Do You Lilac It, but I just needed to layer it.


I loved this Hits, but i had just gotten my stamping plates to be reviewed, so I decided to stamp it!


GORGEOUS RIGHT? *-*


Now this is how my stamping went down.


What do you think of it?


Cute, but not good enough.


I'm really sorry for my terrible cuticles!!!


Good or terrible?


I like this picture, hm :)

oh I miss my long nails *-*


My friends really enjoyed it, and I was really happy with it. And this lasted three days, I was reluctant to take it off...
KKCenterHK ~ 10% Off With Coupon Code
If you decide to buy something in there website type this code: jutmelchior and you'll get a 10% discount.

I really loved both plates, and I'm looking forward to test all the designs!!! ♥
I hope everyone enjoyed the post, I'll see if I post more often, I really hope I can!


Thank you, jutmelchior
Check out  jutmelchior blog
http://jutmelchior.blogspot.com.br/2012/05/my-first-time-stamping.html