2012年9月10日 星期一

Nail Dotting Tools for cute polkadot pattern by cominica


I love polkadot pattern, you could say I'm addicted to them. Lol, especially if they're with pastel colors. I just can't get enough of them. Hahahaha. I often make polkadot nail art too sometimes, but with a brush/toothpick and sometimes it could be messy. I started to think I need Nail Dotting tools and I must have it so I can make my nail art easier. 。◕‿◕。
So, I got my Nail Dotting tools from Kkcenterhk, my favorite store ever! They have almost everything for beauty things with affordable price! (///∇//)

 I got 5 different size of Nail Dotting tools in 1 pack!


Comes with a cute pastel colors! Each side has different size of dots, so you can try many style or dot pattern. ♡

You can use it for picking small rhinestone or glitters too~♡-♡

This is my nail before the dots pattern, look plain and not fun, bahahhahaha.

Taaadaaaahhhhh~ Just a simple dots to show you the result. So cute right?? I can add ribbon or other decorations later to make it cuter.

With this Nail Dotting tools you can control the size of the dots. You can make it all the same size or add different size if you feel this is too boring. (/^▽^)/ 

With a fresh green color and yellow dots~ Mix with other size, hehe

Look colorful and cute right?? I love dots sooo soo much~ Do you love it too?


Now dots the purple too with a baby pink color, kekeke soo cuteee! Can add glitters too if you like it. (*≧▽≦)

Those pictures is just to show you the result of the Nail Dotting tools. With this tools, dotting is faster and easier. I can save times to do other decoration for my nails. So, if you're interested in buy one you can check the product "HERE".

Price is only $8.88 and you can get additional discount if you mention my name : Cominica. You can enjoy 10% discount from them, lovely right? 

Thanks for reading and I hope you have a lovely weekend~!! I'll be back with another interesting review soon~ *hugs*


Thank you, cominica
Check out  cominica blog
http://www.cominica.net/2012/09/nail-dotting-tools-for-cute-polkadot.html

Natürliche Wimpern für eine Hochzeit? [+Giveaway] by miutiful


 Meine letzten False Lashes, die ich ausprobiert habe, waren mir eindeutig viel zu lang, daher suchte ich mir diesmal die kürzesten Wimpern aus, die mir KKCenterHK kosten- und bedingungslos zuschickte. 
Das Modell heißt All-Belle Natural Lash-Red Wedding und die Wimpern haben eine Länge von 11mm. 
Man kann sie im 10er Pack für US$26,33 >>HIER erwerben, was umgerechnet ca. 21,30€ sind. 
Auf den ersten Blick kann man schon erkennen, dass die falschen Wimpern dramatisch sind, die einzelnen Wimpern dicht beieinander gelegt wurden und sie deutlich kürzer sind als meine bisherigen Wimpern sind.
Sie haben auch einen sehr schönen Schwung, fühlen sich aber leider sehr unecht an. 
Ich hatte bisher auch noch nie solche Probleme gehabt mir die Wimpern anzubringen, wie ich es bei diesem Modell hatte: Denn dadurch, dass die Wimpern ziemlich kurz und fest sind, ist es schwierig sie in den Fingern zu halten und sie an den oberen Wimpernkranz perfekt anzulegen. 
Man verrutscht sehr leicht oder knickt das Material, wobei die Wimpern diesen Knick dann beibehalten (sieht man z.B. am - von euch aus - rechtem Auge).
Durch die Dichte, das Material und die Länge ist es sehr schwierig, die falschen Wimpern mit den eigenen schön zu verblenden ohne den Schwung der falschen Wimpern zu beeinflussen. 
Besonders die Länge der Falsies kann ich niemanden empfehlen, denn obwohl ich wirklich kurze Wimpern habe, waren meine echten Wimpern getuscht und beim Blend-Versuch länger als die Unechten.
Das Band der Wimpern ist auch ebenfalls dick, weswegen man die Wimpern nicht so leicht vergessen kann, denn sie kratzen und liegen schwer auf den Augen.
Das Design der Wimpern sieht getragen meiner Meinung nach nicht besonders schön aus, da es auf eine merkwürdige Weise "abgehackt" aussieht (durch die gleichen Längen der Wimpern)
Mius Fazit: 
Obwohl die Wimpern für ein Fotoshooting sehr natürlich rüberkommen können (wie auf dem letzten Bild), finde ich sie einfach nur blöd. Der Tragekomfort ist schrecklich, das Anbringen reizt an meiner Engelsgeduld (husthust) und das Design ist einfach zu plump.
Diese Wimpern kann ich wirklich nicht empfehlen, besonders keiner Braut, die sich einen natürlich Look wünscht und sich dann den ganzen Tag lang mit solchen unangenehmen Dingern durchquälen muss! TT_TT//
Nun zu dem kleinen Gewinnspiel: 
Da ich in letzter Zeit sehr viel über falsche Wimpern berichtet habe und bisher viele verschiedene Wimpern ausprobieren durfte, habe ich mir gedacht, dass ich ein kleines Set aus diversen Modellen für euch zusammenstellen möchte, die eine von euch gewinnen und selbst ausprobieren kann ♥
Das Set besteht aus: 
3x All Belle Natural Lash Red Wedding 
2x meiner Lieblingslashes
1x Wimpern aus Vietnam
 
Teilnahmebedingungen: 
  • Regelmäßiger Leser des Blogs sein (weil Dankeschön-Gewinnspiel....)
  • Volljährig oder im Gewinnfall die Einverständniserklärung des Erziehungsberechtigten
Schreibt einfach nur einen Kommentar mit eurer E-mailadresse und dass ihr teilnehmen wollt und schon seid ihr im Lostopf!
Da ich bis zum 05. September noch verreist bin und der Gewinnerin das Wimpernset frühstens am 06. September zuschicken kann, endet das Gewinnspiel erst am 06. September um 23:59Uhr!
Ich wünsch euch vieeeel Glück♥
Eure, Miu 


Thank you, miutiful
Check out  miutiful blog
http://www.miutiful.de/2012/08/naturliche-wimpern-fur-eine-hochzeit.html

Review smalti Ebalay e Ouqian KKCenterhk by beautyandkabuki


Ciao ragazze! Oggi vorrei parlarvi di due smalti che ho avuto il piacere di testare grazie allo store online KKCenterhk. I prodotti mi sono stati inviati gratuitamente un po' di mesi fa. 
Si tratta nello specifico di due brand che non avevo mai sentito nominare e ho avuto anche una grande sopresa a riguardo, ma andiamo con ordine :)

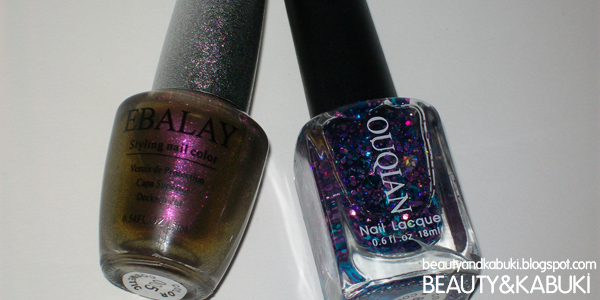
Gli smalti che ho ricevuto sono:
OUQIAN - B078. 18ml,  prezzo:   €4.92 . (ho notato che non è più presente in catalogo ma sono presenti altri colori)
EBALAY-A09. n.005  11ml ,  prezzo: €5.57 .
E ora passiamo nel dettaglio dello smalto che mi ha destato curiosità e di cui ho scoperto tante cose interessanti. Parlo dell' Ebalay (il nome tutto un programma,non ho ben capito come si pronuncia), si tratta di un duochrome verde oro/fucsia :) davvero molto particolare e molto bello, con un finish sbrillinoso.
1- Ebalay n.005 2- OPI the one that got away 
Ebbene, lo so lo so xD ta dahhhhhh vi ricorda qualcuno? essì, boccetta uguale, quantità uguale, finish e stesura praticamente identici e oh oh rullo di tamburi: stesso luogo di fabbricazione "Europe, 5708 JW, Helmond, Netherland". Non so dirvi perchè e come mai ma gli OPI e gli EBALAY sono prodotti nello stesso luogo, la differenza sta nel prezzo, aimè decisamente alto per gli opi. 
In ogni caso non ho la certezza materiale e la sicurezza che si tratti degli stessi identici prodotti, per quanto riguarda la qualità, ci tengo a specificare che l'EBALAY mi sembra un buon brand niente a che invidiare ai due OPI che ho provato in vita mia. La durata è buona con base coat  e top coat arriviamo a 4/5 giorni massimo. La stesura è identica, quindi direi buona, idem il finish e resa finale mi ricorda in particolare il The one that got away della OPI (per questo motivo ho deciso di fare una foto ad entrambi). 

 Luce naturale:
1-Ebalay una passata 2- Ebalay due passate 3- OPI the one that got away  (LUCE NATURALE)

Con flash:
1-Ebalay una passata 2- Ebalay due passate 3- OPI the one that got away  (CON FLASH)
Swatch  OUQIAN - B078


Ok parliamone, lo smalto OUQIAN (altro nome,  altro programma xD) è decisamente carino e coreografico, l'effetto sulle unghie è perfetto, cuoricini e glitterini vari che volendo già di per se anche senza una base colorata fanno la loro porca, porcaccia figura. Se non fosse per due difetti che mi portato, purtroppo, a doverlo bocciare in toto :(. Il primo difetto è l'odore, vi giuro ha un odore che probabilmente è un problema mio, ma non riesco a sopportare è troppo forte e devo necessariamente avere la finestra aperta quando lo applico, è un odore talmente forte di quelli che ti entrano dentro il naso e nel cervello e ti fanno venire mal di testa (fatto davvero insolito per me, credetemi). L'altro difetto non meno problematico è che con questi glitter io ho provato di tutto ma non riesco a farli andare via dall'unghia, sembra quasi che si incollino e inoltre nel punto del glitter resta l'alone dello smalto sottostante. A furia di fregare, fregare e fregare con il dischetto e il leva smalto, l'unghia si stava rovinando quindi non l'ho più potuto utilizzare.
Concludendo cosa vi consiglio?
Sicuramente l'Ebalay è da provare, soprattutto per il prezzo, non ho idea se esistano altri rivenditori anche europei da cui acquistare online ;(, però è consigliatissimo. Per quanto riguarda lo smalto Ouqian, non mi sento di consigliarlo nonostante l'effetto sia davvero particolare e simpatico ;(, se non fosse per il "profumo" e per il fatto che non riuscivo a toglierlo via dalle unghie sicuramente avrei deciso di promuoverlo. 
Spero la mia review possa esservi utile per eventuali acquisti :)
Disclaimer:
Tutti i prodotti e/o marchi menzionati all'interno del mio blog sono copyright dei legittimi proprietari. In base all'introduzione della nuova regolazione del 1 Dicembre 2009 dichiaro che tutte le opinioni postate su questo blog (beautyandkabuki.blogspot.com) sono mie personali. Non lavoro per nessuna casa cosmetica citata nei miei post e quindi non vengo MAI pagata per scrivere delle recensioni anche se alcuni prodotti mi sono stati inviati gratuitamente dalle stesse. Negli articoli in cui vengono recensiti dei prodotti ricevuti gratuitamente è sempre specificato all'inizio di ogni post. Le mie recensioni sono sempre frutto di mie esperienze e valutazioni assolutamente soggettive.


Thank you, beautyandkabuki
Check out  beautyandkabuki blog
http://beautyandkabuki.blogspot.it/2012/09/review-smalti-ebalay-e-ouqian-kkcenterhk.html

Water decals - gold peacock feathers are simple and classy by setinlacquer

I received some wonderful gold peacock feather water decals to share with you.

Water decals are extremely easy to use. Simply take off the plastic protective coating; soak in water until you can move the decal off of the paper backing. Then just place it on the nail and position it where you want it. I really love using these. For the base color I used China Glaze Rodeo Fanatic.

Gold peacock water decals


Seal with a good top coat (I use Seche Vite.). Simply and the look is amazing. A wonderful gold and no line from the decal -  just a great design.
Removing them was a cinch. I didn't have to try any harder than normal. Just a swipe with a cotton ball and remover and they are gone.
You can order these water decals from hhcenterhk.com. Here is a direct link to the water decals. They range from $2.82 to $6.30. If you use the promocode "SetinLacquer" you can get 10 percent off the original price. I know I am going to be buying some.
This product was sent to me for review and the opinions given are my own.


Thank you, setinlacquer
Check out  setinlacquer blog
http://www.setinlacquer.com/2012/09/water-decals-gold-peacock-feathers-are.html

Review #23 - Purpurinas KKCenterHK by beautyandattitude


Olá meninas :)
Depois de vos mostrar os produtos da KKCenterHK, neste post, não resisti em testar logo as purpurinas, por serem fáceis de aplicar e darem um toque engraçado à manicure!

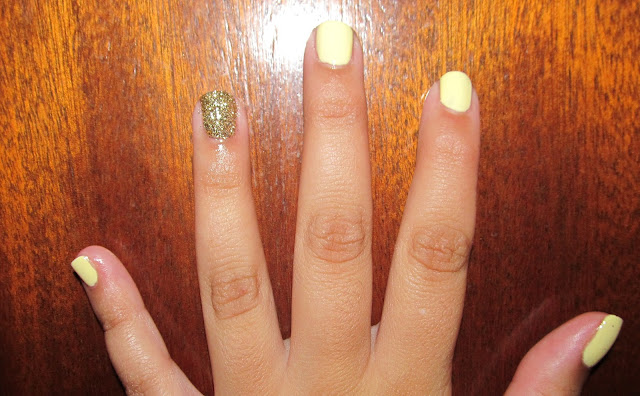
Aqui podem ver a cor que escolhi, dourado... Não me perguntem porquê, mas desde há uns tempos tenho gostado de detalhes em dourado, quer na bijuteria, unhas, malas... Mas nada de folclórico! haha

Decidi pintar as unhas com um verniz amarelo pastel da Cliché que nunca tinha usado, de seu nome Copacabana! E fiz a técnica da filha única com purpurina apenas nos anelares...
Aqui podem ver o verniz: http://beautyandattitude.blogspot.pt/2012/06/compras-16-new-babies.html.

Como fiz esta manicure:

Apliquei a base de unhas,
Pintei as unhas com 2 camadas do verniz Copacabana,
Nos anelares, para aplicar as purpurinas, passei com verniz transparente uma camada generosa e coloquei a unha dentro do frasquinho,
Depois sacudi o excesso, e carreguei as purpurinas, para se fixarem melhor,
Para finalizar apliquei o top coat em todas as unhas...

Esta manicure foi feita em 10 minutos antes de ir beber um cafézinho, só para não ir com elas "nuas", daí algumas imperfeições!
Como não parei quieta e andei a mexer em água, limpezas e coisas que tal, elas duraram 2 dias, a partir daí lascou tudo! :p

Beijinhos meninas e já sabem:


Thank you, beautyandattitude
Check out  beautyandattitude blog
http://beautyandattitude.blogspot.pt/2012/09/review-23-purpurinas-kkcenterhk.html

2012年9月7日 星期五

Makijaż na pożegnanie lata i powrót blogerki marnotrawnej. by ofetowa

Sierpień blogowo dał mi kość - najpierw chorowałam, potem były wszelakie rozjazdy i efekcie nieco zaniedbałam bloga za co Was serdecznie przepraszam. Na szczęście sierpień się już kończy a ja wracam z pełną parą: mnóstwem kosmetyków do recenzji i pomysłami na makijaże. Jakieś swatche też po drodze będą ;)
Na dzisiaj różowo-fioletowy makijaż. Cienie z paletki Sleek Snapshots (chcecie swatche?).
Rzęsy z kkcenterhk  BAQU-502 czyli Baby Queen 502 , które niesamowicie zaskoczyły mnie jakością - są na przezroczystym pasku i są równie miękkie i lekkie co Ardell za to sporo tańsze.


Thank you, ofetowa
Check out  ofetowa blog
http://ofetowa.blogspot.hk/2012/08/makijaz-na-pozegnanie-lata-i-powrot.html

Ostatnie podrygi lata w makijażu by ofetowa

Ten makijaż jest chyba najbardziej pechowy w historii bloga. Robiłam go grubo ponad godzinę z czego najdłużej pastwiłam się nad kreską (polecacie jakiś dobry pędzelek do eyelinera?), która i tak nie jest idealna. Zniszczyłam parę sztucznych rzęs a potem po zrobieniu kilku zdjęć przypomniałam sobie o tuszu :D
No ale w końcu się udało i jest. Jestem z niego chyba najbardziej dumna ze wszystkich dotychczas pokazywanych, może właśnie dlatego że miałam z nim taki problem.
Użyłam bazy Too Faced Shadow Insurance, limonkowej zieleni i pomarańczy ze Snapshots (swatche jeszcze w tym tygodniu), zieleni i żółci z Glory, miedzianego pigmentu z Kobo, czarnego eyelinera w żelu Essence i białej kredki NYX Jumbo. Do tego sztuczne rzęsy kkcenterhk BAQU-502 czyli Baby Queen 502 i tusz IsaDora Extra Volume.


Thank you, ofetowa
Check out  ofetowa blog
http://ofetowa.blogspot.hk/2012/09/ostatnie-podrygi-lata-w-makijazu.html

KKCenterhk again by descude


Am tot amanat aceasta postare,poate pentru ca incep sa ma repet si deja stiti cat de mult iubesc placutele cu modele KKCenterhk,nici nu stiu ce as putea sa mai adaug...ca le vreau pe toate:)???
Le multumesc celor care stau in spatele acestui site pentru colaborarea frumoasa pe care am avut-o,sincer nici nu imi doresc sa se opreasca aici,am fost multumita de tot ce am primit de la ei si faptul ca am putut sa imi aleg exact ce am avut nevoie si nu mi s-a impus,e de apreciat.


Fluturasul e de vina pentru alegerea mea,dar si celelalte modele imi plac in egala masura.


Placuta e B17 si costa 5.05$.
O puteti achizitiona de aici

Pe unghii doar cateva din ele le-am incercat,din lipsa de timp si acestea sunt cateva dintre ele:

Am fost intrebata de mai toata lumea care mi-a "admirat" modelul daca astept sa vina iarna,asa mi-am dat eu seama ca de fapt "floricica" mea este un fulgusor de nea,mda...greseala mea.


Mi s-au rupt doua unghii si am fost nevoita sa le tai,nu le-am mai avut atat de scurte de ani de zile,dar imi place noua lungime si experimentez cat mai multe culori inchise,se vad mult mai bine pe unghii scurte.Pana sa se rupa,facusem o obsesie pentru gradient nails si probabil voi face o postare separata cu cele pe care am reusit sa le si fotografiez.


Thank you, descude
Check out  descude blog
http://descude.blogspot.ro/2012/09/kkcenterhk-again.html

Załóż róż! by grzee


Ostatnio zorientowałam się, że w moim kuferku nie ma żadnego różu! No.. nie licząc jednego, który ma 1000lat i do tego jest pokruszony. Stanowczo stawiam na bronzery, jednak nie mieć w swoich zbiorach różu, to co najmniej wstyd!
Z pomocą przyszła do mnie strona KKCenterHk :)


W solidnym i bardzo eleganckim opakowaniu znajduje się dziesięć róży w różnych tonacjach- róż typowo landrynkowy, czy też ciepła brzoskwinia, każdy znajdzie coś odpowiedniego dla siebie. Wszystkie z "krążków" mają właściwie inne wykończenie. Do wyboru mamy totalne maty, róże z drobinkami oraz delikatnie muśnięte perłą. Sama nie wiem, czy jest to wada czy zaleta... Ja chyba wolałabym, aby wszystkie były o jednakowym wykończeniu, bo osobiście nie lubię kosmetyków świecących się na twarzy,
a jakby nie było, róże, które przypadły mi do gustu, niestety dają taki efekt :( Ich pigmentacja jest wyjątkowo mocna, więc podczas aplikacji lepiej zacząć od małej ilości produktu na pędzlu, aby nie przesadzić, bo efekt może prezentować się dość komicznie. Jeśli chodzi o trwałość, uważam, że jest dość standardowa, w moim przypadku nie tworzą się po dłuższym czasie "plamy", ale wiadomo, że jest to w sumie indywidualna sprawa.


Sama nie wiem czy jestem zadowolona z tej palety...
Kolory są przepiękne, no ale po co tyle tych błyskotek?
Wiadomo, jest to w sumie kwestia gustu.
Sądzę, że prędzej będę korzystała z niej w przypadku klientek,
niż na samej sobie.

A jak to jest w Waszym przypadku?
Wolicie róże, czy jednak stawiacie na bronzery? :)


Ocena
:
ES Brand 10 Makeup Blush Palette Rose


Thank you, grzee
Check out  grzee blog
http://grzee.blogspot.nl/2012/09/zaoz-roz.html

Review : Stamping Image:SPPMB69 by korynails

Hello girls..I've made some time for another special post..My second review..This time I've picked a stamping image plate SPPMB69 from KKCenterHk store!!!
Yep and it's my first time using stamping plate..
So let's se what I've manage to do!


This is how they look packed!


Don't forget to remove the foil

1.I did a more elegant design..that is also great for a bride..


2.The second one I've selected the animal print pattern 3.The third one with butterflies


It was a challenge for me to use stamping plates because I've never use them..but after a couple of tries I've started to get the idea.They are very easy to use and fun.You will get perfect designs!
Hope you like what ideas I did with the stamping image plate SPPMB69 and try it!
At the KKCenterHk store you can find more stamping plates for all your taste!


If you want to order from KKCenterHk you can get 10% of if you enter my discount
coupon: korynails

The coupon will expire in 31st,Jan.,2013


If you have suggestions or questions you can contact me at kory_nails@yahoo.com

Kisses!


Thank you, korynails
Check out  korynails blog
http://korynails.blogspot.ro/2012/09/review-stamping-imagesppmb69.html